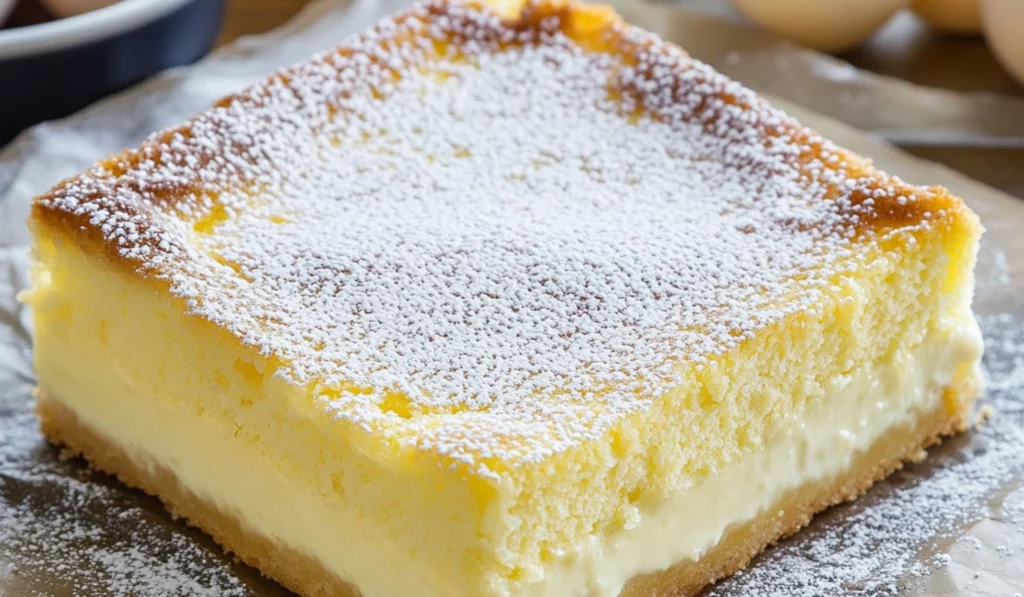
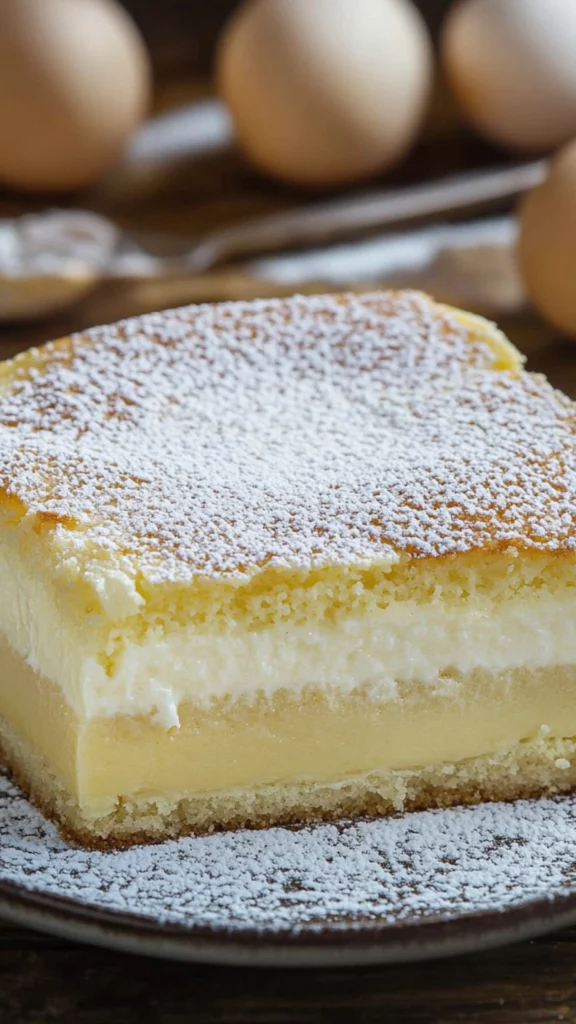
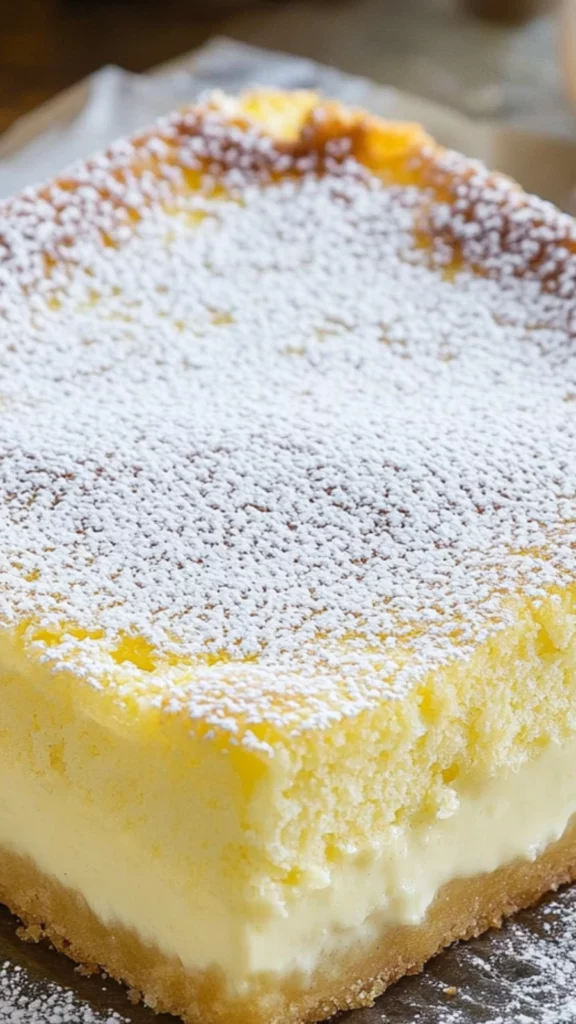
If you’re new to baking and looking for a showstopper dessert that’s simple yet impressive, Vanilla Magic Custard Cake is the perfect recipe to try. This cake is as magical as its name suggests, with three distinct layers—each with a unique texture—that magically form as it bakes. The result is a dessert that looks far more complicated than it actually is. With a creamy custard filling, a fluffy top, and a dense, cake-like bottom, this dessert will have everyone guessing how it was made. The best part? It’s incredibly beginner-friendly. There’s no need for complicated steps, special tools, or intimidating techniques. If you’ve never baked a cake from scratch before, this recipe is a perfect place to start.
Vanilla Magic Custard Cake: A Beginner’s Dream Dessert
If you’re craving a dessert that’s fluffy, creamy, and effortlessly delicious, this Vanilla Magic Custard Cake is the answer. With a custard-like filling, light top, and dense bottom, it’s a dream come true. The best part? It’s simple to make, even for beginners! Just a few easy steps and you’ll have a show-stopping cake that’s sure to impress. Trust me, once you try it, you’ll wonder how something so delicious can come together so quickly.
- Prep Time: 15 minutes
- Cook Time: 45 minutes
- Total Time: 1 hour
- Yield: 10 slices 1x
- Category: Dessert
- Method: Bake
- Cuisine: American
- Diet: Vegetarian
Ingredients
For the Cake:
- 1/2 cup unsalted butter (melted and slightly cooled)
- 2 cups milk (lukewarm)
- 1 and 1/4 cups (150g) powdered sugar
- 4 large eggs (separated into yolks and whites)
- 1 tablespoon water
- 1 cup (115g) all-purpose flour
- 2 teaspoons vanilla extract
- Powdered sugar for dusting (optional)
Instructions
Step 1: Preheat the Oven and Prepare the Baking Dish
Start by preheating your oven to 325°F (165°C). This will ensure the oven reaches the right temperature when you’re ready to bake. While the oven is heating up, lightly grease an 8×8-inch baking dish with butter or nonstick cooking spray. This step is crucial to make sure the cake comes out easily once it’s finished baking.
Step 2: Whip the Egg Whites
In a separate bowl, use a hand mixer or stand mixer to beat the egg whites until stiff peaks form. This is a key step, so be sure to get the egg whites nice and stiff. They should hold their shape when you lift the whisk from the bowl. You can test by lifting the whisk out—the egg whites should form firm peaks that stand up straight. Don’t overbeat the egg whites, though, as they can become dry and difficult to fold in later.
Step 3: Mix the Egg Yolks and Sugar
In another large bowl, beat the egg yolks and powdered sugar together until the mixture turns pale yellow and smooth. This will take about 2-3 minutes with an electric mixer. The sugar will dissolve into the yolks, creating a creamy base for your cake batter.
Step 4: Add Butter, Water, and Flour
Once the yolk-sugar mixture is smooth, add the melted butter and water. Beat this in for about 2 minutes, making sure it’s well combined. Then, sift in the flour, mixing until fully incorporated. This will create a smooth batter without any lumps, so be sure to mix until the flour is fully absorbed.
Step 5: Mix in Milk and Vanilla Extract
Now it’s time to add the milk and vanilla extract. Gradually pour the lukewarm milk into the batter while mixing. Continue mixing until everything is smooth and well combined. Add the vanilla extract and stir to incorporate. The batter should be fairly thin at this point, but that’s completely normal!
Step 6: Fold in the Egg Whites
Take about a third of the whipped egg whites and gently fold them into the batter. Use a spatula to carefully lift and fold the mixture, ensuring you don’t deflate the egg whites. Once this third is fully incorporated, fold in the remaining egg whites in two more additions. Be as gentle as possible during this step so you retain the air in the egg whites, which will help create the fluffy top layer of the cake.
Step 7: Pour the Batter Into the Pan
Once the egg whites are fully incorporated, pour the batter into the prepared baking dish. The batter will seem quite thin, but that’s the magic of this cake—it’s supposed to be this way.
Step 8: Bake the Cake
Bake the cake for 40-60 minutes at 325°F (165°C). Check the cake after 40 minutes. The top should be golden and set, with only a slight jiggle in the center. If the cake begins to brown too quickly before the minimum baking time, you can cover the top with aluminum foil to prevent it from burning. Every oven is different, so the exact baking time may vary, but start checking after 40 minutes.
Step 9: Cool the Cake
Once the cake is finished baking, let it cool completely before dusting with powdered sugar. The custard filling will still be slightly jiggly, which is totally fine. The top should be golden and lightly puffed, and the middle will have a creamy custard-like consistency. This is part of what makes the cake so magical!
Notes
- Egg Whites: Whipping egg whites can be tricky for beginners, but as long as you follow the instructions and make sure your bowl and whisk are clean, you’ll be fine. If you’re having trouble getting the egg whites to form peaks, make sure there’s no trace of egg yolk in them.
- Folding Egg Whites: Be gentle when folding the egg whites into the batter. The goal is to keep the air bubbles intact, which will help the cake’s layers form. Stirring too vigorously will deflate the whites and affect the texture.
- Baking Time: Baking times vary depending on your oven, so don’t be afraid to start checking the cake around 40 minutes. If the center still seems too jiggly, let it bake a little longer.
- Storage: Store any leftovers in an airtight container in the fridge for up to 3 days. This cake is best served chilled, as the custard filling firms up slightly in the refrigerator.
I’ll never forget the first time I made this Vanilla Magic Custard Cake. I had a craving for something sweet but didn’t want to spend hours in the kitchen. After searching my pantry, I realized I had all the ingredients to make this cake. I had heard of the recipe before, but never tried it myself. When I finally took it out of the oven, the top was golden, the custard layer was perfectly set, and the aroma that filled the kitchen was heavenly. I couldn’t wait to take my first bite. The result? Pure magic. It was rich, creamy, and completely indulgent. Since then, I’ve made it countless times, and every time it gets rave reviews. If you’ve never tried this cake, now is the perfect time!
Why This Recipe Is Perfect for Beginners
Baking can seem daunting, especially when you’re just starting out. Recipes with complicated instructions, multiple techniques, or fancy ingredients can make beginners feel overwhelmed. But this Vanilla Magic Custard Cake is different. It’s designed with simplicity in mind. The beauty of this cake lies in its ease of preparation and the magical way the layers form as it bakes. The recipe only requires a few basic ingredients, and the steps are easy to follow. There’s no need for advanced equipment or techniques. Plus, the hands-on time is minimal—about 15 minutes of prep before the cake goes into the oven.
Another reason this cake is perfect for beginners is that it’s forgiving. Even if you’re not a seasoned baker, you’ll have a great chance of success with this recipe. The layers might seem like they won’t come together at first, but trust the process! By the time the cake is done baking, you’ll be left with a dessert that looks and tastes like it came from a professional bakery. The magic really does happen as the cake bakes, so you don’t have to worry about things like mixing or frosting.
Moreover, this Vanilla Magic Custard Cake has a deliciously smooth custard filling that’s not overly sweet, making it a perfect dessert for any occasion. The texture contrasts beautifully with the fluffy top and dense base, and it’s a treat that’s sure to impress. Whether you’re serving it at a dinner party, a family gathering, or just enjoying a quiet evening at home, this cake is bound to be a hit.
Ingredients and Preparation
Before we dive into the recipe, let’s take a look at the ingredients you’ll need. This cake uses basic pantry staples, so you won’t have to worry about sourcing any exotic or hard-to-find items. Here’s what you’ll need:
For the Cake:
- 1/2 cup unsalted butter (melted and slightly cooled)
- 2 cups milk (lukewarm)
- 1 and 1/4 cups (150g) powdered sugar
- 4 large eggs (separated into yolks and whites)
- 1 tablespoon water
- 1 cup (115g) all-purpose flour
- 2 teaspoons vanilla extract
- Powdered sugar for dusting (optional)
These ingredients are simple and common in most households. If you want to make any substitutions, here are some suggestions:
- Butter Substitute: If you prefer to avoid butter, you can use margarine or coconut oil. Be sure to melt whichever fat you choose before incorporating it into the batter.
- Milk Substitute: If you need a dairy-free option, almond milk, oat milk, or coconut milk will work just as well. You can also use a lactose-free variety if that suits your dietary needs.
- Vanilla Extract: While vanilla extract is the most commonly used option, you can also use vanilla bean paste for a more intense flavor, or even almond extract for a slight twist.
Now that you’ve got your ingredients ready, let’s talk about how to prepare them for the cake.
Step-by-Step Instructions
Step 1: Preheat the Oven and Prepare the Baking Dish
Start by preheating your oven to 325°F (165°C). This will ensure the oven reaches the right temperature when you’re ready to bake. While the oven is heating up, lightly grease an 8×8-inch baking dish with butter or nonstick cooking spray. This step is crucial to make sure the cake comes out easily once it’s finished baking.
Step 2: Whip the Egg Whites
In a separate bowl, use a hand mixer or stand mixer to beat the egg whites until stiff peaks form. This is a key step, so be sure to get the egg whites nice and stiff. They should hold their shape when you lift the whisk from the bowl. You can test by lifting the whisk out—the egg whites should form firm peaks that stand up straight. Don’t overbeat the egg whites, though, as they can become dry and difficult to fold in later.
Step 3: Mix the Egg Yolks and Sugar
In another large bowl, beat the egg yolks and powdered sugar together until the mixture turns pale yellow and smooth. This will take about 2-3 minutes with an electric mixer. The sugar will dissolve into the yolks, creating a creamy base for your cake batter.
Step 4: Add Butter, Water, and Flour
Once the yolk-sugar mixture is smooth, add the melted butter and water. Beat this in for about 2 minutes, making sure it’s well combined. Then, sift in the flour, mixing until fully incorporated. This will create a smooth batter without any lumps, so be sure to mix until the flour is fully absorbed.
Step 5: Mix in Milk and Vanilla Extract
Now it’s time to add the milk and vanilla extract. Gradually pour the lukewarm milk into the batter while mixing. Continue mixing until everything is smooth and well combined. Add the vanilla extract and stir to incorporate. The batter should be fairly thin at this point, but that’s completely normal!
Step 6: Fold in the Egg Whites
Take about a third of the whipped egg whites and gently fold them into the batter. Use a spatula to carefully lift and fold the mixture, ensuring you don’t deflate the egg whites. Once this third is fully incorporated, fold in the remaining egg whites in two more additions. Be as gentle as possible during this step so you retain the air in the egg whites, which will help create the fluffy top layer of the cake.
Step 7: Pour the Batter Into the Pan
Once the egg whites are fully incorporated, pour the batter into the prepared baking dish. The batter will seem quite thin, but that’s the magic of this cake—it’s supposed to be this way.
Step 8: Bake the Cake
Bake the cake for 40-60 minutes at 325°F (165°C). Check the cake after 40 minutes. The top should be golden and set, with only a slight jiggle in the center. If the cake begins to brown too quickly before the minimum baking time, you can cover the top with aluminum foil to prevent it from burning. Every oven is different, so the exact baking time may vary, but start checking after 40 minutes.
Step 9: Cool the Cake
Once the cake is finished baking, let it cool completely before dusting with powdered sugar. The custard filling will still be slightly jiggly, which is totally fine. The top should be golden and lightly puffed, and the middle will have a creamy custard-like consistency. This is part of what makes the cake so magical!
Beginner Tips and Notes
- Egg Whites: Whipping egg whites can be tricky for beginners, but as long as you follow the instructions and make sure your bowl and whisk are clean, you’ll be fine. If you’re having trouble getting the egg whites to form peaks, make sure there’s no trace of egg yolk in them.
- Folding Egg Whites: Be gentle when folding the egg whites into the batter. The goal is to keep the air bubbles intact, which will help the cake’s layers form. Stirring too vigorously will deflate the whites and affect the texture.
- Baking Time: Baking times vary depending on your oven, so don’t be afraid to start checking the cake around 40 minutes. If the center still seems too jiggly, let it bake a little longer.
- Storage: Store any leftovers in an airtight container in the fridge for up to 3 days. This cake is best served chilled, as the custard filling firms up slightly in the refrigerator.
Serving Suggestions
While Vanilla Magic Custard Cake is delicious on its own, there are plenty of ways to elevate the flavor and presentation. Here are some serving suggestions:
- Fresh Fruit: Fresh berries such as strawberries, raspberries, or blueberries pair wonderfully with the creamy texture of the cake.
- Whipped Cream: A dollop of freshly whipped cream on top adds a light and airy complement to the rich custard.
- Chocolate Sauce: Drizzling a bit of melted chocolate over the cake adds a touch of decadence.
- Caramel Sauce: For a rich contrast, drizzle with caramel sauce for a sweet and buttery flavor.
If you’re serving this cake at a party or family gathering, consider pairing it with a light beverage, like iced tea or lemonade, to balance the richness of the dessert.
Conclusion
Vanilla Magic Custard Cake is the perfect beginner-friendly dessert that requires just a few simple steps and ingredients. The result is an impressive, delicious cake with a custard-like filling, a fluffy top, and a dense base. Whether you’re an experienced baker or just starting out, this recipe is sure to become a go-to in your baking repertoire. With minimal hands-on time and a foolproof method, you’ll be amazed by how easy it is to create this magical dessert. Don’t hesitate to give it a try—your friends and family will be impressed by both the taste and the beautiful presentation. And, of course, be sure to share your results and any variations in the comments!


