Eggnog Cheesecake Bars are the ultimate Christmas dessert that combines the rich, creamy texture of cheesecake with the festive, spiced flavor of eggnog. They’re perfect for the holiday season, capturing the essence of the holidays in a bite-sized, convenient bar form. Whether you’re hosting a Christmas dinner, attending a holiday party, or just in the mood for a cozy, indulgent treat, these bars are sure to impress. The buttery graham cracker crust, smooth and creamy eggnog-flavored filling, and optional topping of whipped cream and nutmeg come together to create a dessert that feels both luxurious and comforting.

Eggnog Cheesecake Bars: The Ultimate Christmas Dessert

Eggnog Cheesecake Bars are the perfect holiday treat, blending creamy cheesecake with the festive flavor of eggnog. Simple to make with minimal ingredients, these bars are ideal for beginner bakers looking to impress. With easy steps and a deliciously spiced finish, they’re sure to become a new holiday favorite!
- Prep Time: 20 minutes
- Cook Time: 50 minutes
- Total Time: 1 hour 10 minutes
- Yield: 12 servings 1x
- Category: Dessert
- Method: Baking
- Cuisine: American
- Diet: Vegetarian
Ingredients
For the Graham Cracker Crust:
- 1 ½ cups graham cracker crumbs (approximately 10 to 12 graham crackers)
- ¼ cup granulated sugar
- ½ cup unsalted butter, melted
For the Cheesecake Filling:
- 16 oz cream cheese (2 packages), softened
- ¼ cup sour cream
- ½ cup granulated sugar
- 2 large eggs
- ½ cup eggnog
- 1 teaspoon vanilla extract
- ½ teaspoon ground nutmeg
- 2 tablespoons all-purpose flour
For the Topping (Optional):
- Whipped cream (for garnish)
- Ground nutmeg (for garnish)
Instructions
- Preheat the Oven and Prepare the Pan: Preheat your oven to 350°F (175°C). Line an 8×8-inch baking pan with parchment paper, leaving an overhang on the sides. This step will make it easy to remove the bars from the pan after they’ve chilled. Make sure the parchment paper is properly placed to avoid any sticking.
- Prepare the Graham Cracker Crust: In a medium-sized bowl, combine the graham cracker crumbs, sugar, and melted butter. Stir until the crumbs are evenly coated with butter and the mixture begins to clump together. Use your fingers or the back of a spoon to press the mixture firmly into the bottom of the prepared pan. This will create a solid, crunchy base for the cheesecake. Bake the crust in the preheated oven for 10 minutes to set it. Once it’s done, remove it from the oven and set it aside to cool while you prepare the cheesecake filling.
- Prepare the Cheesecake Filling: Lower the oven temperature to 325°F (160°C). Now, it’s time to make the creamy filling. Using an electric mixer or stand mixer, beat the softened cream cheese and sour cream together in a large bowl until the mixture is smooth and creamy. Add the granulated sugar and continue to beat until the sugar is fully incorporated. Scrape down the sides of the bowl as needed to ensure everything is well-mixed.
- Add the Eggs and Flavors: Add the eggs, one at a time, beating well after each addition. This helps incorporate each egg properly and prevents any lumps in the filling. After the eggs are added, pour in the eggnog, vanilla extract, ground nutmeg, and flour. Mix until the batter is smooth and all the ingredients are fully combined.
- Assemble and Bake: Pour the cheesecake mixture over the graham cracker crust, spreading it evenly with a spatula. Bake the bars in the preheated oven for 40-45 minutes, or until the edges are set and the center is slightly jiggly when gently shaken. You want the center to remain a little soft but not runny. If you’re unsure, a toothpick inserted into the center should come out mostly clean with a few crumbs clinging to it. This ensures that the cheesecake is fully cooked but still moist.
- Cool and Chill: Once the bars are done baking, remove them from the oven and let them cool in the pan on a wire rack. Once they’ve cooled to room temperature, transfer the pan to the refrigerator and let the bars chill for at least 3-4 hours, or overnight. This chilling time is essential for setting the bars, making them easier to slice into neat squares.
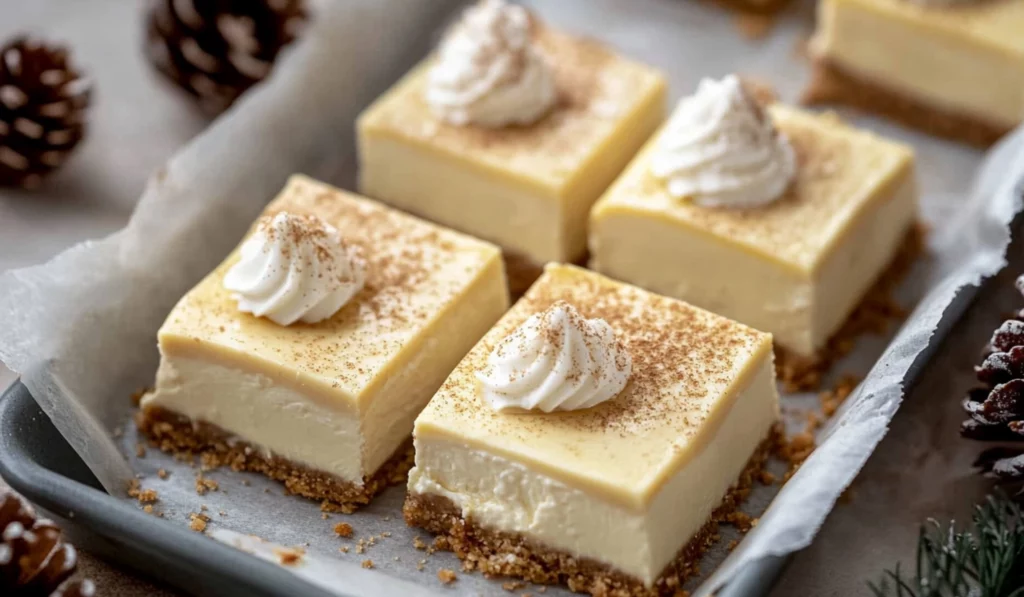
- Slice and Serve: Once the cheesecake has fully chilled and set, lift it out of the pan using the parchment paper overhang. Carefully slice the cheesecake into squares using a sharp knife. If desired, top each square with a dollop of whipped cream and a sprinkle of ground nutmeg. This adds a touch of elegance and enhances the holiday flavor.
Notes
- Room Temperature Ingredients: Make sure your cream cheese, eggs, and sour cream are all at room temperature. Cold ingredients can result in a lumpy filling, which isn’t ideal for a smooth cheesecake. If you forget to take them out ahead of time, you can soften cream cheese quickly by microwaving it in 10-second intervals.
- How to Prevent Cracks: Cracks on the surface of your cheesecake bars are a common issue. To minimize the chances of cracks, make sure not to overmix the batter, especially once the eggs are added. Overmixing can incorporate too much air into the batter, which can cause cracking during baking. If you do get cracks, no worries! You can easily cover them with whipped cream or a sprinkle of nutmeg for a festive look.
- Be Mindful of Baking Time: Cheesecake can be a little tricky when it comes to timing. Don’t be alarmed if the center seems slightly jiggly when you take it out of the oven – that’s exactly how it should be. The residual heat will continue to cook the center even after the bars are out of the oven.
- Making a Water Bath: For those new to baking cheesecakes, the idea of a water bath can seem intimidating. However, it’s an easy technique. Place the pan into a larger roasting pan, and add hot water around it. This ensures the cheesecake bakes evenly and gently.
As a beginner baker, making these Eggnog Cheesecake Bars is an ideal starting point. The recipe is simple, requiring only basic kitchen tools, and it doesn’t require advanced techniques like tempering eggs or working with a water bath for the cheesecake itself. These bars are an excellent way to dip your toes into the world of baking, providing an easy yet rewarding experience. In just over an hour, you’ll have a show-stopping dessert that’s guaranteed to delight guests and family alike. With minimal prep time and straightforward steps, even those who are new to baking can successfully pull off this recipe.
The Perfect Holiday Dessert for Beginners
Eggnog Cheesecake Bars are the perfect treat to bring to a Christmas gathering, as they combine the flavors of two classic holiday favorites – eggnog and cheesecake. The smooth filling made with eggnog and nutmeg offers a creamy and dreamy consistency that complements the crispy graham cracker crust, which provides a satisfying crunch. Plus, the bars can be made ahead of time, so you can get all the heavy lifting done in advance, leaving you free to enjoy the festivities. This recipe allows you to dive into holiday baking with confidence, making it an excellent choice for beginners.
Why This Recipe Works for Beginners
The beauty of these Eggnog Cheesecake Bars lies in their simplicity. As you may know, cheesecakes can sometimes be intimidating, especially when they require precise timing and care during baking. However, this recipe eliminates the stress, making it accessible for first-time bakers. There’s no need for a complicated water bath method or constant monitoring throughout the baking process. Instead, you’ll use a simple 8×8-inch baking pan and bake the bars in a relatively short amount of time, freeing up your attention for other tasks. The recipe uses straightforward ingredients, and every step is easy to follow, making it approachable for any novice baker. Whether you’re an experienced home cook or just starting out, this recipe will help you create a delicious holiday treat that everyone will love.
Ingredients and Preparation
Before diving into the process, it’s important to gather all the ingredients. Here’s what you’ll need for this Eggnog Cheesecake Bars recipe:
For the Graham Cracker Crust:
- 1 ½ cups graham cracker crumbs (approximately 10 to 12 graham crackers)
- ¼ cup granulated sugar
- ½ cup unsalted butter, melted
For the Cheesecake Filling:
- 16 oz cream cheese (2 packages), softened
- ¼ cup sour cream
- ½ cup granulated sugar
- 2 large eggs
- ½ cup eggnog
- 1 teaspoon vanilla extract
- ½ teaspoon ground nutmeg
- 2 tablespoons all-purpose flour
For the Topping (Optional):
- Whipped cream (for garnish)
- Ground nutmeg (for garnish)
Ingredient Substitutes and Tips:
- Graham Cracker Crumbs: If you don’t have graham crackers, you can substitute with crushed digestive biscuits or any plain cookies that will offer a similar crunchy texture. You can also make your own crumbs by processing cookies in a food processor or crushing them in a zip-top bag using a rolling pin.
- Eggnog: If eggnog isn’t available, you can make your own version by mixing milk or cream with a little sugar, nutmeg, and cinnamon. Alternatively, you could substitute it with a non-dairy alternative like almond milk or coconut milk, though the flavor will be slightly different.
- Sour Cream: If you’re looking for a lighter option, you could substitute the sour cream with Greek yogurt. It will provide a similar tanginess and creaminess, and it’s a great substitute if you prefer a healthier version.
- Cream Cheese: Be sure to use full-fat cream cheese for the best texture and flavor. Low-fat versions won’t provide the same creamy consistency.
- Whipped Cream: If you don’t want to make whipped cream from scratch, you can buy a can of ready-made whipped cream or use a dollop of cool whip.
Step-by-Step Instructions
Now that your ingredients are ready, it’s time to get started on making these delightful Eggnog Cheesecake Bars. Don’t worry – the process is easy to follow and relatively quick. Let’s break it down step by step:
- Preheat the Oven and Prepare the Pan: Preheat your oven to 350°F (175°C). Line an 8×8-inch baking pan with parchment paper, leaving an overhang on the sides. This step will make it easy to remove the bars from the pan after they’ve chilled. Make sure the parchment paper is properly placed to avoid any sticking.
- Prepare the Graham Cracker Crust: In a medium-sized bowl, combine the graham cracker crumbs, sugar, and melted butter. Stir until the crumbs are evenly coated with butter and the mixture begins to clump together. Use your fingers or the back of a spoon to press the mixture firmly into the bottom of the prepared pan. This will create a solid, crunchy base for the cheesecake. Bake the crust in the preheated oven for 10 minutes to set it. Once it’s done, remove it from the oven and set it aside to cool while you prepare the cheesecake filling.
- Prepare the Cheesecake Filling: Lower the oven temperature to 325°F (160°C). Now, it’s time to make the creamy filling. Using an electric mixer or stand mixer, beat the softened cream cheese and sour cream together in a large bowl until the mixture is smooth and creamy. Add the granulated sugar and continue to beat until the sugar is fully incorporated. Scrape down the sides of the bowl as needed to ensure everything is well-mixed.
- Add the Eggs and Flavors: Add the eggs, one at a time, beating well after each addition. This helps incorporate each egg properly and prevents any lumps in the filling. After the eggs are added, pour in the eggnog, vanilla extract, ground nutmeg, and flour. Mix until the batter is smooth and all the ingredients are fully combined.
- Assemble and Bake: Pour the cheesecake mixture over the graham cracker crust, spreading it evenly with a spatula. Bake the bars in the preheated oven for 40-45 minutes, or until the edges are set and the center is slightly jiggly when gently shaken. You want the center to remain a little soft but not runny. If you’re unsure, a toothpick inserted into the center should come out mostly clean with a few crumbs clinging to it. This ensures that the cheesecake is fully cooked but still moist.
- Cool and Chill: Once the bars are done baking, remove them from the oven and let them cool in the pan on a wire rack. Once they’ve cooled to room temperature, transfer the pan to the refrigerator and let the bars chill for at least 3-4 hours, or overnight. This chilling time is essential for setting the bars, making them easier to slice into neat squares.
- Slice and Serve: Once the cheesecake has fully chilled and set, lift it out of the pan using the parchment paper overhang. Carefully slice the cheesecake into squares using a sharp knife. If desired, top each square with a dollop of whipped cream and a sprinkle of ground nutmeg. This adds a touch of elegance and enhances the holiday flavor.
Beginner Tips and Notes
- Room Temperature Ingredients: Make sure your cream cheese, eggs, and sour cream are all at room temperature. Cold ingredients can result in a lumpy filling, which isn’t ideal for a smooth cheesecake. If you forget to take them out ahead of time, you can soften cream cheese quickly by microwaving it in 10-second intervals.
- How to Prevent Cracks: Cracks on the surface of your cheesecake bars are a common issue. To minimize the chances of cracks, make sure not to overmix the batter, especially once the eggs are added. Overmixing can incorporate too much air into the batter, which can cause cracking during baking. If you do get cracks, no worries! You can easily cover them with whipped cream or a sprinkle of nutmeg for a festive look.
- Be Mindful of Baking Time: Cheesecake can be a little tricky when it comes to timing. Don’t be alarmed if the center seems slightly jiggly when you take it out of the oven – that’s exactly how it should be. The residual heat will continue to cook the center even after the bars are out of the oven.
- Making a Water Bath: For those new to baking cheesecakes, the idea of a water bath can seem intimidating. However, it’s an easy technique. Place the pan into a larger roasting pan, and add hot water around it. This ensures the cheesecake bakes evenly and gently.
Serving Suggestions
These Eggnog Cheesecake Bars are a treat all on their own, but if you want to elevate the experience, consider pairing them with complementary flavors. For a cozy touch, serve them alongside a cup of hot chocolate, spiced cider, or a warm mug of coffee. The creaminess of the bars pairs beautifully with the richness of these drinks.
If you want to add a bit of texture, fresh fruit like cranberries, raspberries, or sliced strawberries will offer a refreshing contrast to the creamy cheesecake. A drizzle of caramel sauce or even a few chocolate shavings can turn these bars into a more indulgent dessert.

Storage Tips
Store any leftovers in an airtight container in the refrigerator. These Eggnog Cheesecake Bars will stay fresh for up to 4 days. If you want to store them for a longer period, you can freeze them. Wrap the bars in plastic wrap or aluminum foil, and place them in a freezer-safe bag. They can be frozen for up to a month, and when you’re ready to enjoy them again, simply let them thaw overnight in the refrigerator.
Conclusion
Eggnog Cheesecake Bars are a show-stopping, festive dessert that’s both simple to make and utterly delicious. With their creamy filling and buttery graham cracker crust, they bring the best of cheesecake and eggnog together in one perfect bite. Whether you’re a beginner baker or an experienced home cook, these bars are sure to become a favorite holiday treat.


