When it comes to baking cookies, the classic chocolate chip cookie reigns supreme. But what if you could take that timeless recipe and elevate it with a creative, adorable twist? Enter the Teddy Bear Chocolate Chip Cookies—where sweet, chewy chocolate chip cookies meet cute, kawaii bear faces, making for a treat that’s as delightful to look at as it is to eat. These cookies are a fun, charming take on the traditional chocolate chip cookie, perfect for anyone who wants to add a little whimsy to their dessert spread. Whether you’re baking with kids, hosting a themed party, or just want to enjoy a fun treat at home, these cookies will surely steal the show.
PrintTeddy Bear Chocolate Chip Cookies (with Easy Icing Recipe!)

When it comes to baking cookies, the classic chocolate chip cookie reigns supreme. But what if you could take that timeless recipe and elevate it with a creative, adorable twist? Enter the Teddy Bear Chocolate Chip Cookies—where sweet, chewy chocolate chip cookies meet cute, kawaii bear faces, making for a treat that’s as delightful to look at as it is to eat. These cookies are a fun, charming take on the traditional chocolate chip cookie, perfect for anyone who wants to add a little whimsy to their dessert spread. Whether you’re baking with kids, hosting a themed party, or just want to enjoy a fun treat at home, these cookies will surely steal the show.
- Prep Time: 15 minutes
- Cook Time: 13 minutes
- Total Time: 33 minutes
- Yield: 12 bear cookies 1x
- Category: Dessert, Cookies, Baking, Sweet Treats, Snacks
- Method: Baking, Decorating, Mixing, Scooping
- Cuisine: American, Kawaii, Homemade, Comfort Food
- Diet: Vegetarian
Ingredients
Dry Ingredients:
- 1 ½ cups (187.5 g) all-purpose flour
- ¼ tsp (1 g) baking powder
- ½ tsp (2 g) baking soda
- ¾ tsp (4.5 g) table salt
Wet Ingredients:
- ½ cup (113.5 g) unsalted butter, melted and cooled
- ⅓ cup (73.33 g) brown sugar, packed
- ½ cup (100 g) granulated sugar
- 1 egg
- 1 tsp (4 g) vanilla extract
Mix-ins:
- 1 cup (180 g) chocolate chips
Decorations for the Bear Faces:
- 4 tbsp (32 g) powdered sugar
- 1–2½ tsp (7.5–18.75 g) water
- Pink food coloring (optional)
- Black food coloring (optional)
Instructions
Step 1: Make the Cookie Dough
- Begin by stirring together the dry ingredients in a medium-sized mixing bowl. Combine the all-purpose flour, baking powder, baking soda, and table salt, then set this mixture aside.
- In a larger bowl, use a silicone spatula to mix together the melted unsalted butter, brown sugar, and granulated sugar. Stir until the sugars are fully combined with the butter and the mixture is smooth and creamy.
- Add in the egg and vanilla extract to the wet ingredients. Continue stirring until everything is well incorporated, and the mixture is smooth.
- Gradually add the dry ingredient mixture into the wet ingredients. Stir until the dough comes together and no dry spots remain. Be careful not to overmix to ensure the cookies remain soft and chewy.
- Once the dough is fully mixed, gently fold in the chocolate chips. Be sure to distribute them evenly throughout the dough for an even chocolate-to-cookie ratio in every bite.
Step 2: Scoop and Bake the Cookies
- Preheat the oven to 350°F (177°C) and place an oven rack in the center. Line two baking sheets with parchment paper or silicone mats to prevent the cookies from sticking.
- Use a medium cookie dough scoop (about 2-3 tablespoons each) to gather the dough. Place the dough balls onto the lined baking sheets, spacing them 3-4 inches apart to allow for spreading.
- For the bear ears, take about 1 teaspoon of dough and place it on top of the cookie dough balls on both the left and right sides of each cookie.
- Bake the cookies in the preheated oven for 11-13 minutes, or until the edges are set and golden brown. The centers may still appear soft, but they will firm up as the cookies cool.
- Allow the cookies to cool on the baking sheets for about 5 minutes before transferring them to a wire rack to cool completely.
- For rounder bear faces, you can gently reshape the edges of the warm cookies using a silicone spatula. This is especially effective if you want your cookies to have a more defined round shape after baking.
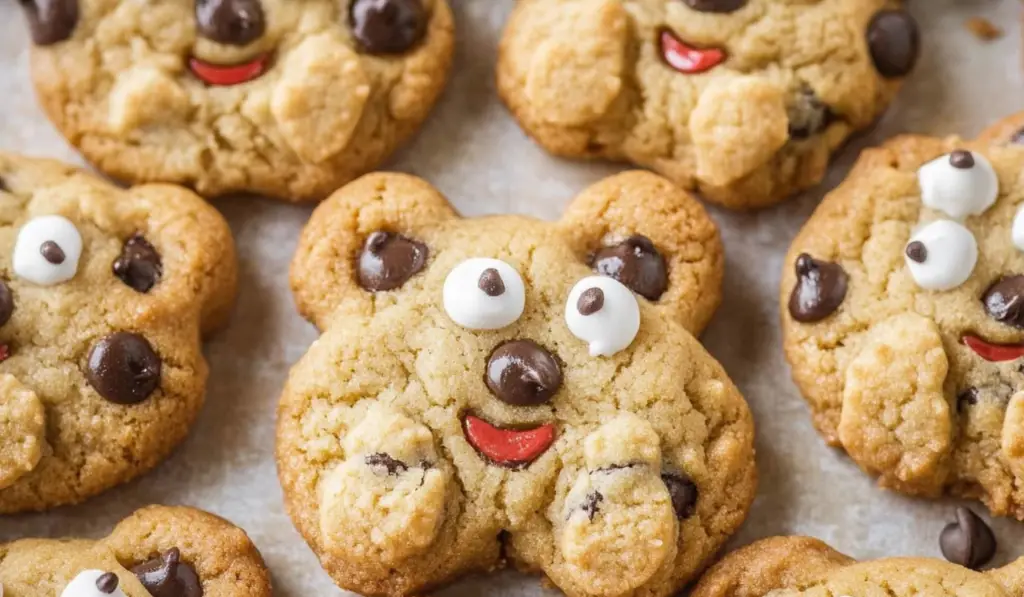
Step 3: Decorate the Cookies
- To make the icing for the bear faces, start by adding the powdered sugar to a small bowl. Slowly add ¼ teaspoon of water at a time, stirring the mixture until it reaches a thick, pipeable consistency. You may need to add up to 2 ½ teaspoons of water, depending on the thickness of the icing.
- Divide the icing into three portions. Add a drop of pink food coloring to one portion to create the blush for the bear faces. Add black food coloring to another portion to make the eyes and nose, and leave the third portion white for the snout and ears.
- Pour each portion of icing into a separate piping bag. For the snout and ears, use the white icing. For the eyes, nose, and blush, use the black and pink icings accordingly.
- Once your cookies have cooled completely, use the piping bags to decorate the bear faces. Start by piping the snout and ears with the white icing. Let the snouts set slightly before piping the eyes and nose using the black icing.
- Finish the decorations by adding a small amount of pink icing to the cheeks for a cute blush effect.
- Allow the decorated cookies to dry completely before serving.
Notes
Once you’ve baked and decorated your Teddy Bear Chocolate Chip Cookies, you can store them to enjoy later. Keep the cookies in an airtight container at room temperature for up to 5 days. This will help them retain their soft, chewy texture while keeping the adorable bear faces intact.
If you’d like to store the dough for later, you can freeze it. Scoop the dough into balls and freeze them on a baking sheet for about 1-2 hours. Once frozen, transfer the dough balls to an airtight container or freezer bag. When you’re ready to bake, just place the dough balls on a lined baking sheet and bake directly from frozen, adding an extra minute or two to the baking time.
These Teddy Bear Chocolate Chip Cookies feature a soft and chewy cookie base packed with gooey chocolate chips. But the real magic comes with the addition of an easy-to-make icing that turns these cookies into adorable little bears. The combination of slightly salty dough with sweet chocolate and playful decorations makes these cookies irresistible to both kids and adults. Not only are they tasty, but they also make for the perfect treat to gift to someone special or to share during holidays or celebrations.
Why You’ll Love These Cookies
Imagine pulling a tray of warm cookies out of the oven. The smell of freshly baked chocolate chip cookies fills the kitchen, and you can already taste the soft, chewy texture before you even take your first bite. Now, picture those cookies transformed into cute little bears, each with a sweet face and rosy cheeks. These Teddy Bear Chocolate Chip Cookies offer all of that—and more.
Baking these cookies is a delightful experience that engages all your senses. The buttery dough, paired with the perfect blend of brown sugar and granulated sugar, creates a rich, comforting flavor that complements the melty chocolate chips. The salt adds just the right amount of contrast to the sweetness, ensuring that each bite is balanced and satisfying. The added icing, with its delicate details, makes these cookies extra special, perfect for any occasion.
Perfect for Every Occasion
Teddy Bear Chocolate Chip Cookies are not just a treat; they’re an experience. Whether you’re preparing for a special event or simply want to bring a smile to someone’s face, these cookies are sure to do the trick. They’re ideal for birthday parties, baby showers, holiday gatherings, or simply as a fun afternoon baking project with your family. Their cute bear faces make them an irresistible dessert for kids, while their rich chocolate flavor is sure to please adults as well.
But the best part is that they’re not just for special occasions. These cookies make a comforting treat any day of the week. They pair beautifully with a glass of milk for a classic dessert or a cup of hot cocoa for a cozy winter snack. Plus, with their soft texture and melt-in-your-mouth chocolate chips, these cookies are sure to satisfy any sweet tooth.
How to Make Teddy Bear Chocolate Chip Cookies
Making Teddy Bear Chocolate Chip Cookies is an easy and enjoyable process. While the addition of the bear face decorations may seem complex, the steps are simple, and the result is worth every minute. Let’s break it down.
Ingredients for Teddy Bear Chocolate Chip Cookies
To make these cookies, you’ll need a mix of pantry staples and a few additional ingredients for the adorable decorations.
Dry Ingredients:
- 1 ½ cups (187.5 g) all-purpose flour
- ¼ tsp (1 g) baking powder
- ½ tsp (2 g) baking soda
- ¾ tsp (4.5 g) table salt
Wet Ingredients:
- ½ cup (113.5 g) unsalted butter, melted and cooled
- ⅓ cup (73.33 g) brown sugar, packed
- ½ cup (100 g) granulated sugar
- 1 egg
- 1 tsp (4 g) vanilla extract
Mix-ins:
- 1 cup (180 g) chocolate chips
Decorations for the Bear Faces:
- 4 tbsp (32 g) powdered sugar
- 1-2½ tsp (7.5-18.75 g) water
- Pink food coloring (optional)
- Black food coloring (optional)
Instructions for Baking Teddy Bear Cookies
Step 1: Make the Cookie Dough
- Begin by stirring together the dry ingredients in a medium-sized mixing bowl. Combine the all-purpose flour, baking powder, baking soda, and table salt, then set this mixture aside.
- In a larger bowl, use a silicone spatula to mix together the melted unsalted butter, brown sugar, and granulated sugar. Stir until the sugars are fully combined with the butter and the mixture is smooth and creamy.
- Add in the egg and vanilla extract to the wet ingredients. Continue stirring until everything is well incorporated, and the mixture is smooth.
- Gradually add the dry ingredient mixture into the wet ingredients. Stir until the dough comes together and no dry spots remain. Be careful not to overmix to ensure the cookies remain soft and chewy.
- Once the dough is fully mixed, gently fold in the chocolate chips. Be sure to distribute them evenly throughout the dough for an even chocolate-to-cookie ratio in every bite.
Step 2: Scoop and Bake the Cookies
- Preheat the oven to 350°F (177°C) and place an oven rack in the center. Line two baking sheets with parchment paper or silicone mats to prevent the cookies from sticking.
- Use a medium cookie dough scoop (about 2-3 tablespoons each) to gather the dough. Place the dough balls onto the lined baking sheets, spacing them 3-4 inches apart to allow for spreading.
- For the bear ears, take about 1 teaspoon of dough and place it on top of the cookie dough balls on both the left and right sides of each cookie.
- Bake the cookies in the preheated oven for 11-13 minutes, or until the edges are set and golden brown. The centers may still appear soft, but they will firm up as the cookies cool.
- Allow the cookies to cool on the baking sheets for about 5 minutes before transferring them to a wire rack to cool completely.
- For rounder bear faces, you can gently reshape the edges of the warm cookies using a silicone spatula. This is especially effective if you want your cookies to have a more defined round shape after baking.
Step 3: Decorate the Cookies
- To make the icing for the bear faces, start by adding the powdered sugar to a small bowl. Slowly add ¼ teaspoon of water at a time, stirring the mixture until it reaches a thick, pipeable consistency. You may need to add up to 2 ½ teaspoons of water, depending on the thickness of the icing.
- Divide the icing into three portions. Add a drop of pink food coloring to one portion to create the blush for the bear faces. Add black food coloring to another portion to make the eyes and nose, and leave the third portion white for the snout and ears.
- Pour each portion of icing into a separate piping bag. For the snout and ears, use the white icing. For the eyes, nose, and blush, use the black and pink icings accordingly.
- Once your cookies have cooled completely, use the piping bags to decorate the bear faces. Start by piping the snout and ears with the white icing. Let the snouts set slightly before piping the eyes and nose using the black icing.
- Finish the decorations by adding a small amount of pink icing to the cheeks for a cute blush effect.
- Allow the decorated cookies to dry completely before serving.
The Flavor, Texture, and Aroma of Teddy Bear Cookies
As you take a bite of these Teddy Bear Chocolate Chip Cookies, you’ll immediately notice the perfect balance of flavors. The cookie base is soft, with a slight chewiness that provides a satisfying bite. The sweetness of the brown sugar and granulated sugar is perfectly complemented by the richness of the butter and the hint of salt. The chocolate chips melt beautifully, offering that familiar, comforting chocolate flavor in every bite.
The bear faces, made from simple yet effective icing, add a whimsical touch that’s guaranteed to make anyone smile. The pink blush on the cheeks and the black eyes and nose create an adorable visual appeal that makes these cookies extra special.
The aroma of these cookies baking in the oven is absolutely irresistible. As they bake, the scent of melting chocolate, vanilla, and butter fills the kitchen, creating a warm and inviting atmosphere. The soft, gooey chocolate chips provide a comforting texture, while the slightly crisp edges give a satisfying bite.
Storage Tips for Teddy Bear Cookies
Once you’ve baked and decorated your Teddy Bear Chocolate Chip Cookies, you can store them to enjoy later. Keep the cookies in an airtight container at room temperature for up to 5 days. This will help them retain their soft, chewy texture while keeping the adorable bear faces intact.
If you’d like to store the dough for later, you can freeze it. Scoop the dough into balls and freeze them on a baking sheet for about 1-2 hours. Once frozen, transfer the dough balls to an airtight container or freezer bag. When you’re ready to bake, just place the dough balls on a lined baking sheet and bake directly from frozen, adding an extra minute or two to the baking time.

Final Thoughts
Teddy Bear Chocolate Chip Cookies are a delightful combination of adorable and delicious. With their soft, chewy texture and playful bear faces, they offer a fun twist on the classic chocolate chip cookie. Whether you’re baking them for a special occasion or simply as a treat for yourself, these cookies are sure to put a smile on your face. Their perfect balance of flavors, textures, and decorations make them a treat that everyone can enjoy. So gather your ingredients, preheat the oven, and get ready to create a batch of these irresistible cookies that are as fun to bake as they are to eat!


