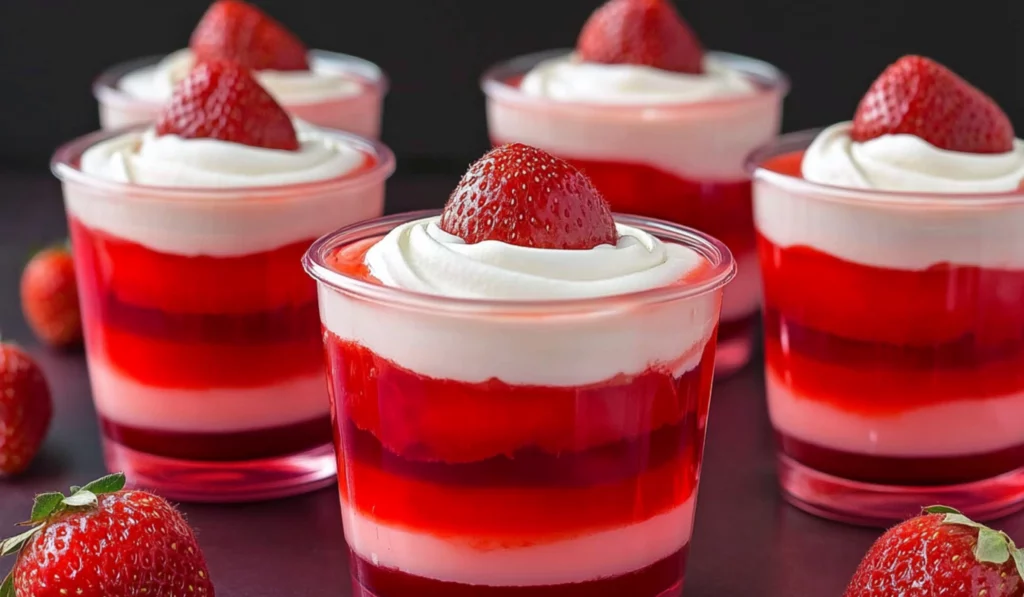
If you’ve ever looked for a dessert that combines fun, simplicity, and stunning visuals, look no further than these vibrant, irresistible Strawberry Jello Cups. A recipe that I hold close to my heart, it’s one I stumbled upon during a family gathering many years ago. My kids were craving something sweet, and my aunt surprised us all with these colorful layered cups, decorated with whipped cream and fresh strawberries. The moment I took my first bite, I knew I had to try making them myself.

Strawberry Jello Cups: The Perfect Dessert for Any Occasion
These Strawberry Jello Cups are a colorful, easy-to-make treat that’s perfect for any occasion. Inspired by a family favorite, they combine fruity Jello layers with creamy Cool Whip, making them a hit for both kids and adults. With just a few simple steps and ingredients, this no-bake dessert is ideal for beginners looking for a quick, fun recipe to impress!
- Prep Time: 45 minutes
- Cook Time: 0 minutes
- Total Time: 11 hours
- Yield: 6 servings 1x
- Category: Dessert
- Method: No-bake
- Cuisine: American
- Diet: Vegetarian
Ingredients
Ingredients for Layers:
- 5 boxes of Strawberry Jello mix (3 oz each)
- 5 cups of boiling water (1 cup per layer)
- 5 cups of cold water (1 cup per layer)
- 2 cups of Cool Whip (about 2 containers), plus extra for topping
- Fresh strawberries (for topping each cup)
Instructions
Layer 1: The Base Layer
- Prepare the first Jello layer: In a medium-sized bowl, pour 1 cup of boiling water and add one packet of strawberry Jello mix. Stir well until the Jello powder is fully dissolved.
- Add cold water: Once the Jello powder is dissolved, add 1 cup of cold water and stir to combine.
- Pour into cups: Evenly divide this Jello mixture into 6 clear cups (or more, depending on how many servings you’re preparing). You can use plastic or glass cups, but I recommend clear cups so you can see the beautiful layers as they form.
- Chill in the fridge: Place the cups in the refrigerator and let the first layer set for about 1-2 hours. Make sure the layer is firm to the touch before moving on to the next step.
Layer 2: The Creamy Cool Whip Layer
- Dissolve Jello: In a bowl, combine 1 cup of boiling water with another packet of strawberry Jello mix. Stir until it’s fully dissolved.
- Add cold water and Cool Whip: Add 1 cup of cold water and stir well. Then, fold in 1 cup of Cool Whip until smooth and creamy.
- Layer on top: Gently spoon or pour this creamy Jello mixture on top of the first Jello layer. Don’t worry if some of the layers start to separate slightly, as this adds to the visual appeal.
- Chill again: Place the cups back into the refrigerator and let this layer set for another 1-2 hours.
Layer 3: Building the Flavor
- Repeat the Jello process: Prepare another Jello mixture by dissolving a packet of strawberry Jello in 1 cup of boiling water, followed by 1 cup of cold water.
- Pour and chill: Pour this Jello layer over the Cool Whip layer and refrigerate for 1-2 hours until set.
Layer 4: Another Creamy Layer
- Repeat for the creamy layer: Dissolve a packet of strawberry Jello in 1 cup of boiling water and add 1 cup of cold water. Fold in 1 cup of Cool Whip until well mixed.
- Layer and refrigerate: Add this creamy Jello layer to the cups and refrigerate for 1-2 hours.
Layer 5: The Final Touch
- Prepare final Jello layer: For the final layer, dissolve a packet of strawberry Jello in 1 cup of boiling water and add 1 cup of cold water.
- Pour and chill: Pour the final layer of Jello into the cups and refrigerate one last time for 1-2 hours to set.
Final Touches:
Once all the layers are set and chilled, it’s time to add the finishing touches. Top each Jello cup with a dollop of Cool Whip and a fresh strawberry. This adds a pop of freshness and visual appeal to each serving.
Notes
- Patience is Key: Each layer needs to chill and set in the refrigerator before adding the next. It may take a few hours to prepare, but the end result is absolutely worth it.
- Layering Effect: Don’t be concerned if some of the layers appear slightly uneven. The slight separation of the creamy layers from the Jello adds a beautiful effect to the dessert.
- Substitute Ingredients: Feel free to swap out Jello flavors, whipped toppings, or fruits. This is a customizable recipe that you can tweak to suit your preferences or dietary needs.
- Troubleshooting: If your Jello doesn’t set properly, it might be because the water temperature wasn’t hot enough when dissolving the Jello powder. Make sure the boiling water fully dissolves the powder before adding cold water.
What makes this recipe so special, aside from its gorgeous presentation, is its simplicity. There’s no need for any complicated techniques, and the ingredients are affordable and easy to find. This dessert is perfect for beginners, those who want to impress without the stress of baking, or anyone simply looking for a colorful treat to serve at a gathering. You’ll love the combination of fruity Jello layers, creamy Cool Whip, and fresh strawberries that make these cups the perfect treat for any occasion.
Whether you’re celebrating a birthday, preparing a Valentine’s Day dessert, or just indulging in a sweet craving, these Strawberry Jello Cups never fail to brighten up any table. Let’s explore how to make this delightful, beginner-friendly dessert!
Why This Recipe Is Perfect for Beginners
If you’ve ever found yourself intimidated by complicated dessert recipes, you’ll appreciate how easy and approachable these Strawberry Jello Cups are. No baking, no intricate equipment, and no fuss. The beauty of this recipe lies in its ease, making it perfect for anyone, whether you’re just starting out in the kitchen or you’re an experienced cook looking for a no-hassle treat.
Each step is designed to be beginner-friendly, with clear instructions on how to layer and set the Jello. The most important thing you’ll need is a bit of patience while the layers chill in the refrigerator. And even if you’re worried about creating perfect layers, don’t stress—this recipe allows a little flexibility, and even if the layers aren’t flawless, they still look impressive and taste amazing.
Beyond the simplicity, Strawberry Jello Cups are also an incredibly adaptable dessert. You can customize the flavor, toppings, and even the presentation to suit your style. This versatility makes the recipe a go-to choice for a variety of occasions, whether it’s a family meal, a holiday gathering, or a fun party treat.
Ingredients and Preparation
Before diving into the steps, let’s take a look at what you’ll need to create these beautiful and refreshing Strawberry Jello Cups. The ingredients are straightforward, and you probably have most of them in your pantry already.
Ingredients for Layers:
- 5 boxes of Strawberry Jello mix (3 oz each)
- 5 cups of boiling water (1 cup per layer)
- 5 cups of cold water (1 cup per layer)
- 2 cups of Cool Whip (about 2 containers), plus extra for topping
- Fresh strawberries (for topping each cup)
Alternative Ingredient Suggestions:
While this recipe calls for strawberry-flavored Jello, there’s plenty of room for flexibility if you want to experiment with different flavors:
- Jello Mix: If you prefer other fruity flavors, consider swapping the strawberry Jello with raspberry, cherry, or even lime for a zesty twist. You can also mix and match different Jello flavors for a rainbow effect, making it even more exciting.
- Cool Whip: For those who prefer dairy-free or plant-based options, you can substitute Cool Whip with coconut whipped cream or any plant-based whipped topping. This will still provide the creamy texture without the dairy.
- Strawberries: Fresh strawberries are a classic topping, but feel free to use other fruits like blueberries, blackberries, or even diced kiwi to add a burst of color and flavor. For a festive touch, you can also top each cup with sprinkles or a chocolate drizzle.
Step-by-Step Instructions
Now that we’ve covered the ingredients, let’s walk through the steps to make these stunning Strawberry Jello Cups. These layers are easy to assemble, and each layer adds a delightful texture and flavor.
Layer 1: The Base Layer
- Prepare the first Jello layer: In a medium-sized bowl, pour 1 cup of boiling water and add one packet of strawberry Jello mix. Stir well until the Jello powder is fully dissolved.
- Add cold water: Once the Jello powder is dissolved, add 1 cup of cold water and stir to combine.
- Pour into cups: Evenly divide this Jello mixture into 6 clear cups (or more, depending on how many servings you’re preparing). You can use plastic or glass cups, but I recommend clear cups so you can see the beautiful layers as they form.
- Chill in the fridge: Place the cups in the refrigerator and let the first layer set for about 1-2 hours. Make sure the layer is firm to the touch before moving on to the next step.
Layer 2: The Creamy Cool Whip Layer
- Dissolve Jello: In a bowl, combine 1 cup of boiling water with another packet of strawberry Jello mix. Stir until it’s fully dissolved.
- Add cold water and Cool Whip: Add 1 cup of cold water and stir well. Then, fold in 1 cup of Cool Whip until smooth and creamy.
- Layer on top: Gently spoon or pour this creamy Jello mixture on top of the first Jello layer. Don’t worry if some of the layers start to separate slightly, as this adds to the visual appeal.
- Chill again: Place the cups back into the refrigerator and let this layer set for another 1-2 hours.
Layer 3: Building the Flavor
- Repeat the Jello process: Prepare another Jello mixture by dissolving a packet of strawberry Jello in 1 cup of boiling water, followed by 1 cup of cold water.
- Pour and chill: Pour this Jello layer over the Cool Whip layer and refrigerate for 1-2 hours until set.
Layer 4: Another Creamy Layer
- Repeat for the creamy layer: Dissolve a packet of strawberry Jello in 1 cup of boiling water and add 1 cup of cold water. Fold in 1 cup of Cool Whip until well mixed.
- Layer and refrigerate: Add this creamy Jello layer to the cups and refrigerate for 1-2 hours.
Layer 5: The Final Touch
- Prepare final Jello layer: For the final layer, dissolve a packet of strawberry Jello in 1 cup of boiling water and add 1 cup of cold water.
- Pour and chill: Pour the final layer of Jello into the cups and refrigerate one last time for 1-2 hours to set.
Final Touches:
Once all the layers are set and chilled, it’s time to add the finishing touches. Top each Jello cup with a dollop of Cool Whip and a fresh strawberry. This adds a pop of freshness and visual appeal to each serving.
Beginner Tips and Notes
- Patience is Key: Each layer needs to chill and set in the refrigerator before adding the next. It may take a few hours to prepare, but the end result is absolutely worth it.
- Layering Effect: Don’t be concerned if some of the layers appear slightly uneven. The slight separation of the creamy layers from the Jello adds a beautiful effect to the dessert.
- Substitute Ingredients: Feel free to swap out Jello flavors, whipped toppings, or fruits. This is a customizable recipe that you can tweak to suit your preferences or dietary needs.
- Troubleshooting: If your Jello doesn’t set properly, it might be because the water temperature wasn’t hot enough when dissolving the Jello powder. Make sure the boiling water fully dissolves the powder before adding cold water.
Serving Suggestions
Strawberry Jello Cups are a visually stunning treat, and they can be served on their own or paired with a variety of side dishes and accompaniments:
- Serve with Ice Cream: For a more indulgent treat, top each Jello cup with a scoop of vanilla ice cream or sorbet.
- Additional Fresh Fruit: Enhance the freshness with additional fruits like blueberries, raspberries, or even mango slices.
- Crumbled Cookies: Add a crunch by sprinkling crushed cookies or graham crackers on top.
- Garnish with Mint: Fresh mint leaves can add a pop of green and a refreshing aroma to the dessert.
Storage Tips
These Jello cups can be stored in the refrigerator for up to 5 days. They’re best enjoyed within the first 2-3 days to ensure the layers remain vibrant and fresh. Be sure to cover the cups with plastic wrap or an airtight lid to prevent the layers from drying out.

Conclusion
Strawberry Jello Cups are not only fun to make but also a crowd-pleasing treat that everyone will love. With their colorful layers, fluffy Cool Whip, and fresh strawberries, they’re the perfect dessert for any occasion. This recipe is ideal for beginners because it’s simple, requires no baking, and allows you to get creative with flavors and toppings.
So, whether you’re preparing them for a special occasion or just to satisfy your sweet tooth, these Strawberry Jello Cups are guaranteed to impress. Don’t hesitate to give this recipe a try and share it with your friends and family—they’ll be amazed by how easy and delicious it is! Let us know how your Jello cups turned out, and feel free to share any fun variations you tried in the comments below. Happy cooking, and enjoy your colorful, layered treat!


