There’s something magical about the combination of creamy cheesecake, a crunchy crust, and sweet fruit toppings that instantly brings a smile to anyone’s face. Strawberry cheesecake is a classic dessert, but when you transform it into individual servings, it becomes even more fun and accessible—especially for beginner cooks! I remember the first time I made these for a family gathering. Watching my younger cousins dive into their mini cheesecake cups, I realized how simple and satisfying it was to create something so delightful. What makes this recipe stand out is not only the combination of a salty-sweet pretzel crust, a luscious vanilla cheesecake filling, and a homemade strawberry sauce but also how quickly and effortlessly it comes together. This dessert doesn’t require any baking and can be prepared in advance, making it a great choice for busy weekdays or weekend celebrations. Whether you’re a beginner or seasoned cook, these dessert cups are the ideal way to impress without the stress.

Strawberry Cheesecake Dessert Cups: A Beginner-Friendly Delight
When it comes to desserts, there’s something irresistibly charming about individual servings. Whether it’s the convenience, the fun factor, or just the satisfaction of having your own personal treat, mini desserts like these Strawberry Cheesecake Dessert Cups are perfect for any occasion. This recipe brings together the delightful combination of a salty-sweet pretzel crust, smooth and creamy cheesecake filling, and fresh strawberry sauce—all packed into a cute little cup that’s easy to enjoy. I vividly remember the first time I made these for a small gathering. Watching friends dive into their dessert cups and hearing their compliments made me realize just how easy it is to create something that looks and tastes impressive. It’s the ideal treat for beginners—no baking required, and it’s perfect for those who love sweet, creamy indulgence without the fuss. Whether you’re new to cooking or just want a quick, hassle-free dessert, these cheesecake cups are sure to become a favorite in your recipe rotation!
- Prep Time: 30 minutes
- Cook Time: 10 minutes
- Total Time: 40 minutes
- Yield: 28 2-ounce cups 1x
- Category: Dessert
- Method: No-bake
- Cuisine: American
- Diet: Vegetarian
Ingredients
Strawberry Sauce (Make-Ahead)
- 2 cups frozen strawberries
- ¼ cup granulated sugar
- 2 tbsp lemon juice
- 1 tbsp cornstarch
- 1 tbsp water
Pretzel Crust
- 1 ½ cups crushed salted pretzels
- 2 tbsp granulated sugar
- 6 tbsp unsalted butter, melted
Vanilla Cheesecake Filling
- 8 oz cream cheese, room temperature
- ¾ cup granulated sugar
- 2 tsp vanilla extract
- 1 ½ cups heavy cream
Instructions
Step 1: Make the Strawberry Sauce
Start by preparing the strawberry sauce, as it needs to cool to room temperature before adding it to the dessert cups. In a medium saucepan, combine 2 cups of frozen strawberries, ¼ cup of granulated sugar, and 2 tablespoons of lemon juice. Place the mixture on medium heat. As the strawberries heat up, they’ll begin to soften. Use the back of a spoon to mash the strawberries into a chunky, saucy consistency. Next, mix 1 tablespoon of cornstarch with 1 tablespoon of water to create a slurry. Pour the slurry into the strawberry mixture, stirring constantly as you do so. This will thicken the sauce. Once it reaches a nice, syrupy consistency, remove it from the heat and let it cool while you prepare the other components.
Step 2: Prepare the Pretzel Crust
In a small bowl, combine 1 ½ cups of crushed salted pretzels and 2 tablespoons of granulated sugar. Then, pour in 6 tablespoons of melted butter. Stir everything together until the pretzel crumbs are evenly coated in butter and sugar. Next, use a spoon or your fingers to evenly distribute the pretzel crust mixture into each of the 28 plastic cups. Press down gently with the back of a spoon or use another cup to compact the mixture so it forms a solid base. This crust will give your dessert that signature sweet-salty crunch.
Step 3: Make the Vanilla Cheesecake Filling
In a separate mixing bowl, beat together 8 oz of room temperature cream cheese and ¾ cup of granulated sugar using an electric hand mixer. Beat until smooth and creamy. Next, add in 2 teaspoons of vanilla extract and mix again. Once the vanilla is incorporated, slowly pour in 1 ½ cups of heavy cream. Beat the mixture on medium-high speed until it becomes thick and fluffy. The cheesecake filling should have a light, airy texture at this point. This is the creamy element that will balance out the crunchiness of the pretzel crust and the sweetness of the strawberry sauce.
Step 4: Assemble the Dessert Cups
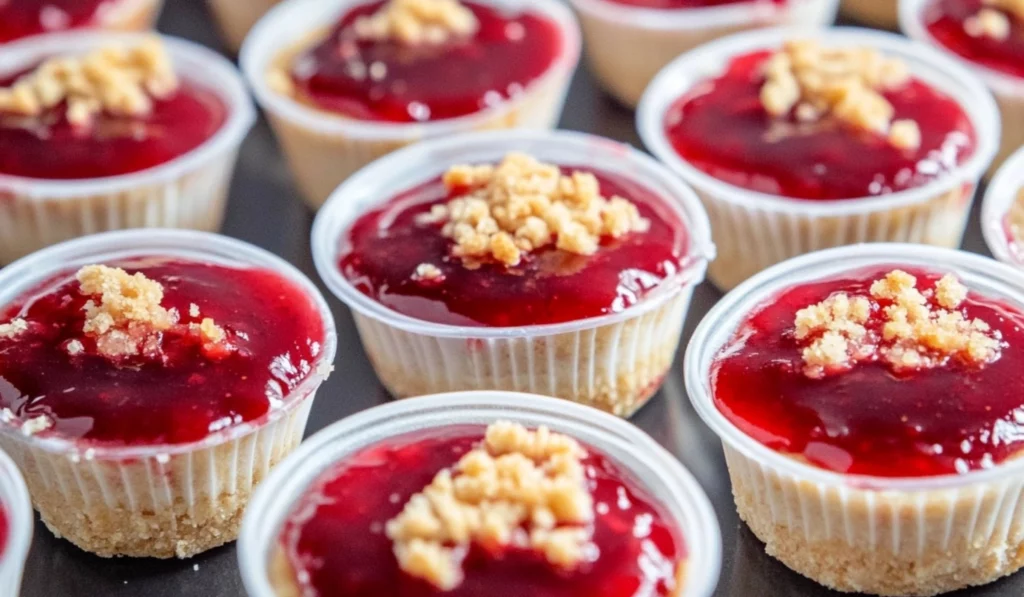
Now it’s time to assemble your dessert cups! Start by filling each cup with the cheesecake mixture. You can use a piping bag to create smooth, even layers or simply spoon the mixture into each cup. Fill the cups to about ¾ full, leaving some space at the top for the strawberry sauce. Once all the cups are filled with cheesecake, top each with a generous spoonful of the strawberry sauce. If desired, sprinkle the remaining pretzel crumbs on top for added crunch.
Step 5: Chill and Serve
Seal the cups with lids and refrigerate them for at least 1 hour to allow the flavors to meld and the cheesecake to set. You can store these dessert cups in the refrigerator for up to 3 days, making them a great make-ahead option. They also keep well in the fridge for a refreshing and quick treat during the week.
Notes
- Prevent Overmixing: When making the cheesecake filling, be careful not to overmix the heavy cream, as it can turn into whipped cream instead of keeping that smooth, creamy consistency you want for the filling.
- Corrupt Strawberry Sauce? If your strawberry sauce becomes too thick, simply add a splash of water or lemon juice and stir to adjust the consistency.
- Pretzel Crust Troubleshooting: If your crust isn’t sticking well, add a bit more melted butter to help bind the crumbs together. You want the crust to stay intact when you bite into it.
- Room Temperature Ingredients: Ensure the cream cheese is at room temperature before mixing it with sugar. This will help prevent lumps in your cheesecake filling and ensure a smooth texture.
- Customizing the Filling: Want to experiment with flavor? You can add a teaspoon of lemon zest, orange zest, or almond extract to the cheesecake filling to add a unique twist.
Why This Recipe is Perfect for Beginners
This recipe is perfect for beginners because it’s straightforward, requires minimal kitchen tools, and has a foolproof method. The crust, filling, and topping are all simple to assemble, with just a few key ingredients. The steps are clearly outlined, and you don’t need to worry about complicated techniques like baking a full cheesecake or dealing with difficult consistency challenges. You can even make the strawberry sauce ahead of time and store it, cutting down on prep time. Not to mention, this recipe is incredibly flexible—you can swap out the strawberry topping for other fruits or experiment with different crusts if you like. This strawberry cheesecake dessert cup recipe doesn’t just result in a delicious treat, but it’s a great way to hone your skills in the kitchen while keeping things easy and fun
Ingredients and Preparation
To make your Strawberry Cheesecake Dessert Cups, you will need the following ingredients. These measurements are for 28 two-ounce dessert cups, making it perfect for sharing or enjoying over a few days.
Strawberry Sauce (Make-Ahead)
- 2 cups frozen strawberries
- ¼ cup granulated sugar
- 2 tbsp lemon juice
- 1 tbsp cornstarch
- 1 tbsp water
Pretzel Crust
- 1 ½ cups crushed salted pretzels
- 2 tbsp granulated sugar
- 6 tbsp unsalted butter, melted
Vanilla Cheesecake Filling
- 8 oz cream cheese, room temperature
- ¾ cup granulated sugar
- 2 tsp vanilla extract
- 1 ½ cups heavy cream
Ingredient Alternatives
- Pretzel Crust: If you don’t have pretzels, graham crackers or digestive biscuits can be used as an alternative for the crust. They’ll give you a similar texture and crunch.
- Cream Cheese: For a lighter version, you can swap regular cream cheese with a lower-fat cream cheese or even Greek yogurt for a tangier twist.
- Whipped Cream: You could use a non-dairy whipped topping if you’re looking for a dairy-free option.
- Frozen Strawberries: Fresh strawberries work just as well if you prefer them, but frozen strawberries are often more affordable and convenient.
Step-by-Step Instructions
Now, let’s break down the process into manageable, easy-to-follow steps.
Step 1: Make the Strawberry Sauce
Start by preparing the strawberry sauce, as it needs to cool to room temperature before adding it to the dessert cups. In a medium saucepan, combine 2 cups of frozen strawberries, ¼ cup of granulated sugar, and 2 tablespoons of lemon juice. Place the mixture on medium heat. As the strawberries heat up, they’ll begin to soften. Use the back of a spoon to mash the strawberries into a chunky, saucy consistency. Next, mix 1 tablespoon of cornstarch with 1 tablespoon of water to create a slurry. Pour the slurry into the strawberry mixture, stirring constantly as you do so. This will thicken the sauce. Once it reaches a nice, syrupy consistency, remove it from the heat and let it cool while you prepare the other components.
Step 2: Prepare the Pretzel Crust
In a small bowl, combine 1 ½ cups of crushed salted pretzels and 2 tablespoons of granulated sugar. Then, pour in 6 tablespoons of melted butter. Stir everything together until the pretzel crumbs are evenly coated in butter and sugar. Next, use a spoon or your fingers to evenly distribute the pretzel crust mixture into each of the 28 plastic cups. Press down gently with the back of a spoon or use another cup to compact the mixture so it forms a solid base. This crust will give your dessert that signature sweet-salty crunch.
Step 3: Make the Vanilla Cheesecake Filling
In a separate mixing bowl, beat together 8 oz of room temperature cream cheese and ¾ cup of granulated sugar using an electric hand mixer. Beat until smooth and creamy. Next, add in 2 teaspoons of vanilla extract and mix again. Once the vanilla is incorporated, slowly pour in 1 ½ cups of heavy cream. Beat the mixture on medium-high speed until it becomes thick and fluffy. The cheesecake filling should have a light, airy texture at this point. This is the creamy element that will balance out the crunchiness of the pretzel crust and the sweetness of the strawberry sauce.
Step 4: Assemble the Dessert Cups
Now it’s time to assemble your dessert cups! Start by filling each cup with the cheesecake mixture. You can use a piping bag to create smooth, even layers or simply spoon the mixture into each cup. Fill the cups to about ¾ full, leaving some space at the top for the strawberry sauce. Once all the cups are filled with cheesecake, top each with a generous spoonful of the strawberry sauce. If desired, sprinkle the remaining pretzel crumbs on top for added crunch.
Step 5: Chill and Serve
Seal the cups with lids and refrigerate them for at least 1 hour to allow the flavors to meld and the cheesecake to set. You can store these dessert cups in the refrigerator for up to 3 days, making them a great make-ahead option. They also keep well in the fridge for a refreshing and quick treat during the week.
Beginner Tips and Notes
- Prevent Overmixing: When making the cheesecake filling, be careful not to overmix the heavy cream, as it can turn into whipped cream instead of keeping that smooth, creamy consistency you want for the filling.
- Corrupt Strawberry Sauce? If your strawberry sauce becomes too thick, simply add a splash of water or lemon juice and stir to adjust the consistency.
- Pretzel Crust Troubleshooting: If your crust isn’t sticking well, add a bit more melted butter to help bind the crumbs together. You want the crust to stay intact when you bite into it.
- Room Temperature Ingredients: Ensure the cream cheese is at room temperature before mixing it with sugar. This will help prevent lumps in your cheesecake filling and ensure a smooth texture.
- Customizing the Filling: Want to experiment with flavor? You can add a teaspoon of lemon zest, orange zest, or almond extract to the cheesecake filling to add a unique twist.
Serving Suggestions
These Strawberry Cheesecake Dessert Cups are delicious on their own, but they can be elevated with a few extra touches. Consider serving them with a dollop of freshly whipped cream on top, or sprinkle some finely chopped mint leaves for a refreshing flavor contrast. If you’re feeling adventurous, you can even drizzle some chocolate syrup over the top for a chocolate-strawberry combination. For a more luxurious dessert, garnish with a few whole strawberries or add a drizzle of caramel sauce to complement the flavors.
These cups can also be served as a part of a larger dessert table, where guests can pick and choose their favorite mini treats. They’re great for weddings, baby showers, birthday parties, or casual get-togethers. If you want to make them a bit more festive, add edible gold leaf on top, or a few colorful sprinkles.
Storage Tips for Leftovers
These dessert cups can be stored in the refrigerator for up to 3 days. If you’re making them ahead of time for a special occasion, they’re great because they can be prepared the night before. Just make sure they are sealed tightly with lids to prevent the filling from absorbing any unwanted odors in the fridge. If you’re looking to freeze the cups, it’s best to freeze the cheesecake filling and crust separately, as the fruit sauce may become watery when frozen. When you’re ready to serve, thaw the components and assemble the cups fresh.
If you do have leftovers, be sure to store them in airtight containers. They will stay fresh and enjoyable for up to three days in the fridge, though the texture of the pretzel crust may soften slightly after a day or two. If you’re concerned about the crust losing its crunch, you can store the pretzels separately and sprinkle them over the cups just before serving.

Conclusion
These Strawberry Cheesecake Dessert Cups are the perfect balance of creamy, crunchy, and fruity goodness. Whether you’re a beginner cook or someone who’s been in the kitchen for years, this recipe offers an approachable and fun way to create an irresistible treat. Not only are they simple to make, but the individual servings make them perfect for parties, gatherings, or even just a sweet indulgence on a quiet evening. I love that this recipe brings people together—whether it’s a family gathering or a picnic with friends, these dessert cups are sure to steal the show. The beauty of this recipe lies in its simplicity, versatility, and the ability to prepare it ahead of time. Give this recipe a try, and let me know how it turns out for you. I’m sure once you take your first bite, you’ll be hooked—and so will everyone else! Happy cooking, and don’t forget to share your experiences in the comments below. What’s your favorite twist on the classic strawberry cheesecake? I’d love to hear about it!


