
When it comes to indulgent desserts, there’s something undeniably special about red velvet. The combination of a rich, vibrant color and a soft, moist texture makes it a standout treat for any occasion, but especially for celebrations of love, like Valentine’s Day. Red velvet desserts are widely beloved, and these Red Velvet Truffles elevate the traditional cake to bite-sized perfection. Imagine the velvety taste of red velvet cake wrapped in smooth, white chocolate and topped with a decadent drizzle of dark chocolate. It’s the kind of dessert that you’ll fall in love with the first time you taste it. Whether you’re looking to spoil a loved one, gift something homemade, or treat yourself, these red velvet truffles are a wonderful, indulgent choice. But here’s the best part—they’re incredibly easy to make, even for beginner bakers! In fact, this recipe requires minimal effort, and the results are nothing short of impressive.

Red Velvet Truffles: A Sweet and Irresistible Treat for Beginners
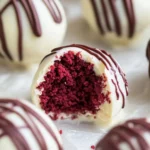
Red Velvet Truffles are a delicious, bite-sized treat that combines the rich flavor of red velvet cake with creamy white and dark chocolate. Perfect for beginners, they’re easy to make with just a few ingredients and minimal steps. Whether for a special occasion or a sweet snack, these truffles are sure to impress and bring a burst of joy with every bite!
- Prep Time: 35 minutes
- Cook Time: 0 minutes
- Total Time: 35 minutes
- Yield: 40 truffles 1x
- Category: Dessert
- Method: No-bake, chill
- Cuisine: American
- Diet: Vegetarian
Ingredients
- 1 box red velvet cake mix (plus the ingredients listed on the box to prepare the cake, typically water, oil, and eggs)
- 8 oz cream cheese, softened
- 16 oz white chocolate
- 2 oz dark or semi-sweet chocolate
Instructions
1. Prepare the Cake
Start by preparing the red velvet cake mix according to the package instructions. This will typically involve mixing the cake mix with water, oil, and eggs. Bake the cake in a 9×13-inch pan at the temperature specified on the box, and then let it cool completely before proceeding. Cooling is an important step because it helps to firm up the cake, making it easier to crumble.
2. Crumble the Cake
Once the cake has cooled, use your hands or a fork to crumble it into small, fine pieces. The goal is to break it into tiny crumbs, which will form the base of your truffles. Be thorough with crumbling to ensure there are no large chunks, as this will help the truffle mixture bind together more easily when you add the cream cheese.
3. Mix with Cream Cheese
After crumbling the cake, add the softened cream cheese to the cake crumbs. Use your hands or a spatula to gently knead the mixture together until the cream cheese is completely incorporated into the cake. The mixture should be moist and sticky, resembling dough, which makes it easy to roll into balls. The cream cheese provides both flavor and texture, turning the cake crumbs into a creamy, luscious filling for the truffles.
4. Roll into Balls
Now it’s time to form your truffles! Scoop out about 1 heaping tablespoon of the mixture and roll it into a ball using your hands. You should aim for about 35-40 truffles depending on the size of the balls. Place each ball on a baking sheet lined with parchment paper. It’s important that the truffles are spaced evenly so they don’t stick together during the chilling process.
5. Chill the Truffles
Chill the tray of truffles in the fridge for at least 30 minutes, or until the balls have firmed up. Chilling helps the truffles maintain their shape when they’re dipped in chocolate, so don’t skip this step! If you’re in a rush, you can even place the tray in the freezer for 10-15 minutes for a quicker set.
6. Melt the White Chocolate
While the truffles chill, melt the white chocolate in a microwave-safe bowl. Heat the chocolate in 30-second intervals, stirring between each, until it is fully melted and smooth. Alternatively, you can melt the chocolate using a double boiler on the stovetop. Be careful not to overheat the chocolate, as it can burn quickly.
7. Dip the Truffles
Once the truffles are chilled and the white chocolate is ready, it’s time to dip. Using a fork, carefully lower each truffle into the melted white chocolate. Roll the truffle around to coat it evenly, ensuring the entire surface is covered in chocolate. Then, gently tap the fork against the side of the bowl to remove any excess chocolate. Place the coated truffle back onto the parchment paper.
8. Chill Again
Place the dipped truffles back in the fridge to chill for at least 30 minutes, or until the chocolate has hardened. This ensures that the white chocolate coating sets and the truffles hold their shape.
9. Melt the Dark Chocolate
Once the white chocolate has set, melt the dark or semi-sweet chocolate using the same method as you did with the white chocolate. When it’s melted, transfer the dark chocolate into a piping bag or a zip-top plastic bag, and cut off a small corner of the bag to create a drizzle effect.
10. Drizzle the Dark Chocolate
Using the piping bag, drizzle the dark chocolate over each truffle. This will add a decorative touch and a contrast of flavor, as the bitterness of the dark chocolate complements the sweetness of the white chocolate coating. Once you’ve finished drizzling, return the truffles to the fridge for 10-15 minutes to allow the dark chocolate to firm up.
Notes
- Softened Cream Cheese: Make sure the cream cheese is softened before adding it to the cake crumbs. Cold cream cheese can be difficult to incorporate and might create lumps in your mixture.
- Chill the Truffles Well: Chilling is crucial for the truffles to hold their shape when dipped in chocolate. Don’t rush this step!
- Melting Chocolate: If you’re new to melting chocolate, take your time and use a low heat setting to avoid burning it. Stir often, and don’t heat the chocolate for too long in one go.
- Creative Decorations: Once you’ve drizzled the dark chocolate, you can get creative with your truffles! Add sprinkles, edible glitter, or colored sugar to make them extra festive for special occasions.
What makes this recipe particularly great for beginners is its simplicity. There’s no need to worry about complicated baking techniques, and the ingredients are easy to find in your local grocery store. Whether you’re a novice or just looking for a simple yet impressive dessert, these Red Velvet Truffles fit the bill. Let’s dive into this delicious recipe that combines minimal effort with maximum flavor, making it a fantastic starting point for those who are still getting comfortable in the kitchen.
Why This Recipe Is Perfect for Beginners
Baking as a beginner can often feel daunting, with complex techniques and multiple steps. However, the beauty of Red Velvet Truffles lies in their simplicity. Instead of starting from scratch, the base of these truffles is made using a boxed red velvet cake mix, which cuts down on prep time and eliminates the need to make a cake batter from scratch. Once the cake is prepared and cooled, it’s simply crumbled and mixed with softened cream cheese. This step requires no baking or delicate timing, which makes it perfect for beginners who may be intimidated by traditional baking. Additionally, once the truffle balls are formed, they are simply dipped in melted white and dark chocolate, adding flavor and texture with minimal effort.
Another reason this recipe is great for beginners is that it doesn’t require an intricate set of kitchen tools. You won’t need a stand mixer, a piping bag, or any other specialized equipment. Instead, the ingredients can be mixed by hand, making it accessible for anyone with basic kitchen tools. For those unfamiliar with melting chocolate, we’ll guide you through that process step-by-step, ensuring that even this part is easy to tackle. Plus, the process of chilling the truffles ensures that they set perfectly, giving you time to focus on other tasks while the truffles firm up in the fridge. These truffles are an excellent way to practice your kitchen skills without feeling overwhelmed by the process.
Ingredients and Preparation
Before you begin making these delightful truffles, let’s take a look at the ingredients and preparation steps. The ingredients are simple, yet they come together beautifully to create a rich, indulgent treat that everyone will love. The best part? You probably already have most of these ingredients in your pantry.
Ingredients
- 1 box red velvet cake mix (plus the ingredients listed on the box to prepare the cake, typically water, oil, and eggs)
- 8 oz cream cheese, softened
- 16 oz white chocolate
- 2 oz dark or semi-sweet chocolate
The cake mix serves as the base, delivering that iconic red velvet flavor without the need to make the cake batter from scratch. The cream cheese is key in binding the cake crumbs together and giving the truffles a smooth, creamy texture. The combination of white chocolate for coating and dark chocolate for drizzling on top ensures a balanced sweetness and richness. These ingredients are accessible and familiar, making this recipe ideal for beginner bakers.
Alternative Ingredient Suggestions
While this recipe is simple and versatile, you may want to try different variations depending on dietary preferences or the ingredients available to you. Here are a few alternatives:
- Cake Mix Substitutes: If you prefer not to use a boxed cake mix, you can make a homemade red velvet cake batter. This typically includes flour, cocoa powder, sugar, buttermilk, eggs, and red food coloring. While this would require a bit more effort, it’s an option if you want to try something from scratch.
- Vegan Alternatives: If you need a vegan option, you can substitute the cream cheese with plant-based cream cheese, and choose a dairy-free white chocolate option for coating the truffles.
- Chocolate Variations: You can use other types of chocolate, such as milk chocolate or even dark chocolate for both the coating and drizzle. The milk chocolate will make the truffles sweeter, while dark chocolate will provide a more balanced, slightly bitter contrast to the sweetness of the red velvet cake.
Now that we have the ingredients and alternatives sorted, let’s move on to the fun part—preparing these delightful Red Velvet Truffles!
Step-by-Step Instructions
1. Prepare the Cake
Start by preparing the red velvet cake mix according to the package instructions. This will typically involve mixing the cake mix with water, oil, and eggs. Bake the cake in a 9×13-inch pan at the temperature specified on the box, and then let it cool completely before proceeding. Cooling is an important step because it helps to firm up the cake, making it easier to crumble.
2. Crumble the Cake
Once the cake has cooled, use your hands or a fork to crumble it into small, fine pieces. The goal is to break it into tiny crumbs, which will form the base of your truffles. Be thorough with crumbling to ensure there are no large chunks, as this will help the truffle mixture bind together more easily when you add the cream cheese.
3. Mix with Cream Cheese
After crumbling the cake, add the softened cream cheese to the cake crumbs. Use your hands or a spatula to gently knead the mixture together until the cream cheese is completely incorporated into the cake. The mixture should be moist and sticky, resembling dough, which makes it easy to roll into balls. The cream cheese provides both flavor and texture, turning the cake crumbs into a creamy, luscious filling for the truffles.
4. Roll into Balls
Now it’s time to form your truffles! Scoop out about 1 heaping tablespoon of the mixture and roll it into a ball using your hands. You should aim for about 35-40 truffles depending on the size of the balls. Place each ball on a baking sheet lined with parchment paper. It’s important that the truffles are spaced evenly so they don’t stick together during the chilling process.
5. Chill the Truffles
Chill the tray of truffles in the fridge for at least 30 minutes, or until the balls have firmed up. Chilling helps the truffles maintain their shape when they’re dipped in chocolate, so don’t skip this step! If you’re in a rush, you can even place the tray in the freezer for 10-15 minutes for a quicker set.
6. Melt the White Chocolate
While the truffles chill, melt the white chocolate in a microwave-safe bowl. Heat the chocolate in 30-second intervals, stirring between each, until it is fully melted and smooth. Alternatively, you can melt the chocolate using a double boiler on the stovetop. Be careful not to overheat the chocolate, as it can burn quickly.
7. Dip the Truffles
Once the truffles are chilled and the white chocolate is ready, it’s time to dip. Using a fork, carefully lower each truffle into the melted white chocolate. Roll the truffle around to coat it evenly, ensuring the entire surface is covered in chocolate. Then, gently tap the fork against the side of the bowl to remove any excess chocolate. Place the coated truffle back onto the parchment paper.
8. Chill Again
Place the dipped truffles back in the fridge to chill for at least 30 minutes, or until the chocolate has hardened. This ensures that the white chocolate coating sets and the truffles hold their shape.
9. Melt the Dark Chocolate
Once the white chocolate has set, melt the dark or semi-sweet chocolate using the same method as you did with the white chocolate. When it’s melted, transfer the dark chocolate into a piping bag or a zip-top plastic bag, and cut off a small corner of the bag to create a drizzle effect.
10. Drizzle the Dark Chocolate
Using the piping bag, drizzle the dark chocolate over each truffle. This will add a decorative touch and a contrast of flavor, as the bitterness of the dark chocolate complements the sweetness of the white chocolate coating. Once you’ve finished drizzling, return the truffles to the fridge for 10-15 minutes to allow the dark chocolate to firm up.
Beginner Tips and Notes
- Softened Cream Cheese: Make sure the cream cheese is softened before adding it to the cake crumbs. Cold cream cheese can be difficult to incorporate and might create lumps in your mixture.
- Chill the Truffles Well: Chilling is crucial for the truffles to hold their shape when dipped in chocolate. Don’t rush this step!
- Melting Chocolate: If you’re new to melting chocolate, take your time and use a low heat setting to avoid burning it. Stir often, and don’t heat the chocolate for too long in one go.
- Creative Decorations: Once you’ve drizzled the dark chocolate, you can get creative with your truffles! Add sprinkles, edible glitter, or colored sugar to make them extra festive for special occasions.
Serving Suggestions
These Red Velvet Truffles are perfect on their own, but they can also be paired with a variety of complementary items. Serve them alongside a rich cup of hot chocolate or a scoop of vanilla ice cream for an indulgent dessert experience. They also make a beautiful and thoughtful gift for Valentine’s Day, birthdays, or any celebration where you want to show someone you care. To present them as a gift, place the truffles in decorative boxes or tins for an added touch of elegance.
Storing Leftovers
If you have any leftover truffles (which is unlikely, considering how delicious they are!), store them in an airtight container in the fridge. They’ll stay fresh for up to a week, though we doubt they’ll last that long. Just be sure to allow them to return to room temperature before serving, as the chocolate coating may become firm and lose its creamy texture when refrigerated.

Conclusion
These Red Velvet Truffles are a decadent, easy-to-make dessert that will leave everyone wanting more. The combination of moist red velvet cake, creamy cream cheese, and rich chocolate makes for a truly irresistible treat. Whether you’re making them for a special occasion or simply because you love red velvet, these truffles are sure to be a hit. They’re a fantastic beginner recipe, and with a little patience and attention to detail, you’ll be able to create beautiful, delicious truffles that look like they came from a professional bakery. So go ahead, get in the kitchen, and treat yourself and your loved ones to a bite-sized piece of red velvet heaven. Happy baking!


