Fall is a magical time of year, full of vibrant leaves, crisp air, and the unmistakable aroma of pumpkin spice wafting through kitchens everywhere. For many, the season wouldn’t be complete without a slice of pumpkin pie—an iconic dessert that brings warmth and comfort to the table. However, what if you could enjoy all the flavors of pumpkin pie without the hassle of making a full-sized pie or turning on the oven? Enter Pumpkin Pie in a Cup—a delightful, no-bake twist on the classic dessert that’s perfect for beginners!

Pumpkin Pie in a Cup: The Ultimate No-Bake Fall Dessert for Beginners

When fall rolls around, there’s nothing better than a cozy dessert, and Pumpkin Pie in a Cup delivers just that! This no-bake treat gives you all the flavors of classic pumpkin pie—spiced, creamy, and delicious—without the oven. Perfect for beginners, it’s an easy, fun way to enjoy pumpkin pie in individual servings. Let’s dive in and make this simple, tasty treat!
- Prep Time: 10 minutes
- Cook Time: 0 minutes
- Total Time: 10 minutes
- Yield: 5 servings 1x
- Category: Dessert
- Method: Layering, Mixing, No-bake, Refrigerating
- Cuisine: American
- Diet: Vegetarian
Ingredients
- 2 cups Biscoff cookie crumbs (from about 30 cookies)
- 6 tablespoons unsalted butter, melted
- 8 ounces cream cheese, softened
- ½ cup granulated white sugar
- 1 cup pumpkin puree (NOT pumpkin pie mix)
- 1 teaspoon pumpkin pie spice
- 6 ounces frozen whipped topping, thawed (plus more for topping)
Instructions
Step 1: Make the Cookie Crust
The first step in this no-bake recipe is to create the cookie crust. In a small mixing bowl, combine the Biscoff cookie crumbs with the melted butter. Stir the mixture until the crumbs are evenly coated with the butter. The butter helps to bind the crumbs together, creating a firm crust that will hold up well when layered with the pumpkin cheesecake filling.
Once the mixture is fully combined, set it aside. If you’re using individual serving cups, you can divide the crust mixture evenly among the cups and press it down gently with the back of a spoon. You want a compact layer at the bottom of each cup, so the crust doesn’t crumble when you serve it.
Step 2: Prepare the Pumpkin Cheesecake Filling
Next, it’s time to make the creamy pumpkin filling. Start by placing the softened cream cheese in a large mixing bowl. Use an electric mixer to beat the cream cheese and granulated sugar until the mixture is smooth and fluffy. The sugar will dissolve into the cream cheese, creating a sweet and creamy base for the pumpkin filling.
Once the cream cheese and sugar are fully combined, add the pumpkin puree and pumpkin pie spice. The pumpkin puree gives the filling its rich flavor and color, while the pumpkin pie spice adds the signature autumnal warmth that makes this dessert so comforting. Stir the mixture until the pumpkin and spices are well incorporated into the cream cheese mixture.
After that, gently fold in the whipped topping. This step is important because the whipped topping adds lightness to the filling, giving it a fluffy, mousse-like texture. Be sure to fold it in carefully so as not to deflate the airiness of the whipped topping.
Step 3: Layer the Cups
Now that you have your crust and filling prepared, it’s time to assemble the cups! You can either use a piping bag to add the pumpkin cheesecake mixture to the cups, or simply use a spoon. If you’re using a piping bag, it helps to fill the bag with the mixture and then pipe it neatly into each cup. If you don’t have a piping bag, no worries—just spoon the filling in carefully, making sure to create even layers.
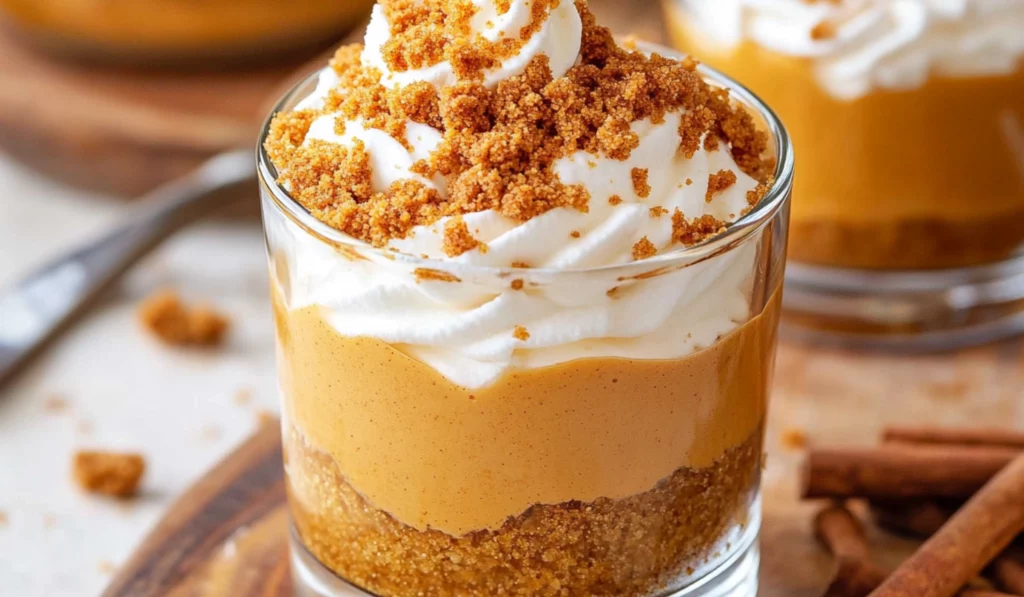
Start by adding a spoonful of the cookie crumb mixture into each cup. Press the crumbs gently into the bottom to form a firm base. Then, layer the pumpkin cheesecake filling over the crust. Use about 2 to 3 tablespoons of filling per layer, depending on the size of your cups. After each layer of filling, add another layer of cookie crumbs, repeating the process until the cups are filled to your desired height.
Once the layers are complete, place the cups in the refrigerator to chill for at least an hour. This allows the cheesecake filling to firm up and set, making it easier to enjoy when you’re ready to serve.
Step 4: Garnish and Serve
Before serving, top each cup with a generous dollop of whipped cream and a sprinkle of Biscoff cookie crumbs for added texture and flavor. You can also add a pinch of cinnamon or nutmeg to give each cup a little extra spice. If you’re feeling fancy, drizzle some caramel sauce or chocolate syrup over the top for an indulgent touch.
Serve the cups chilled, and enjoy the sweet, creamy, and spiced layers that make up this delightful no-bake dessert.
Notes
- Cream Cheese: Make sure the cream cheese is softened before mixing. Cold cream cheese can be difficult to blend smoothly, resulting in a lumpy filling.
- Whipped Topping: Be gentle when folding the whipped topping into the pumpkin mixture. Over-mixing can cause it to lose its fluffy texture.
- Chill Time: Don’t skip the chilling time! Allow at least an hour for the cups to set in the fridge. This will give the filling a chance to firm up and will also help the flavors meld together.
- Even Layers: When layering the crust and filling, aim for even layers so that each bite of dessert has the perfect balance of cookie crust and creamy filling.
Whether you’re hosting a fall dinner, celebrating a holiday, or simply indulging in a sweet treat on a cozy evening, this easy dessert offers a fun and quick way to enjoy everything you love about pumpkin pie in individual servings. With a spiced cookie crust, creamy pumpkin cheesecake filling, and fluffy whipped topping, it’s a treat that’s both simple to make and sure to impress.
In this guide, we’ll walk you through everything you need to know to create Pumpkin Pie in a Cup, from the ingredients and preparation to step-by-step instructions and tips for success. You’ll also find serving suggestions and creative ideas to customize the recipe to fit your preferences. Whether you’re a seasoned baker or a beginner in the kitchen, this recipe is guaranteed to be a hit!
Why Pumpkin Pie in a Cup is Perfect for Beginners
Pumpkin Pie in a Cup is the ideal dessert for beginner cooks because it requires no baking, making it less intimidating than traditional pumpkin pie. All you need is a few simple ingredients, a couple of mixing bowls, and your refrigerator to set the dessert. The process is straightforward, with very few steps to follow, allowing you to create a delicious treat without a complicated recipe.
One of the reasons this recipe is perfect for beginners is its versatility. The ingredients can be easily substituted based on what you have on hand or personal preferences. For example, if you’re not a fan of Biscoff cookies, you can swap them out for graham crackers or ginger snaps to create a different flavor profile. You can also adjust the sweetness of the pumpkin filling by using a different type of sweetener if you prefer a lower-sugar dessert.
This no-bake pumpkin pie also offers the convenience of individual servings, which makes it easy to serve at parties or gatherings. No need to worry about cutting perfect slices—each person gets their own little cup of deliciousness! It’s also a great way to introduce beginner cooks to the concept of layered desserts, where each component comes together to form a delightful combination of flavors and textures.
Ingredients and Preparation
Before you get started, it’s important to have all your ingredients ready. Here’s a list of the key components for your Pumpkin Pie in a Cup:
Ingredients:
- 2 cups Biscoff cookie crumbs (from about 30 cookies)
- 6 tablespoons unsalted butter, melted
- 8 ounces cream cheese, softened
- ½ cup granulated white sugar
- 1 cup pumpkin puree (NOT pumpkin pie mix)
- 1 teaspoon pumpkin pie spice
- 6 ounces frozen whipped topping, thawed (plus more for topping)
These ingredients come together to form a rich, creamy filling with a crunchy, spiced cookie crust. If you’re new to cooking, don’t worry! These ingredients are all easily found at your local grocery store, and many of them are pantry staples.
Alternative Ingredient Suggestions:
- Biscoff Cookie Crumbs: If you can’t find Biscoff cookies, you can substitute them with graham cracker crumbs for a more traditional flavor, or use gingersnap cookies for a spicier option that pairs wonderfully with the pumpkin filling.
- Cream Cheese: For a dairy-free or vegan version, you can use plant-based cream cheese. Be sure it’s softened to achieve a smooth texture when mixing with the other ingredients.
- Whipped Topping: If you prefer to avoid dairy, you can use coconut whipped cream or any other non-dairy whipped topping to replace the standard whipped cream.
- Sugar: If you’re watching your sugar intake, you can substitute stevia or monk fruit sweetener for the granulated sugar. Adjust to taste, as these alternatives can sometimes be sweeter than regular sugar.
Step-by-Step Instructions
Now that you’ve gathered your ingredients, let’s get started! Below is a detailed, beginner-friendly guide on how to assemble your Pumpkin Pie in a Cup.
Step 1: Make the Cookie Crust
The first step in this no-bake recipe is to create the cookie crust. In a small mixing bowl, combine the Biscoff cookie crumbs with the melted butter. Stir the mixture until the crumbs are evenly coated with the butter. The butter helps to bind the crumbs together, creating a firm crust that will hold up well when layered with the pumpkin cheesecake filling.
Once the mixture is fully combined, set it aside. If you’re using individual serving cups, you can divide the crust mixture evenly among the cups and press it down gently with the back of a spoon. You want a compact layer at the bottom of each cup, so the crust doesn’t crumble when you serve it.
Step 2: Prepare the Pumpkin Cheesecake Filling
Next, it’s time to make the creamy pumpkin filling. Start by placing the softened cream cheese in a large mixing bowl. Use an electric mixer to beat the cream cheese and granulated sugar until the mixture is smooth and fluffy. The sugar will dissolve into the cream cheese, creating a sweet and creamy base for the pumpkin filling.
Once the cream cheese and sugar are fully combined, add the pumpkin puree and pumpkin pie spice. The pumpkin puree gives the filling its rich flavor and color, while the pumpkin pie spice adds the signature autumnal warmth that makes this dessert so comforting. Stir the mixture until the pumpkin and spices are well incorporated into the cream cheese mixture.
After that, gently fold in the whipped topping. This step is important because the whipped topping adds lightness to the filling, giving it a fluffy, mousse-like texture. Be sure to fold it in carefully so as not to deflate the airiness of the whipped topping.
Step 3: Layer the Cups
Now that you have your crust and filling prepared, it’s time to assemble the cups! You can either use a piping bag to add the pumpkin cheesecake mixture to the cups, or simply use a spoon. If you’re using a piping bag, it helps to fill the bag with the mixture and then pipe it neatly into each cup. If you don’t have a piping bag, no worries—just spoon the filling in carefully, making sure to create even layers.
Start by adding a spoonful of the cookie crumb mixture into each cup. Press the crumbs gently into the bottom to form a firm base. Then, layer the pumpkin cheesecake filling over the crust. Use about 2 to 3 tablespoons of filling per layer, depending on the size of your cups. After each layer of filling, add another layer of cookie crumbs, repeating the process until the cups are filled to your desired height.
Once the layers are complete, place the cups in the refrigerator to chill for at least an hour. This allows the cheesecake filling to firm up and set, making it easier to enjoy when you’re ready to serve.
Step 4: Garnish and Serve
Before serving, top each cup with a generous dollop of whipped cream and a sprinkle of Biscoff cookie crumbs for added texture and flavor. You can also add a pinch of cinnamon or nutmeg to give each cup a little extra spice. If you’re feeling fancy, drizzle some caramel sauce or chocolate syrup over the top for an indulgent touch.
Serve the cups chilled, and enjoy the sweet, creamy, and spiced layers that make up this delightful no-bake dessert.
Beginner Tips and Notes
As you prepare this recipe, here are a few tips to keep in mind to ensure your Pumpkin Pie in a Cup turns out perfectly:
- Cream Cheese: Make sure the cream cheese is softened before mixing. Cold cream cheese can be difficult to blend smoothly, resulting in a lumpy filling.
- Whipped Topping: Be gentle when folding the whipped topping into the pumpkin mixture. Over-mixing can cause it to lose its fluffy texture.
- Chill Time: Don’t skip the chilling time! Allow at least an hour for the cups to set in the fridge. This will give the filling a chance to firm up and will also help the flavors meld together.
- Even Layers: When layering the crust and filling, aim for even layers so that each bite of dessert has the perfect balance of cookie crust and creamy filling.
Serving Suggestions
This Pumpkin Pie in a Cup is a perfect standalone dessert, but it can also be paired with a variety of sides to create a complete fall-themed treat:
- Chai-Spiced Nuts: Serve the cups with some toasted pecans or walnuts dusted with cinnamon and sugar for a crunchy contrast to the creamy filling.
- Apple Slices: Thinly sliced fresh apples or a warm apple compote make a great side that complements the spices in the dessert.
- Spiced Hot Beverages: Pair this dessert with a hot cup of pumpkin spice latte, hot apple cider, or a comforting chai tea for the ultimate fall experience.
Leftovers can be stored in an airtight container in the refrigerator for up to two days. If you have extra whipped cream or cookie crumbs, feel free to top the cups again before serving!

Conclusion
Pumpkin Pie in a Cup is a fun, easy, and delicious way to enjoy the flavors of fall without the hassle of baking a whole pie. With simple ingredients and a straightforward process, this no-bake dessert is perfect for beginners who want to impress their friends and family with minimal effort. Whether you’re preparing for a holiday celebration or simply treating yourself to a comforting dessert, this pumpkin pie is sure to become a seasonal favorite.
We hope you’re inspired to try this recipe and share it with your loved ones! If you make this Pumpkin Pie in a Cup, we’d love to hear how it turned out for you. Share your thoughts or any creative twists you made in the comments below. Enjoy every bite of this sweet and creamy fall treat!


