There’s something magical about the warm, comforting spices of pumpkin that bring a sense of nostalgia, especially during the fall and winter holidays. As the air gets cooler and the festive season approaches, many of us begin to crave the rich flavors of pumpkin pie, cinnamon, and nutmeg. But what if you could take those familiar flavors and transform them into a smooth, luxurious dessert that’s equally impressive and easy to make? That’s where this Pumpkin Crème Brûlée comes in. It’s a show-stopping dessert that pairs the velvety smoothness of classic crème brûlée with the comforting warmth of pumpkin, all crowned with that iconic caramelized sugar crust.

Pumpkin Crème Brûlée: A Rich, Creamy Holiday Delight for Beginners

Looking for a holiday dessert that’s both comforting and impressive? This Pumpkin Crème Brûlée is the perfect choice! With its smooth, spiced custard and caramelized sugar topping, it’s a delicious twist on the classic dessert. Easy to make and perfect for beginners, this pumpkin-flavored treat will wow your guests and satisfy your sweet tooth!
- Prep Time: 15 minutes
- Cook Time: 35 minutes
- Total Time: 50 minutes
- Yield: 6 servings 1x
- Category: Dessert
- Method: Baking
- Cuisine: American
- Diet: Vegetarian
Ingredients
- 2 cups (480 ml) heavy whipping cream
- 1 ½ teaspoons pure vanilla extract
- 4 large egg yolks
- ¼ cup (50g) light brown sugar
- ¼ cup (60g) pumpkin puree
- ¼ teaspoon pumpkin spice mix
- ⅛ teaspoon salt
- 6 teaspoons granulated sugar (for the caramelized topping)
Instructions
1. Preheat your oven and prepare the water bath: Begin by preheating your oven to 300°F (150°C). This lower temperature ensures the custard cooks slowly, resulting in that smooth, silky texture. Next, place six 4-ounce ramekins on the bottom of a large roasting pan or baking dish—this will be your water bath. A water bath helps maintain a gentle cooking temperature, ensuring the custard doesn’t overcook and curdle.
2. Heat the cream mixture: In a medium saucepan, combine the heavy cream, vanilla extract, half of the brown sugar, pumpkin puree, pumpkin spice mix, and salt. Heat the mixture over medium heat, stirring occasionally, until it begins to simmer. You’ll know it’s ready when you see small bubbles forming around the edges of the pan. Be sure not to let it boil, as that could cause the cream to separate.
3. Whisk the egg yolks and sugar: While the cream is heating up, whisk the egg yolks and the remaining brown sugar in a medium heatproof bowl. Whisk until the mixture is well blended and smooth—don’t overwhisk, as you don’t want to introduce too much air into the eggs. This step is crucial for getting that perfect creamy texture.
4. Temper the egg yolks: To avoid scrambling the eggs, we’ll need to temper them. Slowly pour about half of the hot cream mixture into the egg yolks while whisking constantly. This step gradually raises the temperature of the eggs without cooking them. Once the egg yolks have been tempered, pour the entire egg mixture back into the saucepan with the remaining cream, whisking continuously.
5. Cook the custard: Return the saucepan to the stove and cook the custard over low heat, stirring constantly. Keep an eye on it—you don’t want it to boil! You’ll know it’s ready when the mixture thickens just slightly and the sugar has dissolved. It should coat the back of a spoon. Once done, remove the saucepan from the heat.
6. Strain and divide the custard: To ensure a silky smooth texture, strain the custard through a fine mesh sieve into a clean bowl. This will remove any bits of cooked egg or spices that might have clumped together. Pour the strained custard evenly among the prepared ramekins.
7. Bake the custard: Fill the roasting pan with hot water, making sure the water reaches halfway up the sides of the ramekins. Carefully transfer the pan to the preheated oven and bake for 25-30 minutes. The custards should be set but still slightly wobbly when gently shaken. If the custard is too loose, bake for a few more minutes until it firms up.
8. Cool and chill the crème brûlée: Once the custard is done baking, remove the ramekins from the water bath and let them cool to room temperature on a wire rack. Once they’ve cooled, cover them with plastic wrap and chill in the refrigerator for at least 4 hours, preferably overnight. This chilling step is key for setting the custard.
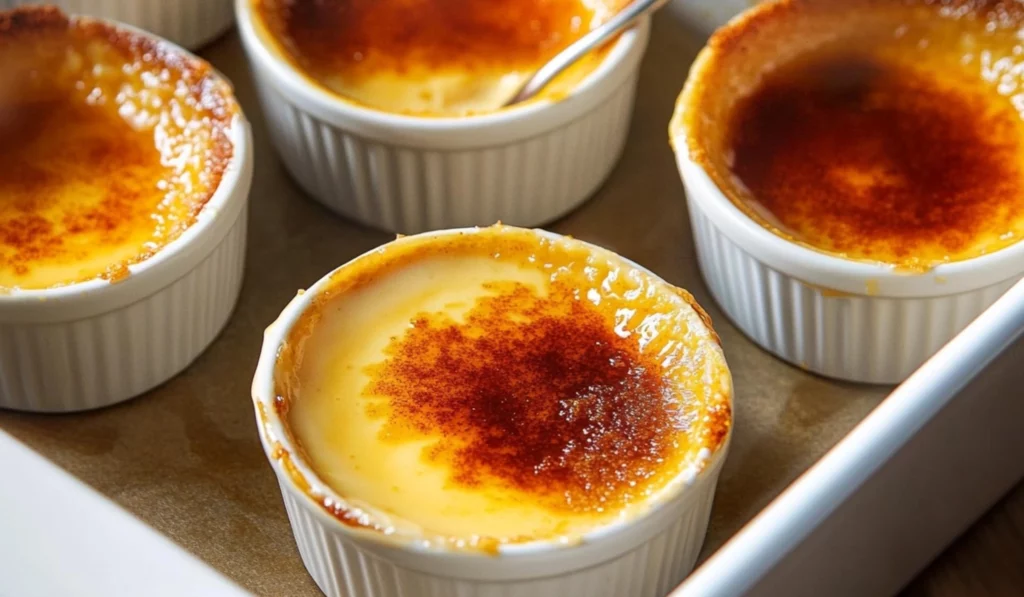
9. Caramelize the sugar topping: Before serving, it’s time to add the signature caramelized sugar topping. Sprinkle about ½ to 1 teaspoon of granulated sugar evenly on top of each custard. Gently shake the ramekins from side to side to distribute the sugar evenly. Using a kitchen torch, carefully caramelize the sugar by starting at the outer edges and working your way inwards. Hold the torch a few inches away from the surface and keep the flame moving to avoid burning the sugar. The sugar should melt and bubble, turning golden brown. Serve immediately.
Notes
- Prevent Overcooking: One of the most common issues when making crème brûlée is overcooking the custard. To avoid this, make sure to bake at a low temperature and check for doneness by gently shaking the ramekins. If the custard is slightly wobbly in the center, it’s perfect!
- Caramelizing the Sugar: If you don’t have a kitchen torch, you can use your oven’s broiler to caramelize the sugar. Simply sprinkle the sugar on the custard, place the ramekins under the broiler for 2-3 minutes, and watch carefully as the sugar melts and browns.
- Substitute for a Water Bath: If you don’t have a large roasting pan, you can use a deep baking dish or even a large casserole dish to create the water bath. Just ensure the water reaches halfway up the ramekins.
As someone who loves experimenting in the kitchen, I remember the first time I made this dessert—it was for Thanksgiving dinner. I wanted something special that would stand out from the usual pumpkin pie, and Pumpkin Crème Brûlée fit the bill perfectly. The best part? It’s surprisingly easy for beginners to master! With just a few simple ingredients and basic kitchen equipment, you can make this rich, creamy dessert that’s perfect for your next holiday gathering. Whether you’re an experienced cook or just starting your culinary journey, this recipe is a great way to impress friends and family with minimal effort.
Why This Pumpkin Crème Brûlée Is Perfect for Beginners
If you’ve never tried making crème brûlée before, don’t worry! This pumpkin version is actually a great recipe to start with. The technique of making custard might sound intimidating, but it’s really just a matter of carefully heating the ingredients, whisking the egg yolks, and baking the custard in a water bath. Plus, there’s no complicated pastry or dough involved—just creamy, smooth custard and that irresistible caramelized sugar topping. This recipe takes a total of about 50 minutes from start to finish, but most of that time is hands-off while the custard sets in the oven and cools in the fridge.
The combination of heavy cream, egg yolks, and pumpkin puree creates a deliciously smooth, velvety texture that’s perfect for a holiday dessert. You’ll also enjoy the health benefits of using pumpkin—packed with vitamins and antioxidants—while indulging in a treat that feels both decadent and light. Let’s dive into this foolproof, beginner-friendly recipe that’s sure to become a seasonal favorite!
Ingredients and Preparation
For this Pumpkin Crème Brûlée, you’ll need just a few ingredients to create that perfect balance of creamy custard and sweet, spicy pumpkin flavor. Here’s the complete list:
Ingredients:
- 2 cups (480 ml) heavy whipping cream
- 1 ½ teaspoons pure vanilla extract
- 4 large egg yolks
- ¼ cup (50g) light brown sugar
- ¼ cup (60g) pumpkin puree
- ¼ teaspoon pumpkin spice mix
- ⅛ teaspoon salt
- 6 teaspoons granulated sugar (for the caramelized topping)
Ingredient Alternatives and Flexibility:
- Pumpkin Puree: You can substitute homemade pumpkin puree or canned pumpkin puree. Just make sure the pumpkin puree is smooth and doesn’t contain added sugar or spices. If you don’t have pumpkin puree, you can use sweet potato puree for a similar texture and flavor.
- Heavy Cream: If you’re looking for a lighter version, you can substitute half-and-half or whole milk for the heavy cream. However, this may slightly alter the creamy texture.
- Vanilla Extract: While pure vanilla extract is the best option for flavor, you can use vanilla bean paste or even vanilla bean seeds for an extra indulgent touch. However, avoid using imitation vanilla as it lacks the depth of flavor.
- Pumpkin Spice: If you don’t have pumpkin spice on hand, you can easily make your own by mixing ground cinnamon, nutmeg, ginger, and allspice.
Step-by-Step Instructions
Now that you have your ingredients ready, let’s walk through the steps to make this indulgent Pumpkin Crème Brûlée. Don’t worry—each step is simple and clear, so you’ll feel confident the whole way through!
1. Preheat your oven and prepare the water bath: Begin by preheating your oven to 300°F (150°C). This lower temperature ensures the custard cooks slowly, resulting in that smooth, silky texture. Next, place six 4-ounce ramekins on the bottom of a large roasting pan or baking dish—this will be your water bath. A water bath helps maintain a gentle cooking temperature, ensuring the custard doesn’t overcook and curdle.
2. Heat the cream mixture: In a medium saucepan, combine the heavy cream, vanilla extract, half of the brown sugar, pumpkin puree, pumpkin spice mix, and salt. Heat the mixture over medium heat, stirring occasionally, until it begins to simmer. You’ll know it’s ready when you see small bubbles forming around the edges of the pan. Be sure not to let it boil, as that could cause the cream to separate.
3. Whisk the egg yolks and sugar: While the cream is heating up, whisk the egg yolks and the remaining brown sugar in a medium heatproof bowl. Whisk until the mixture is well blended and smooth—don’t overwhisk, as you don’t want to introduce too much air into the eggs. This step is crucial for getting that perfect creamy texture.
4. Temper the egg yolks: To avoid scrambling the eggs, we’ll need to temper them. Slowly pour about half of the hot cream mixture into the egg yolks while whisking constantly. This step gradually raises the temperature of the eggs without cooking them. Once the egg yolks have been tempered, pour the entire egg mixture back into the saucepan with the remaining cream, whisking continuously.
5. Cook the custard: Return the saucepan to the stove and cook the custard over low heat, stirring constantly. Keep an eye on it—you don’t want it to boil! You’ll know it’s ready when the mixture thickens just slightly and the sugar has dissolved. It should coat the back of a spoon. Once done, remove the saucepan from the heat.
6. Strain and divide the custard: To ensure a silky smooth texture, strain the custard through a fine mesh sieve into a clean bowl. This will remove any bits of cooked egg or spices that might have clumped together. Pour the strained custard evenly among the prepared ramekins.
7. Bake the custard: Fill the roasting pan with hot water, making sure the water reaches halfway up the sides of the ramekins. Carefully transfer the pan to the preheated oven and bake for 25-30 minutes. The custards should be set but still slightly wobbly when gently shaken. If the custard is too loose, bake for a few more minutes until it firms up.
8. Cool and chill the crème brûlée: Once the custard is done baking, remove the ramekins from the water bath and let them cool to room temperature on a wire rack. Once they’ve cooled, cover them with plastic wrap and chill in the refrigerator for at least 4 hours, preferably overnight. This chilling step is key for setting the custard.
9. Caramelize the sugar topping: Before serving, it’s time to add the signature caramelized sugar topping. Sprinkle about ½ to 1 teaspoon of granulated sugar evenly on top of each custard. Gently shake the ramekins from side to side to distribute the sugar evenly. Using a kitchen torch, carefully caramelize the sugar by starting at the outer edges and working your way inwards. Hold the torch a few inches away from the surface and keep the flame moving to avoid burning the sugar. The sugar should melt and bubble, turning golden brown. Serve immediately.
Beginner Tips and Notes
- Prevent Overcooking: One of the most common issues when making crème brûlée is overcooking the custard. To avoid this, make sure to bake at a low temperature and check for doneness by gently shaking the ramekins. If the custard is slightly wobbly in the center, it’s perfect!
- Caramelizing the Sugar: If you don’t have a kitchen torch, you can use your oven’s broiler to caramelize the sugar. Simply sprinkle the sugar on the custard, place the ramekins under the broiler for 2-3 minutes, and watch carefully as the sugar melts and browns.
- Substitute for a Water Bath: If you don’t have a large roasting pan, you can use a deep baking dish or even a large casserole dish to create the water bath. Just ensure the water reaches halfway up the ramekins.
Serving Suggestions
Pumpkin Crème Brûlée is perfect on its own, but you can elevate the dessert by serving it with a dollop of freshly whipped cream, a sprinkle of cinnamon, or even a small slice of spiced gingerbread on the side. For a truly festive touch, consider pairing the crème brûlée with a hot cup of cinnamon-spiced coffee or a glass of dessert wine, like a rich Sauternes or late-harvest Riesling.
Storage Tips: If you have leftovers, store the ramekins in the fridge, covered with plastic wrap. They should keep for up to 3 days. Be sure to wait until right before serving to caramelize the sugar, as the topping can lose its crispiness when stored.

Conclusion
This Pumpkin Crème Brûlée is the perfect way to enjoy the flavors of fall while indulging in a dessert that feels both luxurious and approachable. With just a few simple steps, even beginner cooks can master this elegant treat and impress their guests. Whether you’re serving it for Thanksgiving, a holiday dinner, or simply as a special treat for yourself, this dessert is sure to become a favorite. So, grab your ramekins, gather your ingredients, and give this recipe a try—you won’t regret it! And if you do try it, I’d love to hear about your experience in the comments—what creative twists did you add? Let’s get baking!


