When it comes to indulgent desserts, there’s something truly magical about combining two beloved treats into one. That’s exactly what these Peach Cobbler Cheesecake Cones do! By merging the creamy richness of cheesecake with the fruity, spiced goodness of peach cobbler, this recipe delivers a delightful combination that’s both nostalgic and new. I first discovered this dessert at a summer gathering, where everyone raved about the idea of enjoying peach cobbler in a portable, cone-shaped form. It was a hit from the first bite, and I knew I had to share it with others. Perfect for family barbecues, picnics, or just a sweet treat on a lazy day, these Peach Cobbler Cheesecake Cones are as fun to make as they are to eat!

Peach Cobbler Cheesecake Cones: A Fun, Flavorful, and Portable Dessert Delight

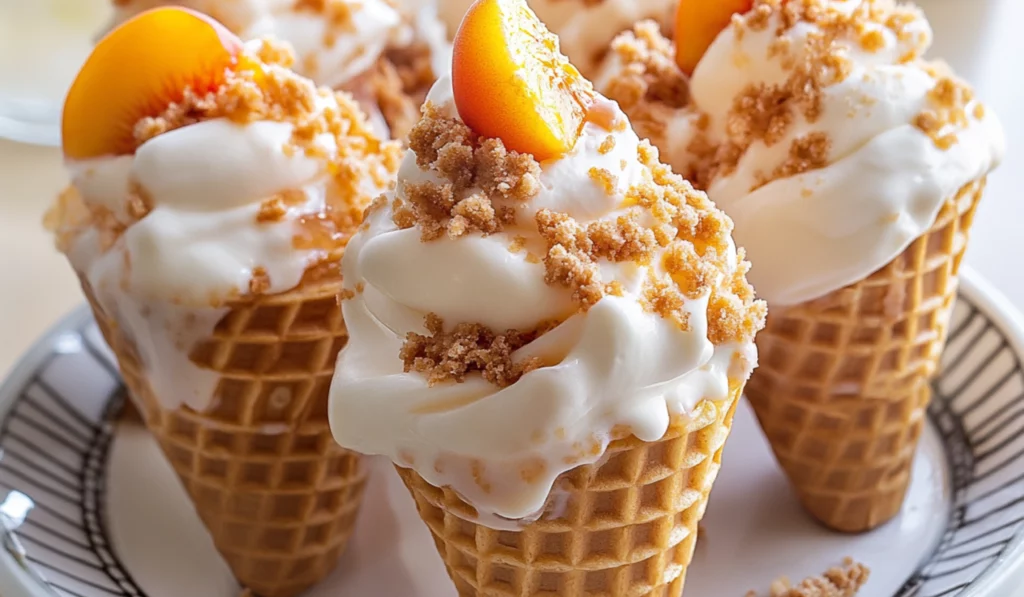
These Peach Cobbler Cheesecake Cones are the perfect mashup of two classic Southern desserts. With creamy cheesecake and sweet peach compote nestled in a crunchy waffle cone, they’re an easy, bite-sized treat that’s perfect for any occasion. Simple to make and full of flavor, they’re a must-try for beginners looking to impress with minimal effort!
- Prep Time: 20 minutes
- Cook Time: 15 minutes
- Total Time: 35 minutes
- Yield: 6 servings 1x
- Category: Dessert
- Method: No-bake
- Cuisine: American
- Diet: Vegetarian
Ingredients
For the Cheesecake Filling:
- 8 oz cream cheese, softened (low-fat options can be used)
- 1/3 cup powdered sugar or a sugar substitute (like stevia or erythritol)
- 1 egg
- 1 tsp vanilla extract
- 1/2 cup diced fresh peaches (fresh or canned, depending on availability)
For the Peach Compote:
- 2 cups diced peaches (again, fresh or canned)
- 1 tbsp lemon juice
- 2 tbsp brown sugar or sugar-free maple syrup (use whichever option aligns with your taste preferences)
- 1 tsp vanilla extract
- 1 tbsp cornstarch or arrowroot powder (this helps thicken the compote)
- 1 tsp cinnamon (adds that warm, cozy flavor)
For Assembly:
- 6 waffle cone bowls (these can be found in most grocery stores, but feel free to use traditional waffle cones if that’s your preference)
- 1 cup white chocolate chips or melting discs (this will be used for coating the cones)
- Garnishes like whipped cream and crushed graham crackers (optional, but highly recommended!)
Instructions
- Prepare the Cheesecake Filling: Start by beating together the cream cheese and your sweetener (whether you’ve chosen powdered sugar or a sugar substitute). Continue to mix until the mixture is light, fluffy, and smooth. Next, add the egg and vanilla extract, blending until fully combined. Gently fold in the diced peaches—this adds a burst of fruity flavor and gives the cheesecake filling a beautiful texture. Once everything is combined, transfer the mixture to a piping bag or a ziplock bag with the tip cut off, and place it in the fridge to chill while you prepare the other components.
- Make the Peach Compote: In a medium saucepan, combine the diced peaches, lemon juice, brown sugar (or maple syrup), and vanilla extract. Heat over medium, stirring occasionally for 5-7 minutes until the peaches soften and release their juices. For a thicker compote, make a slurry by mixing the cornstarch with 2 tbsp of water, then whisk it into the simmering peach mixture. Let it cook for an additional 2-3 minutes until the compote has thickened. The result should be a luscious, sweet-tart sauce with soft, flavorful peach chunks. Set the compote aside to cool slightly.
- Prepare the Cone Bowls: The waffle cone bowls need to be coated with white chocolate to help seal them and prevent them from becoming soggy. Melt the white chocolate chips or discs according to the package instructions, usually in a microwave or a double boiler. Once melted, use a spoon to coat the inside of each cone bowl. Set the cones upright in a glass or cone holder to allow the white chocolate to set, which should take about 15-20 minutes.
- Assemble the Cones: Once the cones are ready and the cheesecake filling has chilled, it’s time to assemble the cones. Start by piping a layer of the cheesecake filling into the bottom of each cone, creating a nice base. Next, spoon or pipe a generous amount of the warm peach compote on top of the cheesecake layer. Then, pipe another layer of cheesecake filling to cover the compote completely. The layers create a lovely contrast, with the creamy cheesecake filling and the sweet peach compote.
- Finish and Garnish: For a final touch, drizzle any remaining melted white chocolate over the top of the cone for an extra layer of sweetness and shine. You can also add a dollop of whipped cream and sprinkle crushed graham crackers over the top for added texture and flavor. If you like, you can even garnish with a fresh peach slice for a pretty touch. Place the cones in the fridge for 30 minutes to allow the flavors to meld and set the filling.
- Serve and Enjoy: Serve your Peach Cobbler Cheesecake Cones chilled, and enjoy the sweet, creamy goodness of this delightful dessert. Each bite is a little piece of heaven—a perfect blend of fruitiness, richness, and spice.
Notes
- Overmixing the Cheesecake Filling: When mixing the cheesecake filling, be careful not to overmix, as this can lead to a dense texture. Once the ingredients are combined and the peaches are folded in, stop mixing.
- Consistency of the Peach Compote: If your peach compote isn’t thickening as expected, don’t worry. Just give it a little more time to simmer, and if needed, add more cornstarch slurry. If you want a smoother compote, you can puree the peaches slightly with a hand blender.
- Alternative Fruit Options: Don’t feel restricted to peaches! You can swap them out for other fruits like strawberries, raspberries, or even cherries, depending on your preferences or the season.
- Serving Tips: If you have leftovers, these cones can be stored in the fridge for up to two days. They’re best served within 24 hours, though, as the cones can become a little soggy over time.
Not only does this dessert taste incredible, but it’s also the ideal recipe for beginner cooks. Why? Because it’s straightforward, doesn’t require any fancy techniques, and allows for flexibility with ingredients. Whether you want to use fresh peaches or a different fruit, swap out the sugar for a healthier alternative, or even experiment with gluten-free cones, you have plenty of options to make it your own.
If you’re looking for a simple, delicious, and unique dessert that will impress everyone, keep reading. I’ll walk you through this easy-to-follow recipe step by step, share some tips, and even give suggestions on how to make these Peach Cobbler Cheesecake Cones even more special.
Ingredients and Preparation: What You’ll Need to Make Peach Cobbler Cheesecake Cones
Before we dive into the process, let’s take a quick look at the ingredients you’ll need for both the cheesecake filling and the peach compote. I’ll also offer some ideas for substitutions and variations, making sure you can tailor the recipe to suit your taste or dietary preferences.
For the Cheesecake Filling:
- 8 oz cream cheese, softened (low-fat options can be used)
- 1/3 cup powdered sugar or a sugar substitute (like stevia or erythritol)
- 1 egg
- 1 tsp vanilla extract
- 1/2 cup diced fresh peaches (fresh or canned, depending on availability)
For the Peach Compote:
- 2 cups diced peaches (again, fresh or canned)
- 1 tbsp lemon juice
- 2 tbsp brown sugar or sugar-free maple syrup (use whichever option aligns with your taste preferences)
- 1 tsp vanilla extract
- 1 tbsp cornstarch or arrowroot powder (this helps thicken the compote)
- 1 tsp cinnamon (adds that warm, cozy flavor)
For Assembly:
- 6 waffle cone bowls (these can be found in most grocery stores, but feel free to use traditional waffle cones if that’s your preference)
- 1 cup white chocolate chips or melting discs (this will be used for coating the cones)
- Garnishes like whipped cream and crushed graham crackers (optional, but highly recommended!)
Step-by-Step Instructions: Creating Your Peach Cobbler Cheesecake Cones
This recipe is a great starting point for beginner bakers. The steps are simple, and with a little patience, you’ll be able to create a dessert that looks and tastes like it came from a professional kitchen. Here’s how to do it:
- Prepare the Cheesecake Filling: Start by beating together the cream cheese and your sweetener (whether you’ve chosen powdered sugar or a sugar substitute). Continue to mix until the mixture is light, fluffy, and smooth. Next, add the egg and vanilla extract, blending until fully combined. Gently fold in the diced peaches—this adds a burst of fruity flavor and gives the cheesecake filling a beautiful texture. Once everything is combined, transfer the mixture to a piping bag or a ziplock bag with the tip cut off, and place it in the fridge to chill while you prepare the other components.
- Make the Peach Compote: In a medium saucepan, combine the diced peaches, lemon juice, brown sugar (or maple syrup), and vanilla extract. Heat over medium, stirring occasionally for 5-7 minutes until the peaches soften and release their juices. For a thicker compote, make a slurry by mixing the cornstarch with 2 tbsp of water, then whisk it into the simmering peach mixture. Let it cook for an additional 2-3 minutes until the compote has thickened. The result should be a luscious, sweet-tart sauce with soft, flavorful peach chunks. Set the compote aside to cool slightly.
- Prepare the Cone Bowls: The waffle cone bowls need to be coated with white chocolate to help seal them and prevent them from becoming soggy. Melt the white chocolate chips or discs according to the package instructions, usually in a microwave or a double boiler. Once melted, use a spoon to coat the inside of each cone bowl. Set the cones upright in a glass or cone holder to allow the white chocolate to set, which should take about 15-20 minutes.
- Assemble the Cones: Once the cones are ready and the cheesecake filling has chilled, it’s time to assemble the cones. Start by piping a layer of the cheesecake filling into the bottom of each cone, creating a nice base. Next, spoon or pipe a generous amount of the warm peach compote on top of the cheesecake layer. Then, pipe another layer of cheesecake filling to cover the compote completely. The layers create a lovely contrast, with the creamy cheesecake filling and the sweet peach compote.
- Finish and Garnish: For a final touch, drizzle any remaining melted white chocolate over the top of the cone for an extra layer of sweetness and shine. You can also add a dollop of whipped cream and sprinkle crushed graham crackers over the top for added texture and flavor. If you like, you can even garnish with a fresh peach slice for a pretty touch. Place the cones in the fridge for 30 minutes to allow the flavors to meld and set the filling.
- Serve and Enjoy: Serve your Peach Cobbler Cheesecake Cones chilled, and enjoy the sweet, creamy goodness of this delightful dessert. Each bite is a little piece of heaven—a perfect blend of fruitiness, richness, and spice.
Beginner Tips and Notes: Troubleshooting and Helpful Hints
While this recipe is relatively easy to follow, here are some tips and notes to help ensure success, even for beginner bakers:
- Overmixing the Cheesecake Filling: When mixing the cheesecake filling, be careful not to overmix, as this can lead to a dense texture. Once the ingredients are combined and the peaches are folded in, stop mixing.
- Consistency of the Peach Compote: If your peach compote isn’t thickening as expected, don’t worry. Just give it a little more time to simmer, and if needed, add more cornstarch slurry. If you want a smoother compote, you can puree the peaches slightly with a hand blender.
- Alternative Fruit Options: Don’t feel restricted to peaches! You can swap them out for other fruits like strawberries, raspberries, or even cherries, depending on your preferences or the season.
- Serving Tips: If you have leftovers, these cones can be stored in the fridge for up to two days. They’re best served within 24 hours, though, as the cones can become a little soggy over time.
Serving Suggestions: Making the Peach Cobbler Cheesecake Cones Even More Delicious
These Peach Cobbler Cheesecake Cones are indulgent on their own, but they pair well with a variety of other items to make the dessert even more festive. Consider these ideas:
- Serve the cones with a scoop of vanilla ice cream or a drizzle of caramel sauce for an extra touch of sweetness.
- Add a sprinkling of chopped nuts, such as toasted pecans or almonds, for a little crunch that complements the smooth cheesecake filling.
- If you’re hosting a larger gathering, these cones can be served alongside other Southern-inspired desserts like pecan pie, banana pudding, or peach cobbler.

Conclusion: Why These Peach Cobbler Cheesecake Cones Are a Must-Try
If you’re looking for a show-stopping dessert that’s as fun as it is delicious, Peach Cobbler Cheesecake Cones are the way to go. Not only do they combine two classic desserts into one irresistible treat, but they’re also perfect for beginners. With simple steps and easy-to-find ingredients, even novice bakers will feel confident in making these cones. The addition of fresh, juicy peaches and the creamy cheesecake filling makes each bite a flavor explosion, while the waffle cone adds a satisfying crunch.
These cones are versatile, too—you can adapt them to suit your dietary preferences, swap out fruits, or even make them as a gluten-free treat. Plus, they’re super portable, making them perfect for parties, picnics, or family gatherings. Whether you enjoy them on a hot summer day or as a sweet winter indulgence, Peach Cobbler Cheesecake Cones are bound to become your new favorite dessert.
Now that you have all the tools and tips to make these cones a reality, go ahead and give them a try! I’d love to hear how they turn out for you, and don’t forget to share your creations with your friends and family. The joy of cooking is all about having fun and trying new things, so get creative with your toppings and flavors.
I hope these Peach Cobbler Cheesecake Cones bring as much joy to your kitchen as they have to mine! Happy baking!


