On a scorching summer day, there’s nothing more refreshing than indulging in a cool, creamy dessert that offers a burst of citrusy goodness. As a child, I remember the thrill of running to the ice cream truck, eagerly awaiting the moment when I could take that first bite of a creamsicle—the perfect fusion of tangy orange and velvety vanilla ice cream. The flavors were an instant hit, and the nostalgia it brings remains unrivaled. Now, imagine being able to enjoy that same irresistible flavorsome experience in the form of a pie—a no-bake dessert that’s as easy to make as it is delicious. Introducing the Orange Jello Creamsicle Pie, a delightful combination of smooth orange cream filling, enveloped in a buttery cookie crust and topped with a luscious whipped cream topping. This dessert is a tribute to the classic creamsicle, offering all the refreshing citrusy flavors and a creamy texture, but with the added fun and simplicity of a pie. It’s the perfect treat for hot summer days, family gatherings, or any occasion that calls for a sweet and satisfying dessert.

Orange Jello Creamsicle Pie: A Refreshing Twist on a Classic Summer Treat

There’s something magical about the combination of tangy orange and creamy sweetness, like the nostalgic creamsicles we loved as kids. This Orange Jello Creamsicle Pie brings that same vibrant flavor to a no-bake pie, with a buttery cookie crust and a dreamy, fluffy filling. Perfect for hot summer days or any time you need a quick, refreshing dessert, this easy recipe is a crowd-pleaser for both beginners and experienced cooks alike.
- Prep Time: 30 minutes
- Cook Time: 0 minutes
- Total Time: 2 hours
- Yield: 8 slices 1x
- Category: Dessert
- Method: No-bake
- Cuisine: American
- Diet: Vegetarian
Ingredients
For the Crust:
- 3 cups shortbread cookies: These will create a buttery, crisp crust that perfectly complements the creamy filling. Shortbread cookies are ideal for this dessert because they’re simple, slightly sweet, and provide the perfect amount of crunch.
- ¼ cup butter (melted): Butter holds the cookie crumbs together, ensuring the crust stays firm and cohesive while adding a rich, buttery flavor.
For the Filling:
- 1 orange (peeled and sliced): The fresh orange provides the vibrant citrus flavor that is the hallmark of this creamsicle-inspired pie.
- 2 tablespoons orange zest: Zesting the orange adds a more intense orange flavor, enriching the overall taste of the filling.
- 1 teaspoon vanilla extract: Vanilla is the perfect complement to the tangy orange, adding depth and balance to the pie.
- ¼ cup orange juice: Fresh orange juice intensifies the citrus flavor and enhances the overall creaminess of the filling.
- 1 box of orange Jello (3-ounce): This ingredient gives the pie its signature orange flavor and provides a nice firm texture to the filling.
- 12 ounces cream cheese, softened and cubed (divided): Cream cheese brings a smooth, creamy texture to the filling and helps balance the sweetness of the other ingredients.
- 12 ounces Cool Whip (divided): Cool Whip adds a light, airy texture to the filling, making it fluffy and indulgent.
- 1 can sweetened condensed milk (14-ounce): This ingredient adds richness and sweetness to the filling, making it extra creamy and satisfying.
For the Garnish:
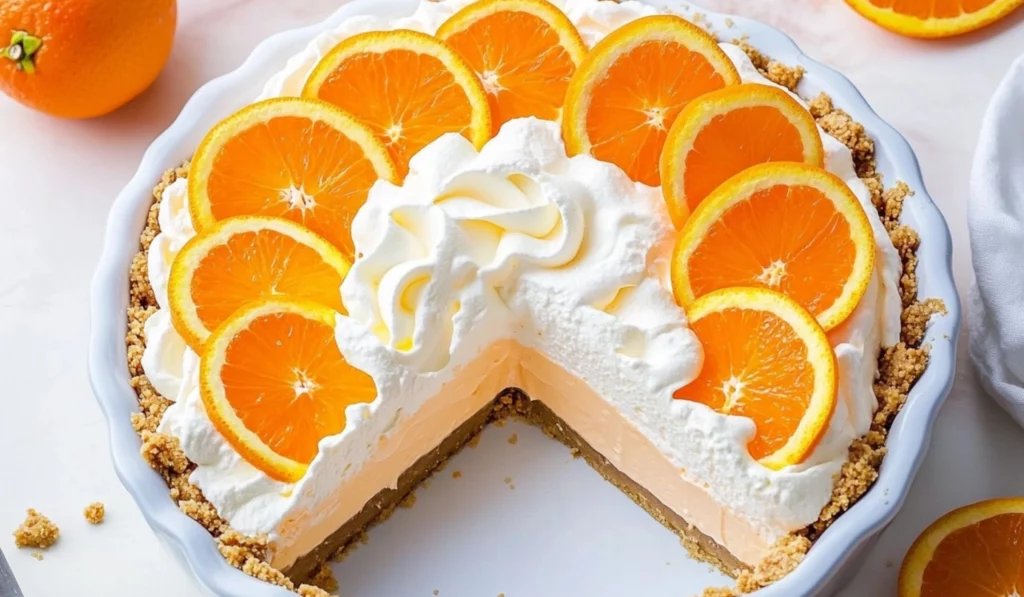
- Orange slices for garnish: Fresh orange slices provide a beautiful finishing touch and add an extra layer of citrus flavor to the pie.
Instructions
Step 1: Prepare the Crust
- Spray the pie dish: Begin by spraying a deep pie dish with non-stick cooking spray. This will ensure that the pie comes out of the dish easily after chilling.
- Pulse the cookies: In a food processor, pulse the shortbread cookies until they reach a sand-like consistency. If you don’t have a food processor, you can place the cookies in a ziplock bag and crush them with a rolling pin.
- Mix with melted butter: In a mixing bowl, combine the cookie crumbs with the melted butter. Stir until the mixture is evenly combined.
- Press into the pie dish: Press the cookie mixture into the bottom and up the sides of the pie dish. Use the back of a spoon to press down firmly, ensuring the crust is compact and holds together.
- Chill the crust: Place the crust in the freezer while you make the filling. This will allow it to firm up quickly.
Step 2: Create the Orange Flavor
- Rinse the food processor: After using it for the crust, rinse out the food processor before making the orange filling.
- Puree the orange mixture: Add the peeled and sliced orange, orange zest, vanilla extract, and orange juice to the food processor. Puree the mixture until it’s smooth and well-combined. Set it aside.
Step 3: Make the Filling Base
- Combine cream cheese and Jello mix: In a stand mixer (or large mixing bowl with a hand mixer), combine 8 ounces of cream cheese and the orange Jello mix. Beat until smooth and well-incorporated.
- Add sweetened condensed milk: Fold in the sweetened condensed milk to the mixture. This will create a creamy, rich base for the filling.
- Combine until smooth: Continue mixing until the filling is smooth and velvety.
Step 4: Make the Filling Fluffy
- Add Cool Whip: Fold in 8 ounces of Cool Whip, which will make the filling airy and light. Gently incorporate the Cool Whip to maintain the fluffiness of the mixture.
- Whip it to perfection: If you prefer an even fluffier filling, you can whip the Cool Whip and cream cheese mixture before folding them into the Jello base.
Step 5: Assemble the Pie
- Pour the filling into the crust: Carefully pour the filling into the pie crust, spreading it evenly with a rubber spatula. Smooth the top of the pie to ensure it’s level.
- Chill the pie: Place the pie in the fridge for a couple of hours for a soft-serve texture. For a firmer, frozen dessert, place it in the freezer for an hour.
Step 6: Make the Topping
- Whip the cream cheese and Cool Whip: In a separate bowl, whip the remaining cream cheese and Cool Whip until smooth and fluffy.
- Spread the topping: Once the pie has chilled, spread the whipped cream mixture over the top of the pie, covering it completely.
Step 7: Garnish and Serve
- Garnish with orange slices: Top the pie with fresh orange slices to add a burst of color and flavor.
- Serve and enjoy: Slice the pie and serve it to your friends and family. Enjoy the cool, creamy goodness of this delightful dessert!
Notes
- Crust Tip: When pressing the cookie crumbs into the pie dish, make sure the crust is packed firmly. If the crust is too loose, it may fall apart when you slice into the pie.
- Cream Cheese Tip: Make sure the cream cheese is softened before mixing it. Cold cream cheese can lead to a lumpy filling, so leave it out at room temperature for about 30 minutes.
- Jello Tip: When adding the Jello, be sure it dissolves completely to avoid any graininess in the filling.
- Chill Time: Don’t skimp on the chilling time. Letting the pie chill for at least two hours ensures that the filling sets properly and the flavors meld together.
Why This Recipe is Perfect for Beginners
One of the standout features of this recipe is its beginner-friendly nature. If you’ve ever felt intimidated by the thought of baking, don’t worry—this no-bake pie recipe will have you feeling like a kitchen pro in no time. There’s no need to worry about mastering complex baking techniques or dealing with difficult tools. All you need is a food processor, a stand mixer or hand mixer, and a few simple ingredients to create this pie. This dessert doesn’t require any fancy baking skills, making it ideal for beginners looking for an easy yet impressive treat. In addition to being simple, this recipe is also time-efficient. You won’t have to spend hours in the kitchen, and it requires only about 30 minutes of prep time and a couple of hours for chilling. What’s more, it’s a no-bake recipe—meaning you don’t have to worry about turning on the oven and heating up your kitchen, which is especially appreciated during the hot summer months. The vibrant flavors and creamy texture of this pie make it an irresistible choice for both beginners and experienced cooks alike. Another benefit of this recipe is its versatility. Whether you’re making it for a casual family dinner or bringing it to a potluck, this pie is sure to be a crowd-pleaser. It’s light yet satisfying, making it an ideal option for both children and adults who enjoy a sweet, fruity dessert. So, if you’re new to baking (or non-baking, in this case), you’ll find that this recipe is the perfect way to create a delicious treat without any stress or mess.
Ingredients and Preparation: Simple Ingredients, Big Flavor
Now that you know why this Orange Jello Creamsicle Pie is perfect for beginners, let’s take a look at the ingredients and preparation methods that make it so easy to whip up. The ingredient list is simple, requiring only a handful of pantry staples and a few fresh items that will bring the flavors of summer to life.
For the Crust:
- 3 cups shortbread cookies: These will create a buttery, crisp crust that perfectly complements the creamy filling. Shortbread cookies are ideal for this dessert because they’re simple, slightly sweet, and provide the perfect amount of crunch.
- ¼ cup butter (melted): Butter holds the cookie crumbs together, ensuring the crust stays firm and cohesive while adding a rich, buttery flavor.
For the Filling:
- 1 orange (peeled and sliced): The fresh orange provides the vibrant citrus flavor that is the hallmark of this creamsicle-inspired pie.
- 2 tablespoons orange zest: Zesting the orange adds a more intense orange flavor, enriching the overall taste of the filling.
- 1 teaspoon vanilla extract: Vanilla is the perfect complement to the tangy orange, adding depth and balance to the pie.
- ¼ cup orange juice: Fresh orange juice intensifies the citrus flavor and enhances the overall creaminess of the filling.
- 1 box of orange Jello (3-ounce): This ingredient gives the pie its signature orange flavor and provides a nice firm texture to the filling.
- 12 ounces cream cheese, softened and cubed (divided): Cream cheese brings a smooth, creamy texture to the filling and helps balance the sweetness of the other ingredients.
- 12 ounces Cool Whip (divided): Cool Whip adds a light, airy texture to the filling, making it fluffy and indulgent.
- 1 can sweetened condensed milk (14-ounce): This ingredient adds richness and sweetness to the filling, making it extra creamy and satisfying.
For the Garnish:
- Orange slices for garnish: Fresh orange slices provide a beautiful finishing touch and add an extra layer of citrus flavor to the pie.
Alternative Ingredient Suggestions:
- For the crust: If you don’t have shortbread cookies on hand, you can substitute them with graham crackers or vanilla wafer cookies. Both options will give the pie a slightly different flavor but will still provide the desired crunch.
- For a dairy-free version: Swap out the cream cheese and Cool Whip for non-dairy alternatives such as coconut cream cheese and whipped coconut cream. You can also replace the sweetened condensed milk with a dairy-free milk option, such as almond or coconut milk. However, note that the consistency of the filling may vary slightly depending on the substitutes used.
- For extra flavor: If you love citrus flavors, try adding a tablespoon of lime zest or a bit of lemon juice in addition to the orange zest and juice for a more complex, tangy filling.
Step-by-Step Instructions: A Beginner’s Guide to Assembling the Pie
With the ingredients prepared, let’s move on to the fun part: assembling the pie! As a beginner, you’ll find this process to be straightforward, with each step clearly outlined to ensure success.
Step 1: Prepare the Crust
- Spray the pie dish: Begin by spraying a deep pie dish with non-stick cooking spray. This will ensure that the pie comes out of the dish easily after chilling.
- Pulse the cookies: In a food processor, pulse the shortbread cookies until they reach a sand-like consistency. If you don’t have a food processor, you can place the cookies in a ziplock bag and crush them with a rolling pin.
- Mix with melted butter: In a mixing bowl, combine the cookie crumbs with the melted butter. Stir until the mixture is evenly combined.
- Press into the pie dish: Press the cookie mixture into the bottom and up the sides of the pie dish. Use the back of a spoon to press down firmly, ensuring the crust is compact and holds together.
- Chill the crust: Place the crust in the freezer while you make the filling. This will allow it to firm up quickly.
Step 2: Create the Orange Flavor
- Rinse the food processor: After using it for the crust, rinse out the food processor before making the orange filling.
- Puree the orange mixture: Add the peeled and sliced orange, orange zest, vanilla extract, and orange juice to the food processor. Puree the mixture until it’s smooth and well-combined. Set it aside.
Step 3: Make the Filling Base
- Combine cream cheese and Jello mix: In a stand mixer (or large mixing bowl with a hand mixer), combine 8 ounces of cream cheese and the orange Jello mix. Beat until smooth and well-incorporated.
- Add sweetened condensed milk: Fold in the sweetened condensed milk to the mixture. This will create a creamy, rich base for the filling.
- Combine until smooth: Continue mixing until the filling is smooth and velvety.
Step 4: Make the Filling Fluffy
- Add Cool Whip: Fold in 8 ounces of Cool Whip, which will make the filling airy and light. Gently incorporate the Cool Whip to maintain the fluffiness of the mixture.
- Whip it to perfection: If you prefer an even fluffier filling, you can whip the Cool Whip and cream cheese mixture before folding them into the Jello base.
Step 5: Assemble the Pie
- Pour the filling into the crust: Carefully pour the filling into the pie crust, spreading it evenly with a rubber spatula. Smooth the top of the pie to ensure it’s level.
- Chill the pie: Place the pie in the fridge for a couple of hours for a soft-serve texture. For a firmer, frozen dessert, place it in the freezer for an hour.
Step 6: Make the Topping
- Whip the cream cheese and Cool Whip: In a separate bowl, whip the remaining cream cheese and Cool Whip until smooth and fluffy.
- Spread the topping: Once the pie has chilled, spread the whipped cream mixture over the top of the pie, covering it completely.
Step 7: Garnish and Serve
- Garnish with orange slices: Top the pie with fresh orange slices to add a burst of color and flavor.
- Serve and enjoy: Slice the pie and serve it to your friends and family. Enjoy the cool, creamy goodness of this delightful dessert!
Beginner Tips and Notes: Troubleshooting and Helpful Tips
If you’re a beginner in the kitchen, here are a few tips to make sure your Orange Jello Creamsicle Pie turns out perfectly:
- Crust Tip: When pressing the cookie crumbs into the pie dish, make sure the crust is packed firmly. If the crust is too loose, it may fall apart when you slice into the pie.
- Cream Cheese Tip: Make sure the cream cheese is softened before mixing it. Cold cream cheese can lead to a lumpy filling, so leave it out at room temperature for about 30 minutes.
- Jello Tip: When adding the Jello, be sure it dissolves completely to avoid any graininess in the filling.
- Chill Time: Don’t skimp on the chilling time. Letting the pie chill for at least two hours ensures that the filling sets properly and the flavors meld together.
Serving Suggestions: Perfect Pairings for Your Pie
While this Orange Jello Creamsicle Pie is delicious on its own, you can also elevate it with some fun serving suggestions:
- Fresh fruit: Serve the pie with a side of fresh berries, such as strawberries, blueberries, or raspberries. The slight tartness of the berries pairs well with the sweetness of the pie.
- Citrus drizzle: Add a drizzle of extra orange sauce or caramel syrup on top of each slice for added flavor.
- Iced beverages: Pair this pie with refreshing iced tea, lemonade, or citrusy cocktails to complete the summer vibe.

Conclusion: A Simple Yet Delicious Dessert for Everyone
In conclusion, the Orange Jello Creamsicle Pie is an easy, no-bake dessert that captures the essence of summer in every bite. Whether you’re new to cooking or just looking for a quick treat, this recipe is a winner. The combination of creamy filling, zesty citrus, and buttery crust makes this pie a delightful addition to any occasion. The best part? You don’t have to spend hours in the kitchen to enjoy a dessert that looks and tastes like a professional creation. So go ahead—try it out, and let this refreshing pie become a staple in your summer dessert rotation!


