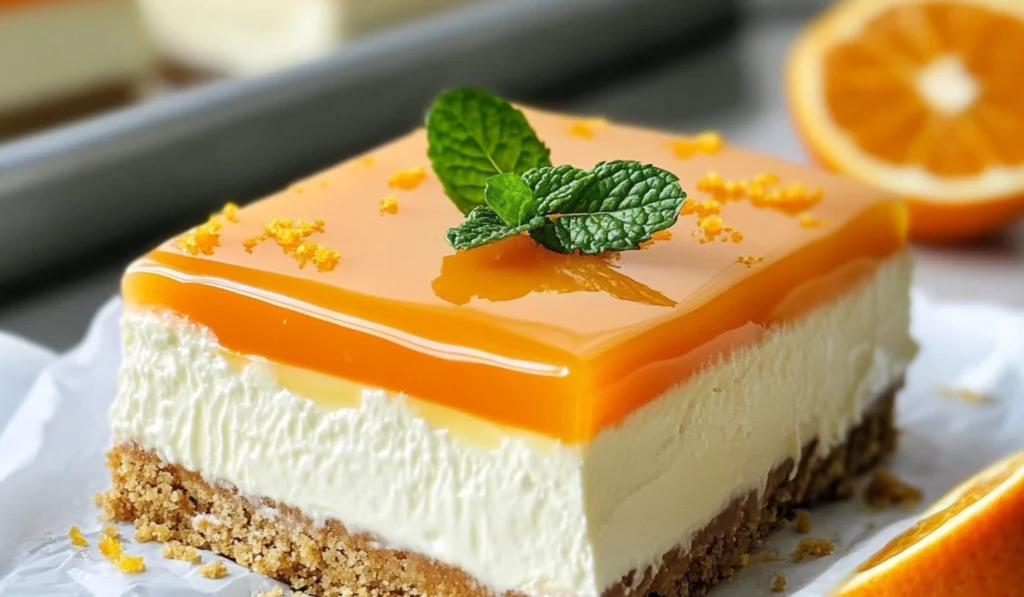
If you’ve ever enjoyed a classic creamsicle on a warm summer day, you know the feeling of taking that first bite of cool, citrusy sweetness that instantly brings a smile to your face. Now, what if I told you that you could transform that nostalgic treat into a decadent, creamy dessert without turning on the oven? Enter Orange Creamsicle Cheesecake Bars—your new go-to summer dessert. With a luscious cheesecake filling, a buttery graham cracker crust, and a tangy homemade orange curd topping, these bars are an absolute showstopper. Whether you’re hosting a summer barbecue, celebrating a birthday, or simply craving a refreshing treat, these bars offer the perfect balance of flavors. The citrusy orange flavor combined with the creamy, velvety texture of the cheesecake is simply irresistible. And the best part? It’s a no-bake dessert, making it perfect for beginners who are looking to impress without a lot of effort.

Orange Creamsicle Cheesecake Bars: A Sweet and Refreshing Summer Dessert

Orange Creamsicle Cheesecake Bars are the perfect summer treat for anyone who loves the refreshing flavors of a creamsicle. With a simple no-bake recipe, they combine a crunchy graham cracker crust, creamy cheesecake filling, and tangy orange curd. Quick and easy to make, these bars are ideal for beginners and sure to be a crowd-pleaser!
- Prep Time: 30 minutes
- Cook Time: 0 minutes
- Total Time: 30 minutes
- Yield: 12–16 bars 1x
- Category: Dessert
- Method: No-bake
- Cuisine: American
- Diet: Vegetarian
Ingredients
Graham Cracker Crust:
- 1 3/4 cups finely crushed graham crackers
- 2 Tablespoons light brown sugar
- 6 Tablespoons melted butter
Orange Cheesecake Filling:
- 3 oz. sweetened orange-flavored gelatin (like Jell-o)
- 1/2 cup boiling water
- 1/2 cup iced water
- 8 oz. cream cheese, softened
- 1/4 cup sugar
- 1 (14 oz.) can sweetened condensed milk
- 1/4 cup freshly squeezed orange juice
- 1 1/2 cup whipped cream (such as Cool Whip or homemade whipped cream)
- Orange food coloring (optional)
Orange Curd:
- 3 Tablespoons butter
- 1/3 cup freshly squeezed orange juice
- 1 1/2 teaspoon orange zest
- 1/3 cup sugar
- 1 egg and 1 egg yolk, lightly whisked with a fork
- Orange food coloring (optional)
For Serving:
- Whipped cream
- Orange wedges
- Mint leaves (optional, for garnish)
Instructions
Step 1: Prepare the Graham Cracker Crust
Start by lining a 9×9-inch baking pan with aluminum foil or plastic wrap, leaving an overhang on the sides for easy removal. Lightly grease the foil or wrap with cooking spray. This step is essential because it ensures you can easily lift the cheesecake bars from the pan once they’ve set. In a medium bowl, combine the finely crushed graham crackers and the light brown sugar. Pour in the melted butter and mix everything together until the crumbs are evenly moistened. Press the mixture firmly into the bottom of the prepared pan, ensuring the crust is packed tightly for a stable base. Once the crust is in place, transfer the pan to the fridge to chill while you prepare the cheesecake filling.
Step 2: Make the Orange Cheesecake Filling
To prepare the cheesecake filling, begin by dissolving the orange-flavored gelatin in 1/2 cup of boiling water. Stir the mixture for about two minutes, or until the gelatin is completely dissolved. Add the iced water to the mixture, stirring well, and set it aside to cool. In a separate bowl, beat the softened cream cheese and sugar together until smooth and creamy. Gradually add the sweetened condensed milk and mix well. Then, pour in the freshly squeezed orange juice and continue to mix until the filling is smooth and well-combined. Next, stir the cooled gelatin mixture into the cream cheese mixture until it’s fully incorporated. If you want to intensify the orange color, add a few drops of orange food coloring and mix it in. Finally, fold in the whipped cream, gently stirring until the mixture is light and airy. Once the filling is ready, pour it over the chilled graham cracker crust and spread it evenly with a spatula. Smooth the top and place the pan in the refrigerator for a few hours, or overnight, until the cheesecake is set and firm.
Step 3: Make the Orange Curd
In a small saucepan, melt the butter over medium heat. Once melted, remove the pan from the heat and whisk in the sugar, orange zest, and freshly squeezed orange juice. Whisk until the sugar dissolves and the mixture is smooth. Add the lightly whisked egg and egg yolk to the saucepan and stir well. Return the pan to the heat and cook the mixture over medium heat, stirring constantly. Keep an eye on it as it thickens, which should take about 5 minutes. You’ll know it’s ready when the curd coats the back of a spoon. Remove the curd from the heat and stir in a few drops of orange food coloring if desired. Transfer the curd to a bowl, cover it with plastic wrap, and let it cool to room temperature. Once the cheesecake is set, spread the orange curd evenly on top of the cheesecake layer.
Step 4: Assemble and Serve
After the cheesecake has set, carefully lift it from the pan using the overhanging foil or plastic wrap. Transfer it to a cutting board and spread the cooled orange curd over the top of the cheesecake layer. For a polished finish, garnish the bars with whipped cream, fresh mint leaves, and orange wedges. Slice the bars into squares or rectangles and serve them chilled for a refreshing, sweet treat.
Notes
- Gelatin Tip: When working with gelatin, always let it cool slightly before adding it to the filling. If the gelatin is too hot, it may cause the cream cheese to melt or curdle.
- Curd Troubleshooting: If the orange curd doesn’t thicken as expected, you can try cooking it a bit longer or adding a teaspoon of cornstarch mixed with water to help it set. Be sure to stir constantly while cooking to prevent the eggs from scrambling.
- Whipped Cream: If you prefer to make homemade whipped cream, simply beat chilled heavy cream with sugar and a splash of vanilla extract until stiff peaks form. If you’re short on time, store-bought whipped cream works just as well.
- Make-Ahead Tip: This dessert can be made a day in advance, making it a great option for gatherings or special occasions. Just keep it stored in the refrigerator until ready to serve.
Why This Recipe is Perfect for Beginners
Making cheesecakes can sometimes seem intimidating, especially when you’re a beginner in the kitchen. With the multiple steps, ingredients, and techniques often involved, it can feel like a big project. But this recipe is different. With only a few simple ingredients and a no-bake method, you’ll be able to whip up these Orange Creamsicle Cheesecake Bars without breaking a sweat. You don’t need to worry about complicated baking techniques or hours of preparation—this recipe is all about simplicity. One of the best things about this recipe is that it’s adaptable. You can make it as simple or as fancy as you like, and you can play around with ingredients based on what you have available. Plus, the cooling time is all you need for the cheesecake to set, which means you can have these ready in just a few hours. If you’re new to making desserts or just want a no-fuss treat, this recipe is a perfect choice. The combination of sweet, tangy, and creamy in these bars makes them a crowd favorite. Whether you serve them at a dinner party, a picnic, or just for a family treat, they’re sure to be a hit. Plus, with the added bonus of the homemade orange curd topping, you’ll feel like a pro in the kitchen!
Ingredients and Preparation
To bring these refreshing Orange Creamsicle Cheesecake Bars to life, here’s everything you’ll need:
Graham Cracker Crust:
- 1 3/4 cups finely crushed graham crackers
- 2 Tablespoons light brown sugar
- 6 Tablespoons melted butter
Orange Cheesecake Filling:
- 3 oz. sweetened orange-flavored gelatin (like Jell-o)
- 1/2 cup boiling water
- 1/2 cup iced water
- 8 oz. cream cheese, softened
- 1/4 cup sugar
- 1 (14 oz.) can sweetened condensed milk
- 1/4 cup freshly squeezed orange juice
- 1 1/2 cup whipped cream (such as Cool Whip or homemade whipped cream)
- Orange food coloring (optional)
Orange Curd:
- 3 Tablespoons butter
- 1/3 cup freshly squeezed orange juice
- 1 1/2 teaspoon orange zest
- 1/3 cup sugar
- 1 egg and 1 egg yolk, lightly whisked with a fork
- Orange food coloring (optional)
For Serving:
- Whipped cream
- Orange wedges
- Mint leaves (optional, for garnish)
Alternative Ingredient Suggestions:
- Graham Cracker Crust: You can swap graham crackers for crushed digestive biscuits or vanilla wafer cookies. If you prefer a gluten-free option, use gluten-free graham crackers or another cookie alternative.
- Whipped Cream: If you want to keep the recipe dairy-free, consider using a dairy-free whipped topping or make your own coconut whipped cream.
- Orange Curd: If you don’t want to make the orange curd from scratch, you can substitute it with store-bought orange marmalade for a quicker option.
Step-by-Step Instructions
Step 1: Prepare the Graham Cracker Crust
Start by lining a 9×9-inch baking pan with aluminum foil or plastic wrap, leaving an overhang on the sides for easy removal. Lightly grease the foil or wrap with cooking spray. This step is essential because it ensures you can easily lift the cheesecake bars from the pan once they’ve set. In a medium bowl, combine the finely crushed graham crackers and the light brown sugar. Pour in the melted butter and mix everything together until the crumbs are evenly moistened. Press the mixture firmly into the bottom of the prepared pan, ensuring the crust is packed tightly for a stable base. Once the crust is in place, transfer the pan to the fridge to chill while you prepare the cheesecake filling.
Step 2: Make the Orange Cheesecake Filling
To prepare the cheesecake filling, begin by dissolving the orange-flavored gelatin in 1/2 cup of boiling water. Stir the mixture for about two minutes, or until the gelatin is completely dissolved. Add the iced water to the mixture, stirring well, and set it aside to cool. In a separate bowl, beat the softened cream cheese and sugar together until smooth and creamy. Gradually add the sweetened condensed milk and mix well. Then, pour in the freshly squeezed orange juice and continue to mix until the filling is smooth and well-combined. Next, stir the cooled gelatin mixture into the cream cheese mixture until it’s fully incorporated. If you want to intensify the orange color, add a few drops of orange food coloring and mix it in. Finally, fold in the whipped cream, gently stirring until the mixture is light and airy. Once the filling is ready, pour it over the chilled graham cracker crust and spread it evenly with a spatula. Smooth the top and place the pan in the refrigerator for a few hours, or overnight, until the cheesecake is set and firm.
Step 3: Make the Orange Curd
In a small saucepan, melt the butter over medium heat. Once melted, remove the pan from the heat and whisk in the sugar, orange zest, and freshly squeezed orange juice. Whisk until the sugar dissolves and the mixture is smooth. Add the lightly whisked egg and egg yolk to the saucepan and stir well. Return the pan to the heat and cook the mixture over medium heat, stirring constantly. Keep an eye on it as it thickens, which should take about 5 minutes. You’ll know it’s ready when the curd coats the back of a spoon. Remove the curd from the heat and stir in a few drops of orange food coloring if desired. Transfer the curd to a bowl, cover it with plastic wrap, and let it cool to room temperature. Once the cheesecake is set, spread the orange curd evenly on top of the cheesecake layer.
Step 4: Assemble and Serve
After the cheesecake has set, carefully lift it from the pan using the overhanging foil or plastic wrap. Transfer it to a cutting board and spread the cooled orange curd over the top of the cheesecake layer. For a polished finish, garnish the bars with whipped cream, fresh mint leaves, and orange wedges. Slice the bars into squares or rectangles and serve them chilled for a refreshing, sweet treat.
Beginner Tips and Notes
- Gelatin Tip: When working with gelatin, always let it cool slightly before adding it to the filling. If the gelatin is too hot, it may cause the cream cheese to melt or curdle.
- Curd Troubleshooting: If the orange curd doesn’t thicken as expected, you can try cooking it a bit longer or adding a teaspoon of cornstarch mixed with water to help it set. Be sure to stir constantly while cooking to prevent the eggs from scrambling.
- Whipped Cream: If you prefer to make homemade whipped cream, simply beat chilled heavy cream with sugar and a splash of vanilla extract until stiff peaks form. If you’re short on time, store-bought whipped cream works just as well.
- Make-Ahead Tip: This dessert can be made a day in advance, making it a great option for gatherings or special occasions. Just keep it stored in the refrigerator until ready to serve.
Serving Suggestions
These Orange Creamsicle Cheesecake Bars are a treat on their own, but you can enhance the experience with a few complementary sides or toppings. Fresh fruit, such as sliced strawberries, raspberries, or even additional orange segments, pairs beautifully with the bars. For a richer finish, drizzle a bit of melted chocolate or sprinkle toasted coconut on top. If you have any leftovers, store them in an airtight container in the refrigerator. These bars will stay fresh for up to 4 days. You can also freeze them for longer storage—just wrap the bars tightly in plastic wrap and foil before placing them in the freezer. When you’re ready to serve, thaw them in the fridge for a few hours.

Conclusion
Orange Creamsicle Cheesecake Bars are the ultimate no-bake dessert, offering the perfect blend of tangy orange flavor and creamy cheesecake goodness. They’re easy to make, require no special baking skills, and are the perfect treat to bring to summer gatherings, picnics, or just to enjoy with family. The graham cracker crust, orange-flavored cheesecake filling, and homemade orange curd topping make for a delightful combination of textures and flavors that will leave everyone asking for the recipe. Whether you’re a beginner in the kitchen or a seasoned cook, this recipe is sure to impress. The best part is that you can enjoy the process of making this dessert without any stress or worry. With a little patience and a few simple steps, you’ll have a dessert that’s as impressive as it is delicious. Give it a try and let me know how it turns out—I’d love to hear about your experience and any fun twists you added to the recipe!


