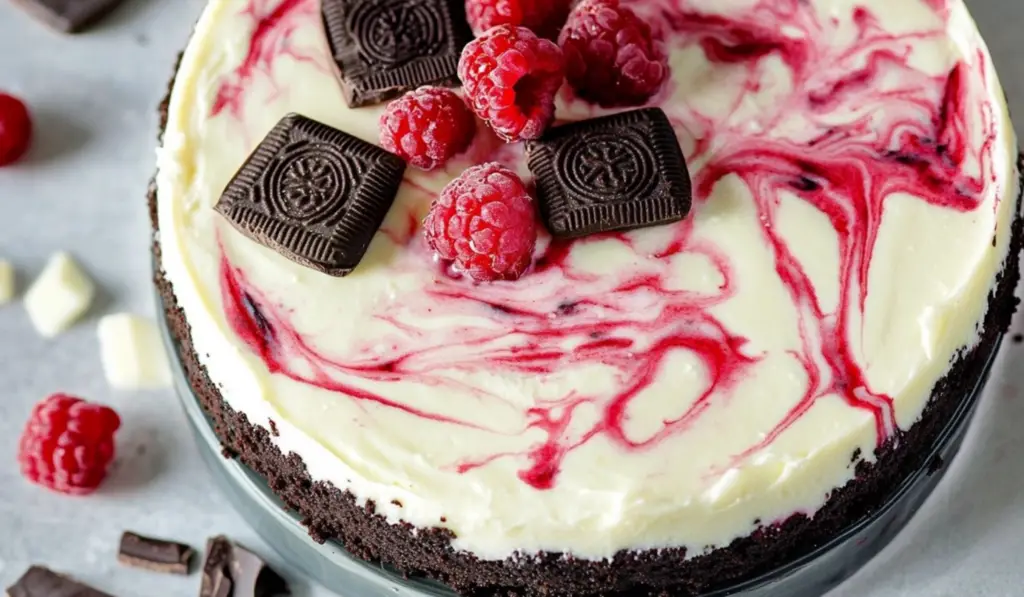
There’s something incredibly special about no-bake cheesecakes. They’re simple to make, rich in flavor, and they require no oven time. This No Bake White Chocolate Raspberry Cheesecake takes that concept to the next level, offering a silky smooth, creamy texture, a tangy swirl of raspberry, and the indulgent sweetness of white chocolate. Whether you’re celebrating a special occasion, hosting a party, or just craving something sweet, this cheesecake is guaranteed to impress.

No Bake White Chocolate Raspberry Cheesecake: A Creamy, Irresistible Delight
There’s something incredibly special about no-bake cheesecakes. They’re simple to make, rich in flavor, and they require no oven time. This No Bake White Chocolate Raspberry Cheesecake takes that concept to the next level, offering a silky smooth, creamy texture, a tangy swirl of raspberry, and the indulgent sweetness of white chocolate. Whether you’re celebrating a special occasion, hosting a party, or just craving something sweet, this cheesecake is guaranteed to impress.
- Prep Time: 25 minutes
- Cook Time: 0 minutes
- Total Time: 25 minutes (not including chilling time)
- Yield: 10–12 servings 1x
- Category: Dessert
- Method: No-bake
- Cuisine: American
- Diet: Vegetarian
Ingredients
For the Crust:
- 2 ½ cups Oreo cookie crumbs (about 26 Oreo cookies)
- 6 tablespoons unsalted butter, melted
For the White Chocolate Cheesecake Filling:
- 16 oz cream cheese, softened
- 1 cup powdered sugar
- 2 cups heavy whipping cream
- 1 teaspoon vanilla extract
- 10 ounces white chocolate, chopped
- 1 ½ cup raspberries
For the Raspberry Swirl:
- ½ cup raspberries
- 2 tablespoons granulated sugar
For Garnish (Optional):
- White chocolate curls
Instructions
1. Prepare the Crust: Start by making the crust for the cheesecake. The crust is made from crushed Oreo cookies, which adds a delightful contrast to the creamy filling. First, finely crush the Oreo cookies in a food processor. If you don’t have a food processor, you can simply place the cookies in a zip-lock bag and crush them using a rolling pin. The goal is to get them into fine crumbs that will hold together when pressed into the pan.
Once the cookies are crushed, transfer the crumbs into a bowl and pour in the melted unsalted butter. Stir until the crumbs are well-coated with the butter, and the mixture is moist and clumps together when pressed. Next, lightly grease the edges of a 9-inch springform pan with cooking spray. This ensures that the cheesecake will come off the pan easily once it’s set.
Press the crumb mixture firmly onto the bottom of the prepared pan. Be sure to create an even layer, pressing it down with the back of a spoon or your fingers. After the crust is evenly pressed, place the pan in the freezer while you make the raspberry swirl and the cheesecake filling. Chilling the crust helps it firm up and ensures that it won’t crumble when you slice the cheesecake later.
2. Make the Raspberry Swirl: The raspberry swirl is the key to this cheesecake’s signature flavor. It’s not only delicious but also adds a burst of color and a marbled effect that makes the cheesecake look visually stunning. To make the swirl, add the fresh raspberries and granulated sugar to a food processor. Pulse the mixture until it’s smooth and well pureed, which should take about 30 seconds.
Once the raspberries are pureed, press the mixture through a fine-mesh strainer to remove the seeds. This step ensures that the raspberry swirl is smooth and seed-free. Discard the seeds and set aside the raspberry sauce for later use. This raspberry swirl will be added to the cheesecake filling to create a beautiful and delicious marbled effect.
3. Make the White Chocolate Cheesecake Filling: The filling is the star of this no-bake cheesecake. White chocolate gives it a rich and creamy texture, while the cream cheese and whipped cream add lightness and structure. Begin by melting the white chocolate. Chop it into small pieces to help it melt evenly, and then place it in a heatproof bowl. You can melt the chocolate using a double boiler or in the microwave. If using the microwave, heat it in short bursts, stirring between each burst to prevent overheating. Set the melted white chocolate aside to cool slightly.
In a medium mixing bowl, beat the softened cream cheese and powdered sugar together until smooth and creamy. It’s important to use room temperature cream cheese to avoid lumps in the filling. You can use an electric mixer or a hand whisk to achieve the smooth texture. Once the cream cheese and sugar are well combined, set it aside.
In a separate bowl, whip the heavy whipping cream until soft peaks form. Then add the vanilla extract and continue to whip until stiff peaks form. The stiff peaks indicate that the whipped cream is ready and will help give the cheesecake filling a light, airy texture.
Now, gently fold the whipped cream into the cream cheese mixture on low speed. Be careful not to overmix, as you want to keep the light and fluffy texture of the whipped cream intact. Once combined, add the melted white chocolate to the mixture and continue to mix on low speed until everything is well incorporated. The white chocolate should melt seamlessly into the mixture, adding richness and a beautiful, smooth consistency to the filling.
4. Assemble the Cheesecake: With the crust chilled and ready, it’s time to assemble the cheesecake. First, sprinkle the fresh raspberries evenly over the top of the crust. This will give the cheesecake a natural burst of fruit and enhance the raspberry flavor throughout the dessert. Be sure to distribute the raspberries evenly to ensure each bite has a balanced amount of fruit.
Carefully spoon the white chocolate cheesecake filling over the raspberries, spreading it out into an even layer. The filling should be smooth and creamy, and it will settle around the raspberries as you spread it. Once the filling is evenly distributed, take the reserved raspberry swirl and spoon a few teaspoons onto the top of the cheesecake.
Use a skewer, knife, or toothpick to swirl the raspberry sauce into the cheesecake. This creates the marbled effect that not only looks stunning but also ensures that each bite will have a hint of raspberry flavor alongside the creamy white chocolate. You can create a simple swirl pattern or get creative with more intricate designs, depending on your preferences.
5. Chill the Cheesecake: Once the cheesecake is assembled, it’s time to chill it. Refrigerate the cheesecake for at least 6 hours to allow it to set. If possible, leave it overnight to ensure that the filling has fully firmed up and the flavors have melded together. The chilling process is crucial for the cheesecake to hold its shape when sliced.
If you’re in a rush, you can speed up the process by placing the cheesecake in the freezer for 2-3 hours, though this may slightly alter the texture.
6. Remove from Springform Pan: After the cheesecake has set, it’s time to remove it from the springform pan. Run a thin knife around the edges of the pan to loosen the cheesecake. Then, carefully remove the sides of the springform pan, revealing the beautifully set cheesecake.
7. Garnish and Serve: For the final touch, you can garnish the cheesecake with white chocolate curls. To make white chocolate curls, use a vegetable peeler to shave thin pieces from a block of white chocolate. This adds a decorative touch to the top of the cheesecake and enhances the white chocolate flavor. You can also drizzle the remaining raspberry sauce over the top or serve with extra fresh raspberries for added flavor and color.
Slice the cheesecake into wedges, and enjoy the creamy, indulgent dessert with friends and family. It’s best served chilled and pairs wonderfully with a cup of coffee or a glass of dessert wine.
Notes
- Substituting the Berries: If raspberries aren’t available, you can easily swap them with other berries like blackberries, strawberries, or blueberries. Each fruit brings its own flavor profile to the cheesecake, and they all pair wonderfully with white chocolate.
- Make-Ahead Tips: This no-bake cheesecake can be made ahead of time, making it perfect for dinner parties or holiday gatherings. You can store it in the refrigerator for up to 3 days before serving.
- Adding a Crunch: If you’d like to add a bit of texture to the cheesecake, consider sprinkling crushed graham crackers, chopped nuts, or even white chocolate chips into the cheesecake filling before setting it in the fridge.
- Non-Dairy Option: For a non-dairy version, you can substitute the heavy cream with coconut cream and the cream cheese with a dairy-free alternative. Make sure to check for vegan white chocolate if you want to keep it plant-based.
- Extra Sweetness: If you prefer your cheesecake to be sweeter, you can add a little extra powdered sugar to the filling. Just be mindful not to over-sweeten, as the raspberry sauce provides a tangy contrast to the sweet filling.
The contrast of flavors between the sweet, creamy filling and the tart, fresh raspberry swirl makes every bite a delightful experience. The Oreo cookie crust adds a satisfying crunch, and the white chocolate gives the cheesecake a rich, luxurious depth of flavor. The best part? You don’t have to spend hours baking and waiting for the cheesecake to set in the oven. With a few simple steps and a bit of time in the fridge, you can have a beautiful, decadent dessert that’s ready to enjoy. Whether you’re a seasoned baker or a beginner, this recipe is approachable, easy to follow, and guarantees mouthwatering results.
What makes this cheesecake especially appealing is its versatility. The raspberry swirl is not just an added flavor, but a visual masterpiece that creates a stunning marbled effect. Each slice reveals the layers of white chocolate goodness, punctuated by the vibrant red of the raspberry sauce. The result is a cheesecake that’s as beautiful to look at as it is to eat. And the fact that it’s no-bake means you don’t have to worry about the intricacies of baking a traditional cheesecake—this one can be made with minimal effort but still tastes like something from a professional bakery.
If you love creamy, indulgent desserts that balance sweetness with a touch of tartness, this No Bake White Chocolate Raspberry Cheesecake is the perfect treat to make. It’s guaranteed to be a hit at your next gathering or just as a special indulgence for yourself and your family.
Ingredients
For the Crust:
- 2 ½ cups Oreo cookie crumbs (about 26 Oreo cookies)
- 6 tablespoons unsalted butter, melted
For the White Chocolate Cheesecake Filling:
- 16 oz cream cheese, softened
- 1 cup powdered sugar
- 2 cups heavy whipping cream
- 1 teaspoon vanilla extract
- 10 ounces white chocolate, chopped
- 1 ½ cup raspberries
For the Raspberry Swirl:
- ½ cup raspberries
- 2 tablespoons granulated sugar
For Garnish (Optional):
- White chocolate curls
Instructions
1. Prepare the Crust: Start by making the crust for the cheesecake. The crust is made from crushed Oreo cookies, which adds a delightful contrast to the creamy filling. First, finely crush the Oreo cookies in a food processor. If you don’t have a food processor, you can simply place the cookies in a zip-lock bag and crush them using a rolling pin. The goal is to get them into fine crumbs that will hold together when pressed into the pan.
Once the cookies are crushed, transfer the crumbs into a bowl and pour in the melted unsalted butter. Stir until the crumbs are well-coated with the butter, and the mixture is moist and clumps together when pressed. Next, lightly grease the edges of a 9-inch springform pan with cooking spray. This ensures that the cheesecake will come off the pan easily once it’s set.
Press the crumb mixture firmly onto the bottom of the prepared pan. Be sure to create an even layer, pressing it down with the back of a spoon or your fingers. After the crust is evenly pressed, place the pan in the freezer while you make the raspberry swirl and the cheesecake filling. Chilling the crust helps it firm up and ensures that it won’t crumble when you slice the cheesecake later.
2. Make the Raspberry Swirl: The raspberry swirl is the key to this cheesecake’s signature flavor. It’s not only delicious but also adds a burst of color and a marbled effect that makes the cheesecake look visually stunning. To make the swirl, add the fresh raspberries and granulated sugar to a food processor. Pulse the mixture until it’s smooth and well pureed, which should take about 30 seconds.
Once the raspberries are pureed, press the mixture through a fine-mesh strainer to remove the seeds. This step ensures that the raspberry swirl is smooth and seed-free. Discard the seeds and set aside the raspberry sauce for later use. This raspberry swirl will be added to the cheesecake filling to create a beautiful and delicious marbled effect.
3. Make the White Chocolate Cheesecake Filling: The filling is the star of this no-bake cheesecake. White chocolate gives it a rich and creamy texture, while the cream cheese and whipped cream add lightness and structure. Begin by melting the white chocolate. Chop it into small pieces to help it melt evenly, and then place it in a heatproof bowl. You can melt the chocolate using a double boiler or in the microwave. If using the microwave, heat it in short bursts, stirring between each burst to prevent overheating. Set the melted white chocolate aside to cool slightly.
In a medium mixing bowl, beat the softened cream cheese and powdered sugar together until smooth and creamy. It’s important to use room temperature cream cheese to avoid lumps in the filling. You can use an electric mixer or a hand whisk to achieve the smooth texture. Once the cream cheese and sugar are well combined, set it aside.
In a separate bowl, whip the heavy whipping cream until soft peaks form. Then add the vanilla extract and continue to whip until stiff peaks form. The stiff peaks indicate that the whipped cream is ready and will help give the cheesecake filling a light, airy texture.
Now, gently fold the whipped cream into the cream cheese mixture on low speed. Be careful not to overmix, as you want to keep the light and fluffy texture of the whipped cream intact. Once combined, add the melted white chocolate to the mixture and continue to mix on low speed until everything is well incorporated. The white chocolate should melt seamlessly into the mixture, adding richness and a beautiful, smooth consistency to the filling.
4. Assemble the Cheesecake: With the crust chilled and ready, it’s time to assemble the cheesecake. First, sprinkle the fresh raspberries evenly over the top of the crust. This will give the cheesecake a natural burst of fruit and enhance the raspberry flavor throughout the dessert. Be sure to distribute the raspberries evenly to ensure each bite has a balanced amount of fruit.
Carefully spoon the white chocolate cheesecake filling over the raspberries, spreading it out into an even layer. The filling should be smooth and creamy, and it will settle around the raspberries as you spread it. Once the filling is evenly distributed, take the reserved raspberry swirl and spoon a few teaspoons onto the top of the cheesecake.
Use a skewer, knife, or toothpick to swirl the raspberry sauce into the cheesecake. This creates the marbled effect that not only looks stunning but also ensures that each bite will have a hint of raspberry flavor alongside the creamy white chocolate. You can create a simple swirl pattern or get creative with more intricate designs, depending on your preferences.
5. Chill the Cheesecake: Once the cheesecake is assembled, it’s time to chill it. Refrigerate the cheesecake for at least 6 hours to allow it to set. If possible, leave it overnight to ensure that the filling has fully firmed up and the flavors have melded together. The chilling process is crucial for the cheesecake to hold its shape when sliced.
If you’re in a rush, you can speed up the process by placing the cheesecake in the freezer for 2-3 hours, though this may slightly alter the texture.
6. Remove from Springform Pan: After the cheesecake has set, it’s time to remove it from the springform pan. Run a thin knife around the edges of the pan to loosen the cheesecake. Then, carefully remove the sides of the springform pan, revealing the beautifully set cheesecake.
7. Garnish and Serve: For the final touch, you can garnish the cheesecake with white chocolate curls. To make white chocolate curls, use a vegetable peeler to shave thin pieces from a block of white chocolate. This adds a decorative touch to the top of the cheesecake and enhances the white chocolate flavor. You can also drizzle the remaining raspberry sauce over the top or serve with extra fresh raspberries for added flavor and color.
Slice the cheesecake into wedges, and enjoy the creamy, indulgent dessert with friends and family. It’s best served chilled and pairs wonderfully with a cup of coffee or a glass of dessert wine.
Tips and Variations:
- Substituting the Berries: If raspberries aren’t available, you can easily swap them with other berries like blackberries, strawberries, or blueberries. Each fruit brings its own flavor profile to the cheesecake, and they all pair wonderfully with white chocolate.
- Make-Ahead Tips: This no-bake cheesecake can be made ahead of time, making it perfect for dinner parties or holiday gatherings. You can store it in the refrigerator for up to 3 days before serving.
- Adding a Crunch: If you’d like to add a bit of texture to the cheesecake, consider sprinkling crushed graham crackers, chopped nuts, or even white chocolate chips into the cheesecake filling before setting it in the fridge.
- Non-Dairy Option: For a non-dairy version, you can substitute the heavy cream with coconut cream and the cream cheese with a dairy-free alternative. Make sure to check for vegan white chocolate if you want to keep it plant-based.
- Extra Sweetness: If you prefer your cheesecake to be sweeter, you can add a little extra powdered sugar to the filling. Just be mindful not to over-sweeten, as the raspberry sauce provides a tangy contrast to the sweet filling.

Why This No-Bake Cheesecake is a Must-Try
This No Bake White Chocolate Raspberry Cheesecake is the perfect dessert for anyone who loves creamy, decadent cheesecake but doesn’t want to turn on the oven. With its smooth and rich filling, crisp Oreo crust, and gorgeous raspberry swirl, it’s a dessert that is sure to impress. Whether you’re serving it for a special occasion or simply indulging in a sweet treat, this cheesecake is a showstopper that combines sweetness, tartness, and luxurious creaminess in every bite.
So, if you’re craving a dessert that’s easy to make, yet elegant enough for any celebration, this no-bake cheesecake is the answer. With just a few simple ingredients and a bit of time in the fridge, you’ll have a delicious, indulgent dessert that everyone will love.


