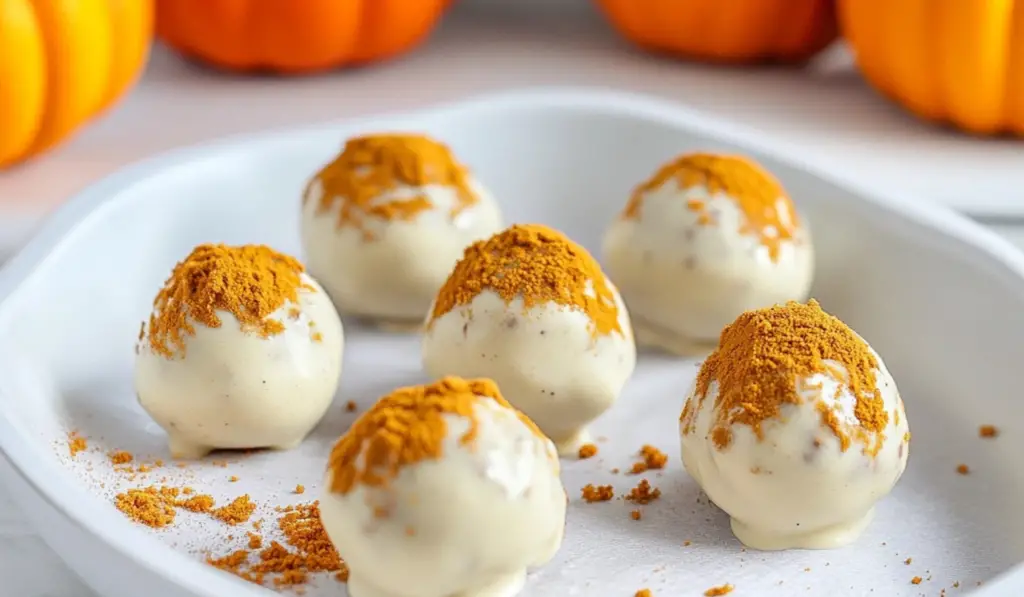
As the crispness of fall settles in, nothing beats the warm, comforting flavors of pumpkin. No Bake Pumpkin Balls are the perfect embodiment of this beloved seasonal ingredient, offering a delightful balance of creamy, spiced pumpkin filling encased in a rich, smooth white chocolate coating. These little bites of heaven take just minutes to prepare, and their flavor is an irresistible combination of pumpkin pie and cheesecake—two fall classics brought together in one mouthwatering treat. Whether you’re looking for a quick snack to satisfy your seasonal cravings, or you want to share a homemade gift with friends and family, these No Bake Pumpkin Balls are guaranteed to please.

No Bake Pumpkin Balls: The Ultimate Fall Treat

As the crispness of fall settles in, nothing beats the warm, comforting flavors of pumpkin. No Bake Pumpkin Balls are the perfect embodiment of this beloved seasonal ingredient, offering a delightful balance of creamy, spiced pumpkin filling encased in a rich, smooth white chocolate coating. These little bites of heaven take just minutes to prepare, and their flavor is an irresistible combination of pumpkin pie and cheesecake—two fall classics brought together in one mouthwatering treat. Whether you’re looking for a quick snack to satisfy your seasonal cravings, or you want to share a homemade gift with friends and family, these No Bake Pumpkin Balls are guaranteed to please.
- Prep Time: 5 minutes
- Cook Time: 0 minutes (No Bake)
- Total Time: 1 hour 5 minutes (includes chilling)
- Yield: 24 truffles 1x
- Category: Dessert, No-Bake Treats
- Method: Dipping, Mixing, No-bake
- Cuisine: American
- Diet: Vegetarian
Ingredients
- 4 oz cream cheese (softened) – Cream cheese adds a rich and creamy texture to the filling, making it smooth and indulgent. Its tangy flavor balances the sweetness of the pumpkin and white chocolate, creating a well-rounded taste.
- 2 Tbsp powdered sugar – Powdered sugar helps sweeten the cream cheese filling and ensures a smooth texture, which is essential for rolling the balls later.
- 1/3 cup pumpkin puree – The star ingredient of this recipe, pumpkin puree brings that signature fall flavor. Its natural sweetness and slightly earthy taste make it the perfect base for these treats.
- 2 cups graham cracker crumbs – Graham cracker crumbs are used to create a slightly crunchy texture that contrasts beautifully with the creamy filling. They also add a subtle sweetness that complements the pumpkin.
- 1/2 tsp pumpkin pie spice – Pumpkin pie spice is a blend of warming spices like cinnamon, nutmeg, and ginger. This spice mix enhances the pumpkin flavor, giving the balls that familiar cozy, spiced taste that’s synonymous with fall.
- 1/2 tsp cinnamon – Cinnamon adds an extra layer of warmth and depth to the filling, reinforcing the fall flavors and making each bite taste like a slice of pumpkin pie.
- 2 cups white chocolate chips – White chocolate chips are melted and used to coat the pumpkin balls, giving them a sweet, creamy finish. The richness of the white chocolate balances the spiced pumpkin filling perfectly.
- 1–2 tsp coconut oil (optional) – Coconut oil is optional, but it helps the white chocolate melt smoothly and ensures a glossy finish. If you prefer a more solid chocolate coating, you can skip this ingredient.
Instructions
- Prepare the Cream Cheese Filling: Start by placing the softened cream cheese and powdered sugar in the bowl of an electric stand mixer (or in a large bowl if you’re using a hand mixer). Beat the mixture together on medium speed for about 2-3 minutes, or until it becomes light, fluffy, and well-combined. This step creates the creamy base for the pumpkin filling and ensures that the sugar is evenly incorporated into the cream cheese.
- Mix in the Pumpkin and Spices: Once the cream cheese mixture is light and fluffy, add the pumpkin puree, 1 cup of graham cracker crumbs, pumpkin pie spice, and cinnamon to the bowl. Continue mixing until everything is fully incorporated. You should have a smooth, thick filling at this point. The spices will fill the air with a warm, comforting aroma, making it clear that fall has officially arrived.
- Add the Remaining Graham Cracker Crumbs: Next, add the second cup of graham cracker crumbs to the mixture and stir again. The additional crumbs will help give the pumpkin filling structure and make it easier to roll into balls. The texture will be firm enough to hold its shape when you form the balls, but still soft enough to be creamy and smooth.
- Chill the Dough: Cover the bowl with plastic wrap or tin foil and refrigerate the dough for at least 30 minutes. Chilling the dough helps it firm up, making it easier to roll into balls. While the dough chills, you can prepare your baking sheet and get everything ready for the next step.
- Shape the Pumpkin Balls: Once the dough is firm and chilled, take a tablespoon or small spoon and scoop out portions of the mixture. Roll each portion into a small ball, about the size of a marble, and place them onto a prepared baking sheet lined with parchment paper. This process should yield about 24 truffles. The dough will be slightly sticky, so be sure to keep your hands clean or lightly dampened to help with rolling.
- Chill Again: Once all the balls are shaped, refrigerate them for another 30 minutes. This additional chilling time ensures that the balls stay firm and hold their shape when you dip them in the white chocolate coating.
- Melt the White Chocolate: While the pumpkin balls are chilling, it’s time to melt the white chocolate. Place the white chocolate chips in a microwave-safe bowl and microwave them on high for 30 seconds. After 30 seconds, stir the chocolate to see if it has fully melted. If not, continue microwaving in 15-second intervals, stirring in between, until the chocolate is smooth and fully melted. If you’d like a smoother consistency, you can add 1-2 teaspoons of coconut oil to the white chocolate. This will help the chocolate melt more easily and give it a shiny finish.
- Dip the Pumpkin Balls in White Chocolate: Using a fork or a candy dipper, dip each chilled pumpkin ball into the melted white chocolate. Allow any excess chocolate to drip off by tapping the fork on the side of the bowl. Once dipped, return the pumpkin balls to the parchment-lined baking sheet. The creamy white chocolate coating will harden as it cools, creating a sweet and smooth outer layer for the pumpkin filling.
- Drizzle and Decorate: Once all the pumpkin balls are dipped in white chocolate, drizzle any remaining melted white chocolate over the tops of the balls for a decorative touch. You can also sprinkle the tops with graham cracker crumbs or festive sprinkles to add a bit of texture and visual appeal.
- Chill Again: Place the finished pumpkin balls back in the refrigerator for 20-30 minutes to allow the chocolate coating to fully set. Once the chocolate has hardened, your No Bake Pumpkin Balls are ready to be enjoyed!
Notes
- Chocolate Coating: If you’re not a fan of white chocolate, feel free to substitute with dark or milk chocolate. Both options will provide a richer flavor and can balance the sweetness of the pumpkin filling.
- Spices: If you prefer a more intense spice flavor, you can adjust the pumpkin pie spice and cinnamon to taste. For an even more personalized flavor, consider adding a pinch of nutmeg, cloves, or ginger.
- Dairy-Free: For a dairy-free version, use a plant-based cream cheese alternative and coconut oil for the white chocolate coating. You can also find dairy-free white chocolate chips in specialty stores.
- Nut Add-ins: To add a bit of crunch, consider adding chopped nuts such as pecans or walnuts to the pumpkin filling. This adds texture and a savory note that complements the sweetness of the pumpkin.
They’re easy to make, requiring no baking and minimal effort, making them perfect for novice and experienced cooks alike. The rich, spiced pumpkin filling and the sweetness of white chocolate come together to create a treat that’s both creamy and crunchy. With their vibrant orange hue and festive feel, these pumpkin balls are perfect for fall gatherings, Halloween parties, or simply enjoying with a cup of tea. The beauty of these pumpkin balls lies in their simplicity—no complicated ingredients or equipment are needed, just a few basic items from your kitchen and a little time to chill. Let’s break down the process and ingredients to make these delightful No Bake Pumpkin Balls.
Ingredients for No Bake Pumpkin Balls
To create these easy No Bake Pumpkin Balls, you will need the following ingredients:
- 4 oz cream cheese (softened) – Cream cheese adds a rich and creamy texture to the filling, making it smooth and indulgent. Its tangy flavor balances the sweetness of the pumpkin and white chocolate, creating a well-rounded taste.
- 2 Tbsp powdered sugar – Powdered sugar helps sweeten the cream cheese filling and ensures a smooth texture, which is essential for rolling the balls later.
- 1/3 cup pumpkin puree – The star ingredient of this recipe, pumpkin puree brings that signature fall flavor. Its natural sweetness and slightly earthy taste make it the perfect base for these treats.
- 2 cups graham cracker crumbs – Graham cracker crumbs are used to create a slightly crunchy texture that contrasts beautifully with the creamy filling. They also add a subtle sweetness that complements the pumpkin.
- 1/2 tsp pumpkin pie spice – Pumpkin pie spice is a blend of warming spices like cinnamon, nutmeg, and ginger. This spice mix enhances the pumpkin flavor, giving the balls that familiar cozy, spiced taste that’s synonymous with fall.
- 1/2 tsp cinnamon – Cinnamon adds an extra layer of warmth and depth to the filling, reinforcing the fall flavors and making each bite taste like a slice of pumpkin pie.
- 2 cups white chocolate chips – White chocolate chips are melted and used to coat the pumpkin balls, giving them a sweet, creamy finish. The richness of the white chocolate balances the spiced pumpkin filling perfectly.
- 1-2 tsp coconut oil (optional) – Coconut oil is optional, but it helps the white chocolate melt smoothly and ensures a glossy finish. If you prefer a more solid chocolate coating, you can skip this ingredient.
These simple ingredients come together to form a delectable treat that perfectly captures the essence of fall in every bite.
Step-by-Step Instructions
Now that you have your ingredients ready, it’s time to get started on these easy No Bake Pumpkin Balls. The process is quick, and you’ll be enjoying these delicious treats in no time.
- Prepare the Cream Cheese Filling: Start by placing the softened cream cheese and powdered sugar in the bowl of an electric stand mixer (or in a large bowl if you’re using a hand mixer). Beat the mixture together on medium speed for about 2-3 minutes, or until it becomes light, fluffy, and well-combined. This step creates the creamy base for the pumpkin filling and ensures that the sugar is evenly incorporated into the cream cheese.
- Mix in the Pumpkin and Spices: Once the cream cheese mixture is light and fluffy, add the pumpkin puree, 1 cup of graham cracker crumbs, pumpkin pie spice, and cinnamon to the bowl. Continue mixing until everything is fully incorporated. You should have a smooth, thick filling at this point. The spices will fill the air with a warm, comforting aroma, making it clear that fall has officially arrived.
- Add the Remaining Graham Cracker Crumbs: Next, add the second cup of graham cracker crumbs to the mixture and stir again. The additional crumbs will help give the pumpkin filling structure and make it easier to roll into balls. The texture will be firm enough to hold its shape when you form the balls, but still soft enough to be creamy and smooth.
- Chill the Dough: Cover the bowl with plastic wrap or tin foil and refrigerate the dough for at least 30 minutes. Chilling the dough helps it firm up, making it easier to roll into balls. While the dough chills, you can prepare your baking sheet and get everything ready for the next step.
- Shape the Pumpkin Balls: Once the dough is firm and chilled, take a tablespoon or small spoon and scoop out portions of the mixture. Roll each portion into a small ball, about the size of a marble, and place them onto a prepared baking sheet lined with parchment paper. This process should yield about 24 truffles. The dough will be slightly sticky, so be sure to keep your hands clean or lightly dampened to help with rolling.
- Chill Again: Once all the balls are shaped, refrigerate them for another 30 minutes. This additional chilling time ensures that the balls stay firm and hold their shape when you dip them in the white chocolate coating.
- Melt the White Chocolate: While the pumpkin balls are chilling, it’s time to melt the white chocolate. Place the white chocolate chips in a microwave-safe bowl and microwave them on high for 30 seconds. After 30 seconds, stir the chocolate to see if it has fully melted. If not, continue microwaving in 15-second intervals, stirring in between, until the chocolate is smooth and fully melted. If you’d like a smoother consistency, you can add 1-2 teaspoons of coconut oil to the white chocolate. This will help the chocolate melt more easily and give it a shiny finish.
- Dip the Pumpkin Balls in White Chocolate: Using a fork or a candy dipper, dip each chilled pumpkin ball into the melted white chocolate. Allow any excess chocolate to drip off by tapping the fork on the side of the bowl. Once dipped, return the pumpkin balls to the parchment-lined baking sheet. The creamy white chocolate coating will harden as it cools, creating a sweet and smooth outer layer for the pumpkin filling.
- Drizzle and Decorate: Once all the pumpkin balls are dipped in white chocolate, drizzle any remaining melted white chocolate over the tops of the balls for a decorative touch. You can also sprinkle the tops with graham cracker crumbs or festive sprinkles to add a bit of texture and visual appeal.
- Chill Again: Place the finished pumpkin balls back in the refrigerator for 20-30 minutes to allow the chocolate coating to fully set. Once the chocolate has hardened, your No Bake Pumpkin Balls are ready to be enjoyed!
Flavor, Texture, and Aroma
As you prepare these No Bake Pumpkin Balls, the aroma of pumpkin pie spice, cinnamon, and vanilla will fill your kitchen, signaling the arrival of fall. The texture of the pumpkin filling is rich and creamy, with a slight crunch from the graham cracker crumbs. The outer white chocolate coating is smooth and melts in your mouth, creating a delightful contrast with the spiced pumpkin interior. Each bite is a burst of pumpkin flavor, enhanced by the subtle warmth of cinnamon and the sweetness of the white chocolate. These little treats are as satisfying as they are delicious, offering a perfect balance of textures and flavors that will keep you coming back for more.
Tips for Substitutions and Variations
While this recipe is delicious as written, there are several ways you can customize it to suit your preferences or dietary needs.
- Chocolate Coating: If you’re not a fan of white chocolate, feel free to substitute with dark or milk chocolate. Both options will provide a richer flavor and can balance the sweetness of the pumpkin filling.
- Spices: If you prefer a more intense spice flavor, you can adjust the pumpkin pie spice and cinnamon to taste. For an even more personalized flavor, consider adding a pinch of nutmeg, cloves, or ginger.
- Dairy-Free: For a dairy-free version, use a plant-based cream cheese alternative and coconut oil for the white chocolate coating. You can also find dairy-free white chocolate chips in specialty stores.
- Nut Add-ins: To add a bit of crunch, consider adding chopped nuts such as pecans or walnuts to the pumpkin filling. This adds texture and a savory note that complements the sweetness of the pumpkin.
Serving Suggestions
These No Bake Pumpkin Balls are incredibly versatile and can be served in various ways. They make a perfect addition to any fall gathering or holiday celebration. Serve them on a platter as a bite-sized treat during Thanksgiving, Halloween, or a cozy fall afternoon. You can also package them in decorative bags as homemade gifts for friends and family. Pair them with a hot cup of apple cider or a warm pumpkin spice latte for the ultimate autumn experience.
Storing and Freezing
These No Bake Pumpkin Balls can be stored in an airtight container in the refrigerator for up to five days. They’re best enjoyed chilled, and there’s no need to thaw them before eating. If you want to make them ahead of time, you can freeze them in a zipper-top freezer-safe bag for up to three months. Simply remove the desired number of balls and let them thaw in the fridge for a few hours before enjoying.

Final Thoughts
No Bake Pumpkin Balls are the perfect treat to celebrate the flavors of fall. With their creamy pumpkin filling, crunchy graham cracker crumbs, and smooth white chocolate coating, they offer a delightful combination of textures and flavors that will appeal to everyone. Whether you’re hosting a fall gathering, gifting homemade treats, or simply indulging in a seasonal snack, these pumpkin balls are sure to impress. Easy to make and even easier to enjoy, this recipe is a must-try for anyone looking to embrace the spirit of autumn with a delicious homemade treat. Enjoy these pumpkin balls chilled, and savor the taste of fall in every bite.


