No-Bake Cheesecake Parfait: A Deliciously Easy Dessert
This No-Bake Cheesecake Parfait is the perfect dessert for beginners! With layers of creamy cheesecake filling, graham cracker crumbs, and sweet cherry topping, it’s quick, easy, and delicious. No baking required, just simple ingredients and a little time to create a treat that’s sure to impress!
- Prep Time: 15 minutes
- Cook Time: 0 minutes
- Total Time: 15 minutes
- Yield: 6 servings 1x
- Category: Dessert
- Method: No-bake
- Cuisine: American
- Diet: Vegetarian
Ingredients
For the Graham Cracker Crust:
- 1 ½ cups finely crushed graham cracker crumbs
- 3 tablespoons granulated sugar
- 7 tablespoons butter, melted
For the Cheesecake Filling:
- 1 (8-ounce) package of cream cheese, softened
- 1 (14-ounce) can sweetened condensed milk
- ⅓ cup freshly squeezed lemon juice
- 1 teaspoon vanilla extract
For the Cherry Topping:
- 1 (21-ounce) can cherry pie filling
Instructions
1. Prepare the Graham Cracker Crust:
- In a small mixing bowl, combine the graham cracker crumbs, granulated sugar, and melted butter. Stir everything together until the crumbs are evenly coated with butter and sugar. The mixture should have a slightly damp texture.
- Set the graham cracker mixture aside to allow the flavors to meld together. This will form the bottom layer of your parfait.
2. Make the Cheesecake Filling:
- In a medium mixing bowl, beat the softened cream cheese with an electric mixer on medium speed. Beat it until the cream cheese is smooth and free of lumps. This should take about a minute.
- Once the cream cheese is smooth, add the sweetened condensed milk and continue beating until well combined.
- Add the freshly squeezed lemon juice and vanilla extract, and mix until the filling is smooth and creamy. The lemon juice will not only help thicken the filling, but it will also add a fresh, zesty note to balance the sweetness.
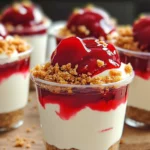
3. Assemble the Parfaits:
- Set 6 plastic, 9-ounce punch cups on a flat surface or a baking sheet for easy assembly.
- Scoop 2 tablespoons of the graham cracker crumb mixture into the bottom of each cup. Press the crumbs down lightly with the back of a spoon to form a solid base for the cheesecake mixture.
- Add 3 tablespoons of the cheesecake mixture to each cup, spreading it out evenly. This creamy layer will be the heart of the parfait.
- Open the cherry pie filling and distribute half of it evenly among the 6 cups. Make sure the cherries are spread out evenly to cover the cheesecake layer.
4. Add Another Layer:
- Sprinkle 2 tablespoons of the graham cracker mixture over the cherry layer. This will add a nice crunch and texture to the parfait.
- Add the remaining cheesecake mixture evenly across all 6 cups, smoothing it out so that it covers the graham cracker crumbs.
- Top each parfait with the remaining cherry pie filling. The vibrant red cherries will not only look beautiful but also add a sweet and tart contrast to the creamy cheesecake.
5. Chill and Serve:
- You can serve the parfaits immediately, but for the best flavor, it’s recommended to chill them in the fridge for at least 30 minutes to 1 hour before serving. Chilling will allow the flavors to meld together and make the dessert even more refreshing.
- You can also prepare these parfaits ahead of time. Simply cover them with plastic wrap or store them in an airtight container, and keep them refrigerated for up to 24 hours.
Notes
1. How to Avoid Lumpy Cheesecake Filling: To avoid any lumps in the cheesecake filling, make sure that the cream cheese is fully softened before you start mixing. Cold cream cheese will result in an uneven texture that won’t blend well with the condensed milk. Leave the cream cheese out at room temperature for about 30 minutes before you begin.
2. Adjusting Sweetness: If you prefer a less sweet dessert, you can reduce the sugar in the graham cracker mixture or use a sugar substitute in the cheesecake filling. Keep in mind that the cherry topping will contribute sweetness as well, so taste as you go and adjust accordingly.
3. Efficient Layering Tips: When adding the layers to the parfait cups, try to keep the layers even for a more appealing presentation. A small offset spatula can help smooth out each layer, making the parfaits look as neat as they taste.