
When it comes to creating desserts that both look and taste extraordinary, sometimes simplicity is key. Easy Jello Meringue Cookies fit that description perfectly. These cookies are airy, delicate, and filled with vibrant, fruity flavors, making them a fantastic option for nearly any occasion. I first came across this recipe when I was searching for an easy yet impressive dessert to bring to an Easter gathering. I wanted something that would not only taste delicious but also be visually stunning. These meringue cookies, with their colorful swirls and crisp texture, were exactly what I was looking for. They were a huge hit at the party, and the best part? They’re gluten-free, light, and perfect for anyone looking to enjoy a sweet treat without the heaviness of traditional cookies.

How to Make Easy Jello Meringue Cookies: A Beginner-Friendly Guide to Beautiful and Elegant Treats
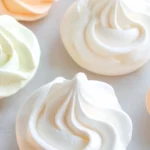
Sometimes, the best desserts are the simplest ones—especially when you’re looking for something that’s both easy to make and a showstopper at your next gathering. That’s exactly what Easy Jello Meringue Cookies deliver: a delicate, melt-in-your-mouth texture with a burst of vibrant flavor that will leave everyone asking for more. I first discovered these cookies when I needed a sweet treat that was not only delicious but also gluten-free. I wanted to impress my guests without spending hours in the kitchen, and this recipe was the perfect solution.
- Prep Time: 30 minutes
- Cook Time: 1 hour
- Total Time: 2 hours 30 minutes
- Yield: 24 cookies (depends on size) 1x
- Category: Dessert
- Method: Baking
- Cuisine: American
- Diet: Gluten Free
Ingredients
- 4 egg whites, room temperature
- 1 cup sugar
- 3 tablespoons Jello dry powder (any flavor)
- Dash of salt
- 1/2 teaspoon cream of tartar
Instructions
- Preheat the Oven
Begin by preheating your oven to 225°F (110°C). The low temperature ensures that the meringues dry out slowly, becoming crisp on the outside while maintaining their delicate, melt-in-your-mouth texture on the inside. Line a baking sheet with parchment paper to prevent the cookies from sticking. You can also use a silicone baking mat for easy cleanup. - Whip the Egg Whites
In a clean, dry mixing bowl, add the egg whites. It’s essential that the bowl and beaters are free of any grease or oil, as this can prevent the egg whites from whipping up properly. Using a hand or stand mixer with the whisk attachment, beat the egg whites on medium speed. The goal is to create frothy, soft peaks. - Add Cream of Tartar and Salt
Once the egg whites have become frothy, add the cream of tartar and a dash of salt. The cream of tartar will help stabilize the egg whites and make sure they hold their shape. Continue to beat the mixture on medium-high speed until soft peaks form. Soft peaks mean that when you lift the whisk, the peaks gently fold over. - Incorporate the Sugar and Jello Powder
Gradually add the sugar, about 1 tablespoon at a time, while continuing to beat the egg whites. This slow addition of sugar helps prevent the meringue from collapsing. Once all the sugar has been added, incorporate the Jello powder, also gradually. Mix until the egg whites are glossy and stiff peaks form. The meringue should stand tall when you lift the whisk, and the mixture should appear smooth and shiny. - Pipe the Meringues
Now it’s time to shape your meringues! Using a 1M piping tip (or any other star tip you have), pipe the meringue onto the prepared baking sheet. You can create rosettes, swirls, or even small kisses—get creative with your designs! Make sure to leave some space between each meringue as they will spread slightly while baking. - Bake the Meringues
Place the baking sheet in the preheated oven and bake for 1 hour. The meringues should be dry and crisp, but they should not have taken on any color. If you notice any slight browning, reduce the oven temperature by 10 degrees next time. Avoid opening the oven door during baking, as this can cause the meringues to collapse. - Cool in the Oven
After 1 hour, turn off the oven and leave the meringues inside for at least 1 hour to cool and dry out completely. This step is crucial for achieving that perfect, light, and crisp texture. Resist the urge to open the oven door, as it can cause the meringues to deflate. If you can, leave them overnight in the oven for a super-crisp texture. - Serve and Enjoy
Once the meringues are completely cool, carefully remove them from the baking sheet and store them in an airtight container. They are now ready to be served! The vibrant colors and delicate sweetness make them perfect for parties, gatherings, or just a special treat.
Notes
- Egg White Tips: To ensure the best results, always use fresh eggs, and make sure the egg whites are free from any yolk. Even a tiny bit of yolk can ruin the texture of your meringue. If separating the eggs is tricky for you, try using an egg separator tool.
- Avoid Humidity: Meringues are particularly sensitive to moisture. On humid days, they can absorb moisture from the air, causing them to become sticky or soft. If you’re baking on a humid day, try to make the meringues in a dry environment, and store them in a sealed container once they’ve cooled completely.
- Baking Time: The baking time is crucial for perfect meringues. If you’re unsure, it’s better to slightly underbake the cookies than overbake them, as they continue to dry out as they cool. Make sure the cookies are crisp before removing them from the oven, and they should easily lift off the parchment paper without sticking.
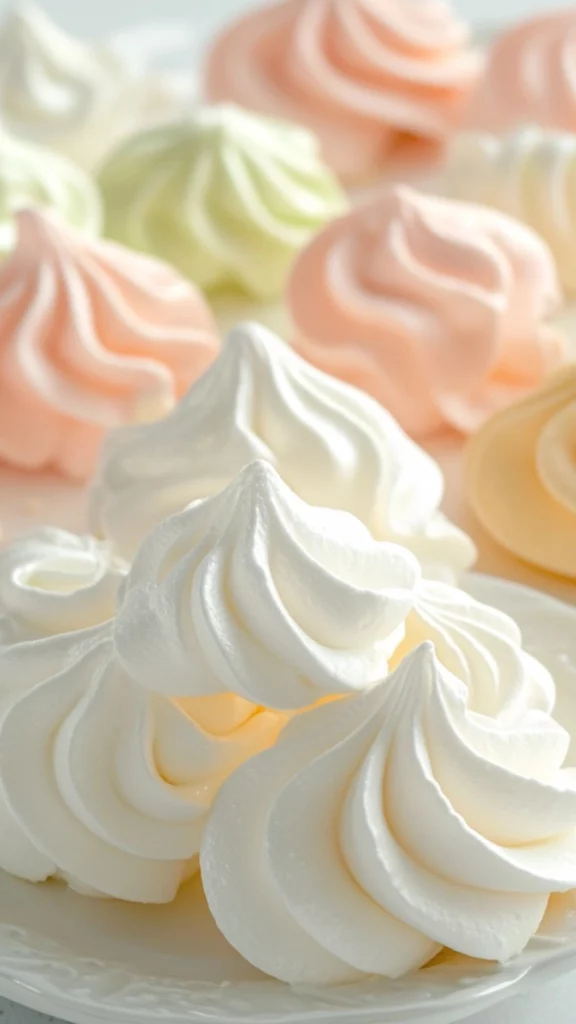
- Color and Flavor: Feel free to experiment with different Jello flavors to create a variety of colorful meringues. If you’d like more intense color, you can increase the amount of Jello powder slightly. Just be cautious, as too much Jello can alter the texture of the meringue.
What makes this recipe particularly beginner-friendly is how straightforward it is. You don’t need to be a professional baker to pull off these meringues. The key to success lies in mastering the technique of whipping egg whites into stiff peaks and baking them at a low temperature for just the right amount of time. The addition of Jello powder not only adds vibrant color but also infuses the cookies with a burst of fruity flavor, making them irresistible to anyone who tries them. So, whether you’re a beginner or an experienced baker looking for a simple yet elegant treat, this recipe is for you.
Ingredients and Preparation
Before you begin, gather all your ingredients. The beauty of this recipe is its simplicity—just a handful of ingredients that you likely already have in your pantry. Here’s what you’ll need:
- 4 egg whites, room temperature
- 1 cup sugar
- 3 tablespoons Jello dry powder (any flavor)
- Dash of salt
- 1/2 teaspoon cream of tartar
Ingredient Substitutions and Alternatives
One of the best parts of this recipe is its flexibility. Here are some substitutions and alternatives you can try:
- Jello Powder: You can get creative with the flavor of Jello powder. If you’re craving citrusy flavors, try lemon, lime, or orange Jello for a refreshing twist. Alternatively, go for berry or tropical flavors like strawberry, cherry, or even pineapple for a fun pop of color and taste. If you’re looking for a more subtle flavor, you can use plain gelatin and add a few drops of extract, such as vanilla or almond.
- Sugar: Granulated sugar is the traditional choice for making meringues, but if you prefer, you could try superfine sugar or caster sugar. These dissolve more quickly into the egg whites, resulting in a smoother meringue. If you’re looking for a healthier option, you could experiment with powdered erythritol or monk fruit sweetener, though this may slightly alter the texture.
- Cream of Tartar: Cream of tartar helps stabilize the egg whites and ensures they reach the right consistency. If you don’t have it on hand, you can use 1 teaspoon of lemon juice or white vinegar as a substitute. However, cream of tartar is the best option for perfect meringues, so try to use it if you can.
- Egg Whites: Always use fresh egg whites for best results. Room-temperature egg whites whip up more easily than cold egg whites, so take them out of the fridge about 30 minutes before you start. If you don’t want to separate eggs, look for pasteurized egg whites at the store, which are safe to consume raw.
Step-by-Step Instructions
Once you’ve gathered your ingredients, you’re ready to begin. Follow these detailed steps to create the perfect meringue cookies:
- Preheat the Oven
Begin by preheating your oven to 225°F (110°C). The low temperature ensures that the meringues dry out slowly, becoming crisp on the outside while maintaining their delicate, melt-in-your-mouth texture on the inside. Line a baking sheet with parchment paper to prevent the cookies from sticking. You can also use a silicone baking mat for easy cleanup. - Whip the Egg Whites
In a clean, dry mixing bowl, add the egg whites. It’s essential that the bowl and beaters are free of any grease or oil, as this can prevent the egg whites from whipping up properly. Using a hand or stand mixer with the whisk attachment, beat the egg whites on medium speed. The goal is to create frothy, soft peaks. - Add Cream of Tartar and Salt
Once the egg whites have become frothy, add the cream of tartar and a dash of salt. The cream of tartar will help stabilize the egg whites and make sure they hold their shape. Continue to beat the mixture on medium-high speed until soft peaks form. Soft peaks mean that when you lift the whisk, the peaks gently fold over. - Incorporate the Sugar and Jello Powder
Gradually add the sugar, about 1 tablespoon at a time, while continuing to beat the egg whites. This slow addition of sugar helps prevent the meringue from collapsing. Once all the sugar has been added, incorporate the Jello powder, also gradually. Mix until the egg whites are glossy and stiff peaks form. The meringue should stand tall when you lift the whisk, and the mixture should appear smooth and shiny. - Pipe the Meringues
Now it’s time to shape your meringues! Using a 1M piping tip (or any other star tip you have), pipe the meringue onto the prepared baking sheet. You can create rosettes, swirls, or even small kisses—get creative with your designs! Make sure to leave some space between each meringue as they will spread slightly while baking. - Bake the Meringues
Place the baking sheet in the preheated oven and bake for 1 hour. The meringues should be dry and crisp, but they should not have taken on any color. If you notice any slight browning, reduce the oven temperature by 10 degrees next time. Avoid opening the oven door during baking, as this can cause the meringues to collapse. - Cool in the Oven
After 1 hour, turn off the oven and leave the meringues inside for at least 1 hour to cool and dry out completely. This step is crucial for achieving that perfect, light, and crisp texture. Resist the urge to open the oven door, as it can cause the meringues to deflate. If you can, leave them overnight in the oven for a super-crisp texture. - Serve and Enjoy
Once the meringues are completely cool, carefully remove them from the baking sheet and store them in an airtight container. They are now ready to be served! The vibrant colors and delicate sweetness make them perfect for parties, gatherings, or just a special treat.
Beginner Tips and Notes
- Egg White Tips: To ensure the best results, always use fresh eggs, and make sure the egg whites are free from any yolk. Even a tiny bit of yolk can ruin the texture of your meringue. If separating the eggs is tricky for you, try using an egg separator tool.
- Avoid Humidity: Meringues are particularly sensitive to moisture. On humid days, they can absorb moisture from the air, causing them to become sticky or soft. If you’re baking on a humid day, try to make the meringues in a dry environment, and store them in a sealed container once they’ve cooled completely.
- Baking Time: The baking time is crucial for perfect meringues. If you’re unsure, it’s better to slightly underbake the cookies than overbake them, as they continue to dry out as they cool. Make sure the cookies are crisp before removing them from the oven, and they should easily lift off the parchment paper without sticking.
- Color and Flavor: Feel free to experiment with different Jello flavors to create a variety of colorful meringues. If you’d like more intense color, you can increase the amount of Jello powder slightly. Just be cautious, as too much Jello can alter the texture of the meringue.
Serving Suggestions
While these Jello Meringue Cookies are delightful on their own, here are some ideas for serving them as part of a larger spread:
- Fruit and Meringue Parfait: Layer the meringue cookies with whipped cream and fresh fruit to create a beautiful and delicious dessert parfait. Berries, kiwi, and citrus fruits pair particularly well with the light, airy meringues.
- Chocolate Drizzle: For an extra touch of decadence, drizzle melted chocolate (either dark or white) over the cooled meringues. You can even dip the bottoms of the cookies into chocolate for a pretty finish.
- Tea Time Treat: Serve the meringues alongside a cup of tea or coffee for a sophisticated afternoon treat. The light texture of the meringues complements the richness of hot beverages perfectly.
- Easter and Holiday Desserts: Jello Meringue Cookies are ideal for special occasions like Easter, bridal showers, or baby showers. Their pastel colors and delicate design make them a perfect fit for festive celebrations.
Storage Tips
- Room Temperature: Store your meringue cookies in an airtight container at room temperature. They will stay fresh for up to two weeks, and the crispy texture will remain intact as long as they are kept sealed.
- Freezing Meringues: If you want to make these cookies in advance, you can freeze them for up to 3 months. Place the cooled meringues in a single layer on a baking sheet and freeze until solid. Then, transfer them to a freezer bag or airtight container. Thaw at room temperature when you’re ready to serve.
- Avoid Moisture: Keep the meringues away from moisture or humidity to preserve their crispness. If stored properly, they will stay light and crunchy, making them a great snack or dessert to keep on hand.
Conclusion
Easy Jello Meringue Cookies are a fantastic treat that is not only fun to make but also delightful to eat. Whether you’re a beginner baker or someone looking for a fun, colorful dessert to bring to a party, this recipe will not disappoint. The simplicity of the ingredients combined with the elegance of the finished product makes these cookies an excellent choice for any occasion.
Give this recipe a try, and let me know how it turns out! Feel free to experiment with different Jello flavors, shapes, and decorations. Don’t forget to share your results in the comments below, and happy baking!


