There’s something magical about a homemade ice cream cake. It combines the best of two worlds—creamy ice cream and rich, decadent cake in one dessert that’s perfect for any celebration. As someone who loves both ice cream and cake, I can attest to the fact that there’s no better way to celebrate a special occasion than with this homemade ice cream cake. The layers of indulgent flavors, from crunchy cookie crumbs to smooth ice cream and homemade salted caramel, make every bite a mouthwatering experience.

Homemade Ice Cream Cake: A Perfect Treat for Any Celebration
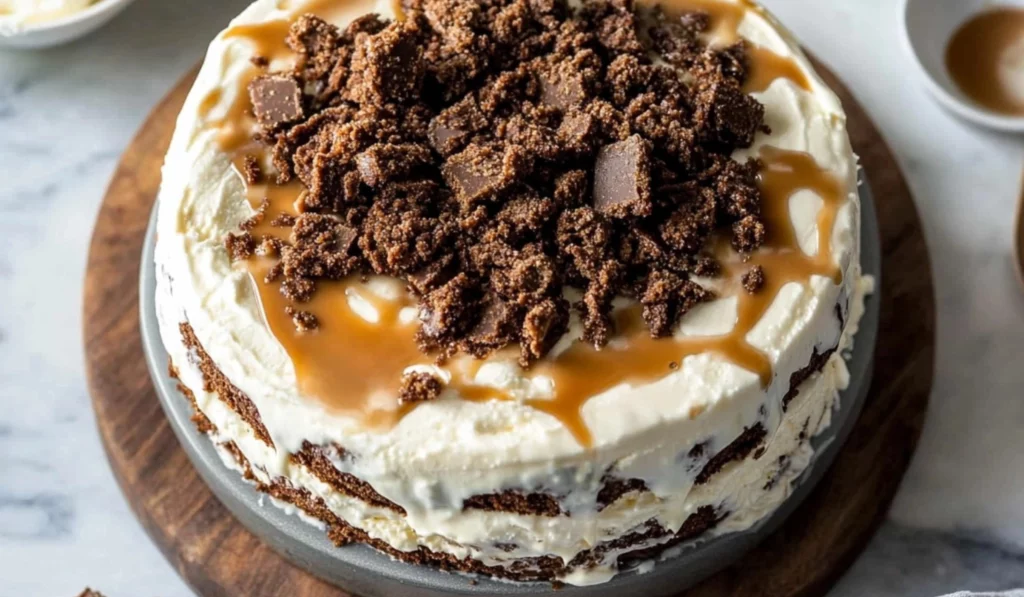
Looking for the perfect dessert? This homemade ice cream cake is the answer! With layers of smooth ice cream, crunchy cookie crumbs, rich ganache, and a touch of salted caramel, it’s a showstopper for any occasion. Best of all, it’s easy to make—even for beginners. So, whether you’re celebrating or just craving something delicious, this cake is sure to impress! Let’s dive into this simple, yet irresistible recipe.
- Prep Time: 1 hour
- Cook Time: 30 minutes
- Total Time: 1 hour 30 minutes
- Yield: 16 servings 1x
- Category: Dessert
- Method: No-bake
- Cuisine: American
- Diet: Vegetarian
Ingredients
Crust + Cookie Crumbs
- 18 chocolate graham crackers, pulverized into crumbs (about 3 cups)
- ¼ cup granulated sugar
- 1 teaspoon salt
- 12 tablespoons unsalted butter, melted (1 ½ sticks)
Ganache
- 1 ¼ cups heavy cream
- 12 ounces semisweet chocolate chips
Salted Caramel
- 1 cup sugar
- 1 tablespoon light corn syrup
- ½ cup heavy cream
- 4 tablespoons (½ stick) unsalted butter
- ¾ teaspoon salt
- 1 teaspoon vanilla extract
Assembly
- 2 half-gallons vanilla ice cream
- 2 teaspoons flaky sea salt
Instructions
Step 1: Make the Crust + Cookie Crumbs
- Crush the graham crackers: Start by crushing the chocolate graham crackers into fine crumbs. You can do this with a food processor if you have one, or by placing the crackers in a plastic bag and crushing them with a rolling pin. Aim for crumbs that are as fine as possible, as this will give your crust a smooth texture.
- Mix the ingredients: In a medium-sized bowl, combine the graham cracker crumbs, granulated sugar, and salt. Mix them together so they’re evenly distributed. Once mixed, pour in the melted butter and stir until the crumbs are fully moistened. The butter helps bind the crumbs together, so they stay firm when pressed into the pan.
- Press the crumbs into the pan: Scoop out half of the crumb mixture and place it into a 9-inch wide, 3-inch deep springform pan that has been sprayed with cooking spray. Use the bottom of a glass or measuring cup to press the crumbs down firmly, creating an even layer. The crumbs should form a base that creeps up about an inch on the sides.
- Freeze the crust: Take the remaining crumbs and spread them out onto a parchment-lined baking sheet. Both the crust in the pan and the remaining crumbs need to freeze for a minimum of 30 minutes to allow the crust to set. This is an important step to help the crumbs firm up and hold their shape.
Step 2: Make the Ganache
- Heat the heavy cream: In a medium saucepan, heat the heavy cream over medium-high heat until it just begins to bubble. This signals that it’s hot enough to melt the chocolate chips. Keep a close eye on the cream so it doesn’t boil over.
- Add the chocolate chips: Remove the saucepan from the heat and immediately pour in the chocolate chips. Stir the mixture with a spoon or spatula until the chocolate chips are fully melted and the ganache becomes smooth and glossy. Set it aside to cool slightly before using.
Step 3: Make the Salted Caramel
- Melt the sugar and corn syrup: In a medium saucepan, combine the sugar and corn syrup over medium heat. Swirl the pan gently until the sugar has completely melted. Be careful not to stir too much, as this can cause the sugar to crystallize.
- Watch for amber color: Allow the sugar to cook until it turns amber in color. This should take around 5-10 minutes. Keep an eye on the caramel to ensure it doesn’t burn.
- Add the cream and butter: Once the sugar has reached the desired amber color, carefully remove the pan from the heat. Add the heavy cream and butter, stirring rapidly to incorporate them. The mixture will bubble up significantly, so be cautious. Stir until everything is fully combined.
- Finish the caramel: Return the pot to the stove over medium heat and cook the caramel for a few more minutes, allowing it to thicken slightly. Once it’s thickened, remove from the heat and stir in the salt and vanilla extract. Let the caramel cool to room temperature before proceeding with the assembly.
Step 4: Assemble the Cake
- First layer of ganache: Remove the springform pan from the freezer and pour half of the ganache over the set crust. Use a spatula to spread it evenly across the surface. Sprinkle a teaspoon of flaky sea salt over the ganache for a salty contrast to the sweet flavors. Return the pan to the freezer for 30 minutes to allow the ganache to firm up.
- First layer of ice cream: Scoop out one half-gallon of vanilla ice cream and spread it evenly over the ganache layer. Press the ice cream down gently to remove any air pockets and ensure the layer is smooth. Once spread, return the pan to the freezer for 30 minutes.
- Add the crumbs and caramel: Take the sheet pan of chocolate crumbs out of the freezer and crumble them into small pieces. Once the ice cream has firmed up, remove the springform pan from the freezer and sprinkle two-thirds of the chocolate crumbs over the ice cream. Then, drizzle three-quarters of the salted caramel over the crumbs. Return the pan to the freezer for another 30 minutes.
- Second layer of ice cream: Scoop out the remaining half-gallon of ice cream and spread it evenly over the caramel layer, pressing it down to ensure there are no air bubbles or gaps. Freeze the cake again for another 30 minutes.
- Top layer of ganache: Pour the remaining ganache over the ice cream layer and spread it evenly across the top. Sprinkle the remaining chocolate crumbs over the ganache and drizzle the last of the salted caramel over the crumbs. Finish with a pinch of flaky sea salt for extra flavor and crunch.
- Final freeze: Place the assembled cake back in the freezer for at least 1 hour, or up to a week before serving. This allows the cake to set completely and ensures that the flavors meld together.
Notes
- Working with Ice Cream: When spreading the ice cream over the layers, make sure it’s soft enough to spread easily. If the ice cream is too hard, it can be difficult to work with, and you may end up with uneven layers. Let it soften for about 10 minutes before spreading it.
- Caramel Troubleshooting: If your caramel turns too dark or burns, you’ll need to start over. Be patient and watch carefully as the sugar begins to melt. The right moment is when the sugar turns amber in color. If it’s too light, the caramel may lack the deep flavor it needs.
- Ganache Consistency: If your ganache seems too thin when poured over the ice cream, allow it to cool a little longer. The ganache should have a smooth, spreadable consistency that doesn’t melt the ice cream beneath it.
Whether it’s for a birthday, an anniversary, or just a fun gathering with friends and family, this ice cream cake is guaranteed to steal the show. It’s a treat that everyone will rave about, and it’s so much fun to make. Plus, you’ll feel accomplished knowing that not only did you make it yourself, but you also made something better than anything you could get from the store.
In this article, I’ll walk you through the process of making the perfect homemade ice cream cake from start to finish. Whether you’re a beginner or a seasoned home baker, this recipe will guide you through each step in a clear and easy-to-follow manner. We’ll also dive into some tips and tricks to ensure your cake turns out perfectly every time. So, grab your ingredients and let’s get started on this delicious journey!
Why This Recipe is Perfect for Beginners
You might be wondering: isn’t an ice cream cake complicated to make? The answer is no—especially with this recipe! This homemade ice cream cake combines store-bought ice cream and a few simple homemade ingredients like caramel, ganache, and chocolate crumbs. This makes the process quick, easy, and highly satisfying.
While the recipe involves several steps, each step is manageable and doesn’t require any special baking skills or complicated techniques. The key to making this cake work is planning ahead. Most of the steps are simple and can be done in advance, leaving you with plenty of time to relax or focus on other aspects of the event. Even though it’s an impressive dessert, it’s simple enough for beginners to make without stress.
The flavors come together in a perfect harmony—crunchy, rich, and creamy. The homemade caramel and ganache elevate the cake, giving it an extraordinary touch. It’s not just a cake, it’s a showstopper. And with minimal prep work and a little patience, you can create a masterpiece that will wow your guests.
Ingredients and Preparation
Crust + Cookie Crumbs
- 18 chocolate graham crackers, pulverized into crumbs (about 3 cups)
- ¼ cup granulated sugar
- 1 teaspoon salt
- 12 tablespoons unsalted butter, melted (1 ½ sticks)
Ganache
- 1 ¼ cups heavy cream
- 12 ounces semisweet chocolate chips
Salted Caramel
- 1 cup sugar
- 1 tablespoon light corn syrup
- ½ cup heavy cream
- 4 tablespoons (½ stick) unsalted butter
- ¾ teaspoon salt
- 1 teaspoon vanilla extract
Assembly
- 2 half-gallons vanilla ice cream
- 2 teaspoons flaky sea salt
Step-by-Step Instructions
Making this homemade ice cream cake may take a little time, but the process is straightforward and well worth the effort. We’ll break down the steps clearly so you can follow along and create a stunning ice cream cake that everyone will love.
Step 1: Make the Crust + Cookie Crumbs
- Crush the graham crackers: Start by crushing the chocolate graham crackers into fine crumbs. You can do this with a food processor if you have one, or by placing the crackers in a plastic bag and crushing them with a rolling pin. Aim for crumbs that are as fine as possible, as this will give your crust a smooth texture.
- Mix the ingredients: In a medium-sized bowl, combine the graham cracker crumbs, granulated sugar, and salt. Mix them together so they’re evenly distributed. Once mixed, pour in the melted butter and stir until the crumbs are fully moistened. The butter helps bind the crumbs together, so they stay firm when pressed into the pan.
- Press the crumbs into the pan: Scoop out half of the crumb mixture and place it into a 9-inch wide, 3-inch deep springform pan that has been sprayed with cooking spray. Use the bottom of a glass or measuring cup to press the crumbs down firmly, creating an even layer. The crumbs should form a base that creeps up about an inch on the sides.
- Freeze the crust: Take the remaining crumbs and spread them out onto a parchment-lined baking sheet. Both the crust in the pan and the remaining crumbs need to freeze for a minimum of 30 minutes to allow the crust to set. This is an important step to help the crumbs firm up and hold their shape.
Step 2: Make the Ganache
- Heat the heavy cream: In a medium saucepan, heat the heavy cream over medium-high heat until it just begins to bubble. This signals that it’s hot enough to melt the chocolate chips. Keep a close eye on the cream so it doesn’t boil over.
- Add the chocolate chips: Remove the saucepan from the heat and immediately pour in the chocolate chips. Stir the mixture with a spoon or spatula until the chocolate chips are fully melted and the ganache becomes smooth and glossy. Set it aside to cool slightly before using.
Step 3: Make the Salted Caramel
- Melt the sugar and corn syrup: In a medium saucepan, combine the sugar and corn syrup over medium heat. Swirl the pan gently until the sugar has completely melted. Be careful not to stir too much, as this can cause the sugar to crystallize.
- Watch for amber color: Allow the sugar to cook until it turns amber in color. This should take around 5-10 minutes. Keep an eye on the caramel to ensure it doesn’t burn.
- Add the cream and butter: Once the sugar has reached the desired amber color, carefully remove the pan from the heat. Add the heavy cream and butter, stirring rapidly to incorporate them. The mixture will bubble up significantly, so be cautious. Stir until everything is fully combined.
- Finish the caramel: Return the pot to the stove over medium heat and cook the caramel for a few more minutes, allowing it to thicken slightly. Once it’s thickened, remove from the heat and stir in the salt and vanilla extract. Let the caramel cool to room temperature before proceeding with the assembly.
Step 4: Assemble the Cake
- First layer of ganache: Remove the springform pan from the freezer and pour half of the ganache over the set crust. Use a spatula to spread it evenly across the surface. Sprinkle a teaspoon of flaky sea salt over the ganache for a salty contrast to the sweet flavors. Return the pan to the freezer for 30 minutes to allow the ganache to firm up.
- First layer of ice cream: Scoop out one half-gallon of vanilla ice cream and spread it evenly over the ganache layer. Press the ice cream down gently to remove any air pockets and ensure the layer is smooth. Once spread, return the pan to the freezer for 30 minutes.
- Add the crumbs and caramel: Take the sheet pan of chocolate crumbs out of the freezer and crumble them into small pieces. Once the ice cream has firmed up, remove the springform pan from the freezer and sprinkle two-thirds of the chocolate crumbs over the ice cream. Then, drizzle three-quarters of the salted caramel over the crumbs. Return the pan to the freezer for another 30 minutes.
- Second layer of ice cream: Scoop out the remaining half-gallon of ice cream and spread it evenly over the caramel layer, pressing it down to ensure there are no air bubbles or gaps. Freeze the cake again for another 30 minutes.
- Top layer of ganache: Pour the remaining ganache over the ice cream layer and spread it evenly across the top. Sprinkle the remaining chocolate crumbs over the ganache and drizzle the last of the salted caramel over the crumbs. Finish with a pinch of flaky sea salt for extra flavor and crunch.
- Final freeze: Place the assembled cake back in the freezer for at least 1 hour, or up to a week before serving. This allows the cake to set completely and ensures that the flavors meld together.
Beginner Tips and Notes
- Working with Ice Cream: When spreading the ice cream over the layers, make sure it’s soft enough to spread easily. If the ice cream is too hard, it can be difficult to work with, and you may end up with uneven layers. Let it soften for about 10 minutes before spreading it.
- Caramel Troubleshooting: If your caramel turns too dark or burns, you’ll need to start over. Be patient and watch carefully as the sugar begins to melt. The right moment is when the sugar turns amber in color. If it’s too light, the caramel may lack the deep flavor it needs.
- Ganache Consistency: If your ganache seems too thin when poured over the ice cream, allow it to cool a little longer. The ganache should have a smooth, spreadable consistency that doesn’t melt the ice cream beneath it.
Serving Suggestions
This homemade ice cream cake is perfect on its own, but you can elevate it further with a few additions. Consider serving it with a dollop of whipped cream, or drizzle some extra caramel sauce over the top for even more flavor. A scoop of extra vanilla or chocolate ice cream on the side will complement the cake’s rich and creamy layers beautifully. For a festive touch, top it with colorful sprinkles or even some fresh berries for contrast.

Conclusion
This homemade ice cream cake is the ultimate dessert for any occasion. With its layers of crunchy graham cracker crumbs, creamy ice cream, rich ganache, and sweet salted caramel, it’s a dessert that will delight anyone who takes a bite. The steps are simple, and with a little patience, you’ll create a dessert that looks and tastes like something from a bakery or restaurant.
The beauty of this cake lies in its versatility. You can make it ahead of time, customize the layers with your favorite flavors, and enjoy it for weeks to come. Whether it’s for a birthday, holiday, or just a treat for yourself, this homemade ice cream cake is sure to impress.
So, give it a try for your next special event and enjoy the process of making something truly unforgettable. And when you take that first bite, know that you’ve created a dessert that will be the star of the show, every time. Happy baking (and freezing)!


