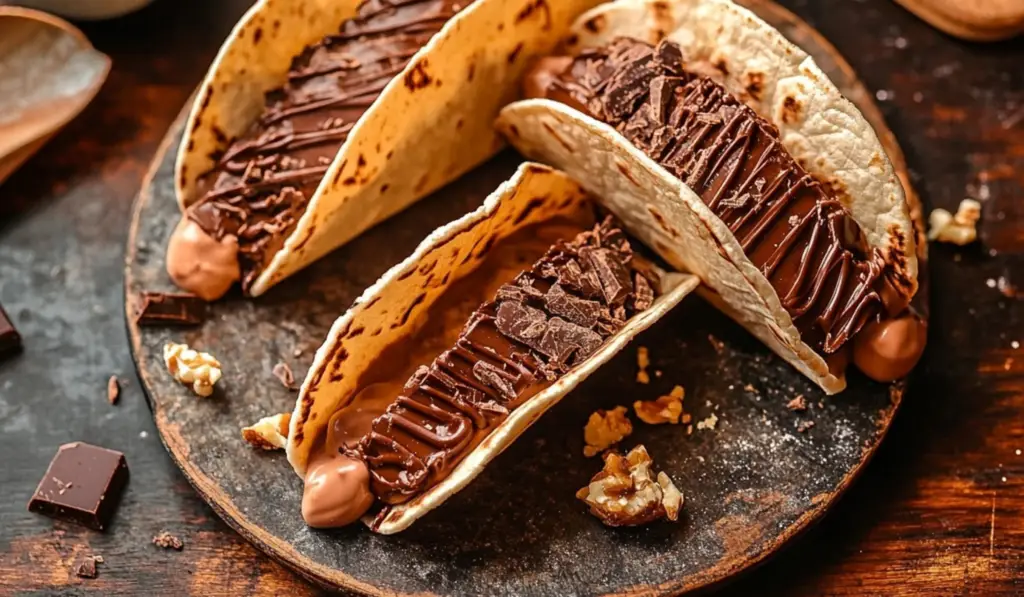
When summer comes around, there’s no shortage of sweet treats to enjoy, but few desserts combine nostalgia, fun, and indulgence as perfectly as the Choco Taco. A beloved snack from childhood, the Choco Taco is an ice cream-filled taco-shaped waffle cone, dipped in chocolate, and rolled in peanuts—creating a texture and flavor contrast that delights the taste buds. But what if you could make these iconic treats right at home, with even more deliciousness? Well, you can! This recipe for Homemade Choco Tacos brings together all the components of the classic version, with a few thoughtful tweaks that elevate the flavor and texture to new heights. It’s the perfect way to celebrate summer with your family, friends, or even just yourself on a warm evening when the craving for something cold and sweet hits.
PrintHomemade Choco Tacos: A Fun and Nostalgic Summer Treat

When summer comes around, there’s no shortage of sweet treats to enjoy, but few desserts combine nostalgia, fun, and indulgence as perfectly as the Choco Taco. A beloved snack from childhood, the Choco Taco is an ice cream-filled taco-shaped waffle cone, dipped in chocolate, and rolled in peanuts—creating a texture and flavor contrast that delights the taste buds. But what if you could make these iconic treats right at home, with even more deliciousness? Well, you can! This recipe for Homemade Choco Tacos brings together all the components of the classic version, with a few thoughtful tweaks that elevate the flavor and texture to new heights. It’s the perfect way to celebrate summer with your family, friends, or even just yourself on a warm evening when the craving for something cold and sweet hits.
- Prep Time: 4 hours
- Cook Time: 55 minutes
- Total Time: 4 hours 55 minutes
- Yield: 8–10 choco tacos 1x
- Category: Dessert
- Method: No-Churn, Baking
- Cuisine: American
- Diet: Vegetarian
Ingredients
For the ice cream base:
- 2 cups heavy cream, cold
- 1 14oz can sweetened condensed milk
- 1 tbsp vanilla bean paste (or 2 tsp vanilla extract)
- Pinch of salt
For the fudge ripple:
- 2 tablespoons cocoa powder
- 2 tablespoons granulated sugar
- 2 tablespoons heavy cream
- 1 tablespoon unsalted butter
- ½ teaspoon vanilla extract
- Pinch of salt
For the waffle cones:
- 2 egg whites
- 3 ½ tablespoons granulated sugar
- 3 ½ tablespoons brown sugar
- ¾ teaspoon vanilla extract
- ⅛ teaspoon salt
- ⅔ cup flour
- 2 tbsp melted butter
For the coating:
- 1 ½ cups chocolate chips
- 1 ½ tablespoon coconut oil
- ¾ cup finely chopped peanuts
Instructions
1. Making the Fudge Ripple for the Ice Cream
The first step in preparing these Homemade Choco Tacos is making the fudge ripple that will swirl throughout the ice cream. This step requires a few simple ingredients—cocoa powder, sugar, heavy cream, butter, vanilla extract, and a pinch of salt.
To start, place the cocoa powder and sugar in a small saucepan and whisk them together. Then, add the heavy cream to the pan and whisk the mixture over medium-low heat. As the cream begins to heat up, the sugar and cocoa powder will dissolve, and you’ll notice the texture become smoother. Now, add the butter to the saucepan and continue to whisk until it melts completely. Once the butter has fully incorporated into the sauce, remove the pan from the heat and stir in the vanilla extract and salt. The result should be a rich, velvety fudge sauce that’s smooth and glossy. Set it aside to cool while you prepare the rest of the ice cream base.
2. Preparing the Ice Cream Base
Now it’s time to make the ice cream base that will fill your homemade taco shells. This is where the magic happens: transforming cold, fluffy whipped cream and sweetened condensed milk into a deliciously creamy ice cream.
To begin, pour the heavy cream into the bowl of a stand mixer (or use a hand mixer) and beat it on medium-high speed until stiff peaks form. This process only takes a few minutes, so keep an eye on it. Once the cream is whipped to perfection, set it aside and grab a large bowl to prepare the other components of the ice cream base. In the large bowl, combine the sweetened condensed milk, vanilla paste (or extract), and a pinch of salt.
Now, gently fold in about one cup of the whipped cream to the condensed milk mixture using a spatula. This step helps lighten the texture of the ice cream base. Once the first cup of whipped cream is fully incorporated, add the remaining whipped cream in two batches, folding gently until there are no lumps and everything is smooth.
3. Layering the Ice Cream
Once the ice cream base is prepared, it’s time to assemble it with the fudge ripple. Start by pouring about a quarter of the ice cream base into a loaf pan. Drizzle a third of the cooled fudge sauce over the ice cream, then repeat the layering process until you’ve used up the entire base and fudge sauce, finishing with a layer of ice cream on top.
Use a spatula to smooth out the surface, ensuring an even spread of both the ice cream and fudge. Once layered, cover the pan and place it in the freezer to set for about 3 hours. The ice cream needs to freeze completely before you can assemble the tacos, so be patient and let the layers solidify in the freezer.
4. Making the Waffle Cones
The taco shell is what truly sets these Homemade Choco Tacos apart. While you could use store-bought cones, making your own waffle cones adds an extra layer of flavor and texture to the final treat. The recipe for the waffle cones is simple yet essential to creating a crisp, sturdy taco shell.
In a mixing bowl, combine the egg whites, granulated sugar, brown sugar, and vanilla extract. Use a hand mixer to beat the ingredients together until they’re well-combined. Then, add the salt and half of the flour to the mixture, continuing to mix until smooth. Gradually add the remaining flour and melted butter, stirring until a thick batter forms. The batter should be smooth, but not too runny.
Next, preheat your waffle cone maker to just above medium heat. Once it’s ready, scoop a heaping tablespoon of batter onto the center of the cone maker. Close the lid and cook the batter for about 3 minutes, or until the cones are golden brown. Every waffle cone maker is different, so keep an eye on the process to ensure they don’t overcook.
Once the waffle cones are done, use tongs to carefully remove them from the cone maker. Allow them to cool for a few seconds, and then, while they’re still soft and pliable, gently shape them into taco shells by folding the edges together with your hands. Hold them in place for about 15 seconds to help them firm up. Repeat this process until you’ve made enough taco shells for your ice cream.
5. Scooping Ice Cream into the Taco Shells
Once the waffle taco shells have cooled and hardened, it’s time to fill them with ice cream. Take the ice cream base out of the freezer and let it soften slightly for a few minutes so it’s easier to scoop. Use a small spatula or the back of a spoon to carefully scoop the ice cream into the taco shells. Press the ice cream down into the shell and smooth out the top for an even fill.
Once the taco shells are filled with ice cream, place them back in the freezer for about 10-15 minutes to firm up. This will make the ice cream easier to coat in the chocolate and ensure it doesn’t melt too quickly when you dip it.
6. Preparing the Chocolate-Peanut Coating
While the ice cream is firming up, it’s time to prepare the chocolate coating. In a microwave-safe bowl, combine the chocolate chips and coconut oil. Microwave in 30-second intervals, stirring well after each interval, until the mixture is fully melted and smooth. The coconut oil helps the chocolate harden more quickly, so your coating will set faster.
Once the chocolate is fully melted, stir in the chopped peanuts. This adds a delightful crunch to the coating and provides an extra layer of flavor.
7. Assembling the Choco Tacos
Now that your ice cream is set and the chocolate-peanut coating is ready, it’s time to dip your tacos. Carefully hold each ice cream-filled taco by the shell and dip the top into the chocolate-peanut mixture. Make sure the entire top of the taco is coated in the glossy chocolate mixture and that the peanuts adhere to the chocolate. Once coated, place the taco back in the freezer for 5-10 minutes to allow the coating to harden completely.
8. Serving and Enjoying
Once the chocolate coating is hardened, your Homemade Choco Tacos are ready to be enjoyed! Serve them immediately for a fun and indulgent treat, or store them in the freezer for later. They’re perfect for any occasion, whether you’re hosting a summer party, enjoying a family night, or simply craving a sweet, crunchy dessert.
Notes
- Dairy-Free Version: To make these Choco Tacos dairy-free, use your favorite non-dairy ice cream, such as coconut milk or almond milk-based varieties, and swap the butter in the waffle cone batter for a dairy-free version.
- Time-Saving Tip: If you’re short on time, use store-bought ice cream instead of making your own. Just let the ice cream soften a bit before scooping it into the taco shells.
- Topping Variations: Feel free to get creative with the toppings. Add sprinkles, chopped almonds, or crushed Oreo cookies for a unique twist. You can also experiment with different types of chocolate, such as dark chocolate or milk chocolate, for a different flavor profile.
What’s so special about these Homemade Choco Tacos, you might ask? For starters, they feature a homemade, no-churn vanilla ice cream that’s swirled with a rich, fudgy ribbon of chocolate sauce. This homemade ice cream is light and airy, yet creamy enough to hold its shape inside the crispy taco shell. Speaking of taco shells, these are made from scratch, using a waffle cone recipe that results in a perfectly crisp shell with just the right amount of sweetness and structure. Finally, the taco shells are dipped in a glossy layer of melted chocolate and sprinkled with finely chopped peanuts for a crunchy contrast to the smooth, cold ice cream.
The best part? These Homemade Choco Tacos are incredibly customizable. Whether you prefer to swap out the ice cream base for a dairy-free option, or try a different topping combination, this recipe can be tailored to suit any taste. And because the entire dessert can be made ahead of time and stored in the freezer, it’s a convenient treat to have on hand whenever you want to indulge in something sweet. Now, let’s dive into the details of making these nostalgic treats, starting with the ingredients and step-by-step instructions that will guide you through the entire process.
Ingredients:
For the ice cream base:
- 2 cups heavy cream, cold
- 1 14oz can sweetened condensed milk
- 1 tbsp vanilla bean paste (or 2 tsp vanilla extract)
- Pinch of salt
For the fudge ripple:
- 2 tablespoons cocoa powder
- 2 tablespoons granulated sugar
- 2 tablespoons heavy cream
- 1 tablespoon unsalted butter
- ½ teaspoon vanilla extract
- Pinch of salt
For the waffle cones:
- 2 egg whites
- 3 ½ tablespoons granulated sugar
- 3 ½ tablespoons brown sugar
- ¾ teaspoon vanilla extract
- ⅛ teaspoon salt
- ⅔ cup flour
- 2 tbsp melted butter
For the coating:
- 1 ½ cups chocolate chips
- 1 ½ tablespoon coconut oil
- ¾ cup finely chopped peanuts
Step-by-Step Instructions:
1. Making the Fudge Ripple for the Ice Cream
The first step in preparing these Homemade Choco Tacos is making the fudge ripple that will swirl throughout the ice cream. This step requires a few simple ingredients—cocoa powder, sugar, heavy cream, butter, vanilla extract, and a pinch of salt.
To start, place the cocoa powder and sugar in a small saucepan and whisk them together. Then, add the heavy cream to the pan and whisk the mixture over medium-low heat. As the cream begins to heat up, the sugar and cocoa powder will dissolve, and you’ll notice the texture become smoother. Now, add the butter to the saucepan and continue to whisk until it melts completely. Once the butter has fully incorporated into the sauce, remove the pan from the heat and stir in the vanilla extract and salt. The result should be a rich, velvety fudge sauce that’s smooth and glossy. Set it aside to cool while you prepare the rest of the ice cream base.
2. Preparing the Ice Cream Base
Now it’s time to make the ice cream base that will fill your homemade taco shells. This is where the magic happens: transforming cold, fluffy whipped cream and sweetened condensed milk into a deliciously creamy ice cream.
To begin, pour the heavy cream into the bowl of a stand mixer (or use a hand mixer) and beat it on medium-high speed until stiff peaks form. This process only takes a few minutes, so keep an eye on it. Once the cream is whipped to perfection, set it aside and grab a large bowl to prepare the other components of the ice cream base. In the large bowl, combine the sweetened condensed milk, vanilla paste (or extract), and a pinch of salt.
Now, gently fold in about one cup of the whipped cream to the condensed milk mixture using a spatula. This step helps lighten the texture of the ice cream base. Once the first cup of whipped cream is fully incorporated, add the remaining whipped cream in two batches, folding gently until there are no lumps and everything is smooth.
3. Layering the Ice Cream
Once the ice cream base is prepared, it’s time to assemble it with the fudge ripple. Start by pouring about a quarter of the ice cream base into a loaf pan. Drizzle a third of the cooled fudge sauce over the ice cream, then repeat the layering process until you’ve used up the entire base and fudge sauce, finishing with a layer of ice cream on top.
Use a spatula to smooth out the surface, ensuring an even spread of both the ice cream and fudge. Once layered, cover the pan and place it in the freezer to set for about 3 hours. The ice cream needs to freeze completely before you can assemble the tacos, so be patient and let the layers solidify in the freezer.
4. Making the Waffle Cones
The taco shell is what truly sets these Homemade Choco Tacos apart. While you could use store-bought cones, making your own waffle cones adds an extra layer of flavor and texture to the final treat. The recipe for the waffle cones is simple yet essential to creating a crisp, sturdy taco shell.
In a mixing bowl, combine the egg whites, granulated sugar, brown sugar, and vanilla extract. Use a hand mixer to beat the ingredients together until they’re well-combined. Then, add the salt and half of the flour to the mixture, continuing to mix until smooth. Gradually add the remaining flour and melted butter, stirring until a thick batter forms. The batter should be smooth, but not too runny.
Next, preheat your waffle cone maker to just above medium heat. Once it’s ready, scoop a heaping tablespoon of batter onto the center of the cone maker. Close the lid and cook the batter for about 3 minutes, or until the cones are golden brown. Every waffle cone maker is different, so keep an eye on the process to ensure they don’t overcook.
Once the waffle cones are done, use tongs to carefully remove them from the cone maker. Allow them to cool for a few seconds, and then, while they’re still soft and pliable, gently shape them into taco shells by folding the edges together with your hands. Hold them in place for about 15 seconds to help them firm up. Repeat this process until you’ve made enough taco shells for your ice cream.
5. Scooping Ice Cream into the Taco Shells
Once the waffle taco shells have cooled and hardened, it’s time to fill them with ice cream. Take the ice cream base out of the freezer and let it soften slightly for a few minutes so it’s easier to scoop. Use a small spatula or the back of a spoon to carefully scoop the ice cream into the taco shells. Press the ice cream down into the shell and smooth out the top for an even fill.
Once the taco shells are filled with ice cream, place them back in the freezer for about 10-15 minutes to firm up. This will make the ice cream easier to coat in the chocolate and ensure it doesn’t melt too quickly when you dip it.
6. Preparing the Chocolate-Peanut Coating
While the ice cream is firming up, it’s time to prepare the chocolate coating. In a microwave-safe bowl, combine the chocolate chips and coconut oil. Microwave in 30-second intervals, stirring well after each interval, until the mixture is fully melted and smooth. The coconut oil helps the chocolate harden more quickly, so your coating will set faster.
Once the chocolate is fully melted, stir in the chopped peanuts. This adds a delightful crunch to the coating and provides an extra layer of flavor.
7. Assembling the Choco Tacos
Now that your ice cream is set and the chocolate-peanut coating is ready, it’s time to dip your tacos. Carefully hold each ice cream-filled taco by the shell and dip the top into the chocolate-peanut mixture. Make sure the entire top of the taco is coated in the glossy chocolate mixture and that the peanuts adhere to the chocolate. Once coated, place the taco back in the freezer for 5-10 minutes to allow the coating to harden completely.
8. Serving and Enjoying
Once the chocolate coating is hardened, your Homemade Choco Tacos are ready to be enjoyed! Serve them immediately for a fun and indulgent treat, or store them in the freezer for later. They’re perfect for any occasion, whether you’re hosting a summer party, enjoying a family night, or simply craving a sweet, crunchy dessert.
Additional Tips and Variations:
- Dairy-Free Version: To make these Choco Tacos dairy-free, use your favorite non-dairy ice cream, such as coconut milk or almond milk-based varieties, and swap the butter in the waffle cone batter for a dairy-free version.
- Time-Saving Tip: If you’re short on time, use store-bought ice cream instead of making your own. Just let the ice cream soften a bit before scooping it into the taco shells.
- Topping Variations: Feel free to get creative with the toppings. Add sprinkles, chopped almonds, or crushed Oreo cookies for a unique twist. You can also experiment with different types of chocolate, such as dark chocolate or milk chocolate, for a different flavor profile.

Conclusion:
These Homemade Choco Tacos are a perfect way to indulge in a beloved childhood treat with a homemade twist. With creamy, homemade vanilla ice cream, crispy waffle cone taco shells, and a sweet, crunchy chocolate-peanut coating, this dessert brings together all the best flavors and textures in every bite. Whether you make them for a special occasion or simply as a fun family treat, these Choco Tacos are sure to bring joy to anyone who tastes them. The recipe is easy to follow and can be customized to fit dietary needs or personal preferences, making it a versatile and delightful treat for everyone. So, grab your waffle cone maker, gather your ingredients, and get ready to create a dessert that’s as fun to make as it is to eat!


