The holiday season brings with it a chance to gather loved ones and create memories, and what better way to do that than with a festive dessert that is both beautiful and delicious? Enter the Pavlova Christmas Tree—an enchanting twist on the classic pavlova that is bound to be the showstopper of any Christmas dinner. This delightful dessert combines the light, crisp texture of meringue with the richness of whipped cream and the tartness of fresh strawberries and passionfruit. The result is a perfect balance of flavors and textures that will bring joy to your holiday table.
PrintFestive Pavlova Christmas Tree with Strawberry and Passionfruit Delight

The holiday season brings with it a chance to gather loved ones and create memories, and what better way to do that than with a festive dessert that is both beautiful and delicious? Enter the Pavlova Christmas Tree—an enchanting twist on the classic pavlova that is bound to be the showstopper of any Christmas dinner. This delightful dessert combines the light, crisp texture of meringue with the richness of whipped cream and the tartness of fresh strawberries and passionfruit. The result is a perfect balance of flavors and textures that will bring joy to your holiday table.
- Prep Time: 20 minutes
- Cook Time: 1 hour
- Total Time: 1 hour 20 minutes
- Yield: Serves 6
- Category: Dessert, Holiday Dessert
- Method: Baking, Whipping
- Cuisine: Australian
- Diet: Vegetarian
Ingredients
- 1 cup white chocolate melts, melted
- 5 free-range egg whites, at room temperature
- ¼ tsp cream of tartar
- 1¼ cups caster sugar
- 2 tsp vanilla extract
- 2 tsp white vinegar
- 2 Tbsp cornflour
- 600ml thickened cream, whipped to soft peaks
- Sliced strawberries, passionfruit pulp, and icing sugar for decoration
Instructions
Step 1: Preparing the Tree Shape
Before you begin making the meringue, it’s essential to prepare your baking surface to help create the tree shape. Start by preheating your oven to 120°C fan-forced (or 140°C conventional).
Next, draw a tree outline on a piece of paper. You can either freehand it or find an image online that you’d like to use as a template. Once you have the tree outline, enlarge it to about 35cm in height and 25cm at the widest part of the base. This will serve as the size of the tree. Once the drawing is the right size, photocopy it and place the copy onto a sheet of baking paper. Make sure the image side is facing down, and then place the paper on your oven tray. This outline will act as your guide when piping the meringue, ensuring your pavlova forms the perfect tree shape.
Step 2: Making the White Chocolate Stars
While the meringue is the star of the dessert, the white chocolate stars are the fun part. These little decorations bring a whimsical touch to the dessert and elevate the presentation. Start by melting the white chocolate melts in a heatproof bowl. You can do this in the microwave in short bursts or by using a double boiler.
Once the chocolate has melted, transfer it to a small snaplock bag and snip one corner to create a makeshift piping bag. On a separate piece of baking paper, pipe small crosses to form the star shapes. To give them a more distinct look, pipe a vertical and horizontal line through the center of each cross. Allow the chocolate to cool and set completely before using them to decorate your pavlova later.
Step 3: Preparing the Meringue
In a large bowl, add the egg whites and cream of tartar. Using an electric mixer with a whisk attachment, beat the egg whites until soft peaks form. This means the egg whites should be fluffy and should hold their shape but still gently curl over when lifted with a whisk.
Once the soft peaks have formed, it’s time to add the sugar. With the mixer running, add the caster sugar one tablespoon at a time, beating well after each addition. This gradual process helps to ensure the sugar dissolves completely and results in a smooth, glossy meringue. Keep beating until the meringue is thick and glossy, and the peaks stand firm.
Next, add the vanilla extract, white vinegar, and cornflour. These ingredients help stabilize the meringue and prevent it from cracking during baking. Beat the mixture briefly to combine.
Step 4: Piping the Meringue
Now that your meringue is ready, transfer it to a large piping bag fitted with a large plain nozzle. You’re now ready to pipe the meringue onto the prepared baking paper. Starting at the bottom of the tree outline, pipe a layer of meringue to form the base of the tree. Work your way up, piping several layers of meringue to create a tree-like shape. Use an offset spatula to smooth out the surface and create a nice, even texture.
Once the tree shape is piped, add an extra 2-3 layers on top to create a cavity in the middle. This gives your tree more structure and depth, making it look even more impressive. Place the tray in the oven and bake for 1 hour, or until the meringue is crisp to the touch. You’ll know the pavlova is ready when it has a lovely golden-brown color and a crisp texture.
After baking, turn off the oven and leave the meringue inside to cool with the door ajar for about 2 hours. This step is crucial as it allows the meringue to set and cool slowly, preventing it from cracking.
Step 5: Assembling the Pavlova
Once the meringue has cooled completely, it’s time to assemble your Pavlova Christmas Tree. Gently spoon the whipped cream into the center of the meringue tree, filling the cavity you created with the additional layers of meringue. You want to have a generous amount of cream to complement the sweetness of the meringue.
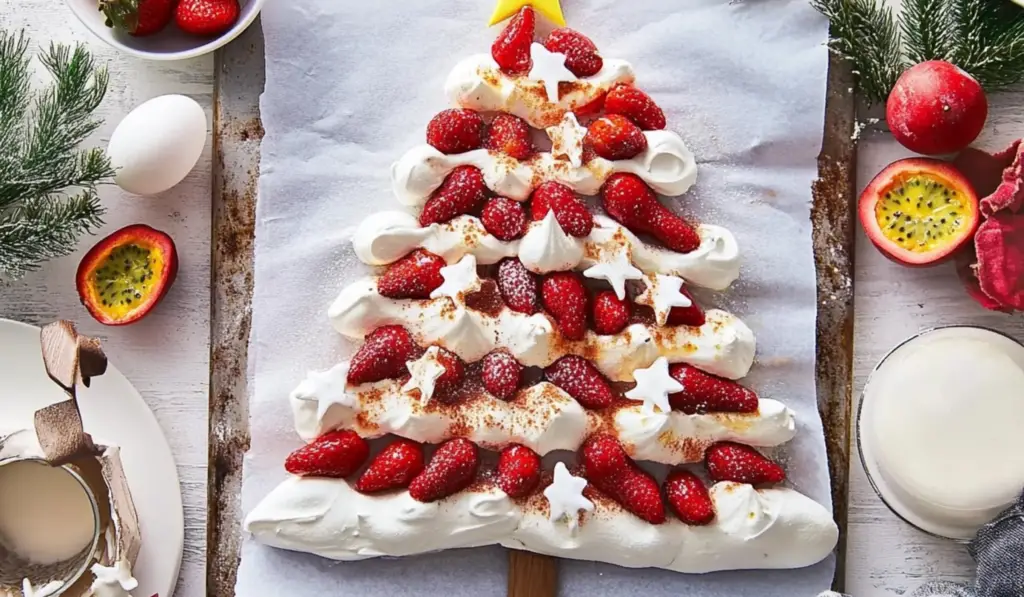
Now it’s time to decorate! Arrange the sliced strawberries on top of the cream, placing them carefully to create a festive look. Add the passionfruit pulp to give your tree a pop of bright, tropical flavor. Finally, place the white chocolate stars on top for that final festive touch. If desired, dust the entire tree with a light dusting of icing sugar to give it a frosty, snowy look.
Step 6: Serving the Pavlova
This Pavlova Christmas Tree is not just a beautiful dessert, but also one that is fun to share. Serve it as the centerpiece of your holiday feast, and watch as your guests are delighted by the stunning presentation. The combination of the crispy meringue, creamy whipped cream, and the burst of fresh fruit is sure to leave everyone smiling.
Notes
- If you prefer a different flavor for the chocolate stars, you can use dark chocolate or even milk chocolate. The richness of dark chocolate pairs beautifully with the sweetness of the meringue and cream.
- For a dairy-free option, substitute the whipped cream with coconut cream. It’s a great alternative that adds a light coconut flavor to the dessert.
- You can add a festive twist by incorporating some cinnamon or nutmeg into the meringue for a warm, spiced flavor. This works especially well with the strawberries and passionfruit.
- If passionfruit isn’t available, you can use fresh berries or even kiwi fruit as a substitute. Their tartness will provide the same refreshing contrast to the sweetness of the pavlova.
The pavlova itself is a dessert made of meringue—egg whites, sugar, and a few other ingredients beaten into a fluffy, glossy mixture and baked until crisp on the outside and soft on the inside. It’s typically topped with whipped cream and fresh fruit, which adds a refreshing contrast to the sweetness of the meringue. What makes this version unique is the festive tree shape, which transforms a traditional dessert into a holiday masterpiece. Decorated with fresh fruit, passionfruit pulp, and homemade white chocolate stars, this Pavlova Christmas Tree is not only a feast for the taste buds but also for the eyes.
Whether you’re hosting a Christmas party or simply want to create something special for your family to enjoy, this dessert is sure to impress. The bright red strawberries, the golden pulp of the passionfruit, and the crisp meringue create a stunning visual contrast, while the rich whipped cream provides the perfect creamy balance. But beyond its aesthetic appeal, this Pavlova Christmas Tree also delivers on taste, offering a delightful combination of sweet, tangy, and creamy elements that will leave everyone asking for seconds.
The Allure of Pavlova
Pavlova is a beloved dessert that has become a holiday classic in many parts of the world. Named after the Russian ballerina Anna Pavlova, this dessert is light and delicate, with a crisp outer shell and a soft, marshmallow-like interior. It’s the perfect combination of textures and flavors: crispy on the outside, soft on the inside, sweet but not overpowering. The whipped cream on top adds a rich, velvety smoothness, while the fresh fruit provides a burst of tangy brightness that balances the sweetness.
What makes this Christmas version of pavlova even more special is the tree shape, which adds a festive touch to the dessert. It’s a fun way to celebrate the holiday season and brings a touch of whimsy to your table. Not only does it look impressive, but it’s also easy to make, with just a few simple ingredients and a little creativity.
With this Pavlova Christmas Tree, you’re not just making a dessert—you’re creating a beautiful centerpiece that will steal the spotlight and become a conversation piece. It’s perfect for those who love baking, but even if you’re a beginner, you can follow this recipe and make something magical that your guests will rave about.
Ingredients
For this Pavlova Christmas Tree, you’ll need the following ingredients:
- 1 cup white chocolate melts, melted
- 5 free-range egg whites, at room temperature
- ¼ tsp cream of tartar
- 1¼ cups caster sugar
- 2 tsp vanilla extract
- 2 tsp white vinegar
- 2 Tbsp cornflour
- 600ml thickened cream, whipped to soft peaks
- Sliced strawberries, passionfruit pulp, and icing sugar for decoration
These ingredients come together to form a show-stopping dessert that’s as delicious as it is beautiful. While the meringue forms the structure of the tree, the whipped cream is the perfect creamy topping, and the strawberries and passionfruit add fresh, juicy flavors. The white chocolate stars are an easy yet elegant addition that adds a festive touch.
Step-by-Step Instructions
Step 1: Preparing the Tree Shape
Before you begin making the meringue, it’s essential to prepare your baking surface to help create the tree shape. Start by preheating your oven to 120°C fan-forced (or 140°C conventional).
Next, draw a tree outline on a piece of paper. You can either freehand it or find an image online that you’d like to use as a template. Once you have the tree outline, enlarge it to about 35cm in height and 25cm at the widest part of the base. This will serve as the size of the tree. Once the drawing is the right size, photocopy it and place the copy onto a sheet of baking paper. Make sure the image side is facing down, and then place the paper on your oven tray. This outline will act as your guide when piping the meringue, ensuring your pavlova forms the perfect tree shape.
Step 2: Making the White Chocolate Stars
While the meringue is the star of the dessert, the white chocolate stars are the fun part. These little decorations bring a whimsical touch to the dessert and elevate the presentation. Start by melting the white chocolate melts in a heatproof bowl. You can do this in the microwave in short bursts or by using a double boiler.
Once the chocolate has melted, transfer it to a small snaplock bag and snip one corner to create a makeshift piping bag. On a separate piece of baking paper, pipe small crosses to form the star shapes. To give them a more distinct look, pipe a vertical and horizontal line through the center of each cross. Allow the chocolate to cool and set completely before using them to decorate your pavlova later.
Step 3: Preparing the Meringue
In a large bowl, add the egg whites and cream of tartar. Using an electric mixer with a whisk attachment, beat the egg whites until soft peaks form. This means the egg whites should be fluffy and should hold their shape but still gently curl over when lifted with a whisk.
Once the soft peaks have formed, it’s time to add the sugar. With the mixer running, add the caster sugar one tablespoon at a time, beating well after each addition. This gradual process helps to ensure the sugar dissolves completely and results in a smooth, glossy meringue. Keep beating until the meringue is thick and glossy, and the peaks stand firm.
Next, add the vanilla extract, white vinegar, and cornflour. These ingredients help stabilize the meringue and prevent it from cracking during baking. Beat the mixture briefly to combine.
Step 4: Piping the Meringue
Now that your meringue is ready, transfer it to a large piping bag fitted with a large plain nozzle. You’re now ready to pipe the meringue onto the prepared baking paper. Starting at the bottom of the tree outline, pipe a layer of meringue to form the base of the tree. Work your way up, piping several layers of meringue to create a tree-like shape. Use an offset spatula to smooth out the surface and create a nice, even texture.
Once the tree shape is piped, add an extra 2-3 layers on top to create a cavity in the middle. This gives your tree more structure and depth, making it look even more impressive. Place the tray in the oven and bake for 1 hour, or until the meringue is crisp to the touch. You’ll know the pavlova is ready when it has a lovely golden-brown color and a crisp texture.
After baking, turn off the oven and leave the meringue inside to cool with the door ajar for about 2 hours. This step is crucial as it allows the meringue to set and cool slowly, preventing it from cracking.
Step 5: Assembling the Pavlova
Once the meringue has cooled completely, it’s time to assemble your Pavlova Christmas Tree. Gently spoon the whipped cream into the center of the meringue tree, filling the cavity you created with the additional layers of meringue. You want to have a generous amount of cream to complement the sweetness of the meringue.
Now it’s time to decorate! Arrange the sliced strawberries on top of the cream, placing them carefully to create a festive look. Add the passionfruit pulp to give your tree a pop of bright, tropical flavor. Finally, place the white chocolate stars on top for that final festive touch. If desired, dust the entire tree with a light dusting of icing sugar to give it a frosty, snowy look.
Step 6: Serving the Pavlova
This Pavlova Christmas Tree is not just a beautiful dessert, but also one that is fun to share. Serve it as the centerpiece of your holiday feast, and watch as your guests are delighted by the stunning presentation. The combination of the crispy meringue, creamy whipped cream, and the burst of fresh fruit is sure to leave everyone smiling.
Tips for Ingredient Substitutions and Variations
While this recipe is delicious as is, there are a few substitutions and variations you can try to customize the dessert to your taste:
- If you prefer a different flavor for the chocolate stars, you can use dark chocolate or even milk chocolate. The richness of dark chocolate pairs beautifully with the sweetness of the meringue and cream.
- For a dairy-free option, substitute the whipped cream with coconut cream. It’s a great alternative that adds a light coconut flavor to the dessert.
- You can add a festive twist by incorporating some cinnamon or nutmeg into the meringue for a warm, spiced flavor. This works especially well with the strawberries and passionfruit.
- If passionfruit isn’t available, you can use fresh berries or even kiwi fruit as a substitute. Their tartness will provide the same refreshing contrast to the sweetness of the pavlova.

Final Thoughts
This Pavlova Christmas Tree is the perfect way to end your holiday meal. Its light and airy meringue base, rich whipped cream topping, and tangy fruit decorations come together to create a dessert that is as delicious as it is festive. Whether you’re an experienced baker or just starting out, this recipe is easy to follow and guarantees a showstopping result.
By making this festive pavlova, you’re not just preparing a dessert—you’re creating a holiday tradition that will be enjoyed by friends and family for years to come. So go ahead and give it a try this Christmas—you won’t regret it!


