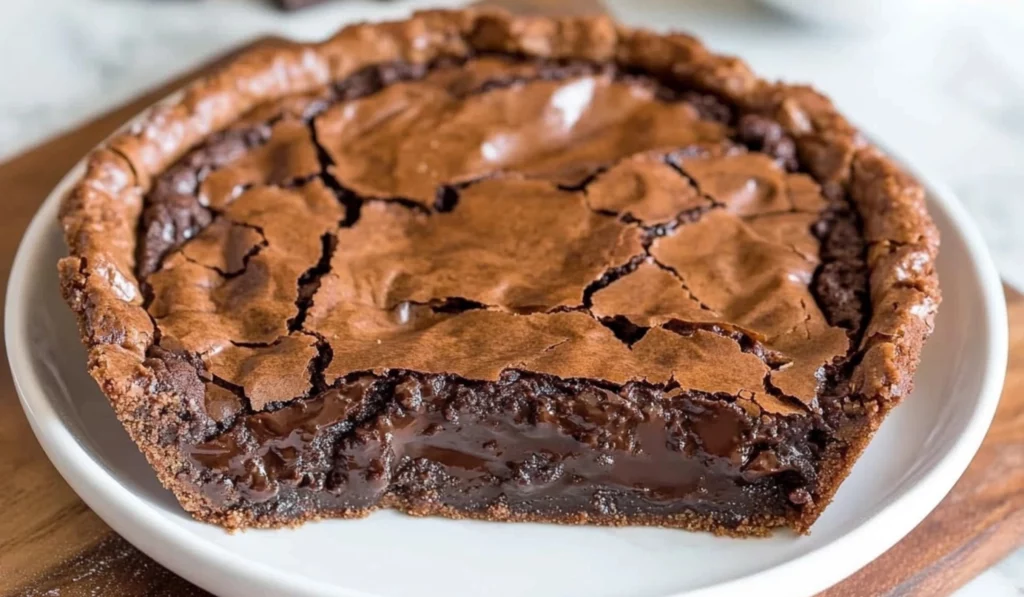
If you’re a chocolate lover, this Easy Gooey Brownie Pie recipe is bound to become a new favorite in your baking repertoire. Picture this: a warm, fudgy, and rich brownie with a crackly top baked into a pie form. Now, imagine a generous drizzle of hot fudge poured over the top, making it even more decadent. Whether you’re new to baking or looking for a simple yet impressive dessert, this recipe ticks all the boxes: quick, easy, and delicious.

Easy Gooey Brownie Pie Recipe: A Sweet and Simple Dessert for Beginners
Craving something rich and chocolatey? This Easy Gooey Brownie Pie is a perfect treat for beginners—simple to make and irresistibly delicious. With its fudgy center, crackly top, and a drizzle of hot fudge, this dessert will satisfy every chocolate lover’s sweet tooth. I first made this when I wanted a fuss-free, impressive dessert, and it quickly became a favorite. Whether you’re a novice baker or just looking for a quick indulgence, this brownie pie is your go-to recipe!
- Prep Time: 10 minutes
- Cook Time: 40 minutes
- Total Time: 50 minutes
- Yield: 10 servings 1x
- Category: Dessert
- Method: Baking
- Cuisine: American
- Diet: Vegetarian
Ingredients
- 6 Tbsp butter (unsalted)
- 3 cups semi-sweet chocolate chips (divided into two parts)
- 3 eggs
- 1 cup sugar
- 1 tsp vanilla extract
- 1/2 cup flour
- 1/4 tsp baking powder
- 1/4 tsp salt
Instructions
-
- Preheat the oven: Start by preheating your oven to 350°F (175°C). It’s always a good idea to preheat the oven while you’re preparing the batter so that the oven is fully heated when it’s time to bake. Grease a 9-inch pie plate or a springform pan. Greasing the pan thoroughly is crucial to ensure the pie slides out easily once baked. If you’re using a springform pan, line the base with parchment paper to avoid any sticking.
-
- Melt butter and chocolate: In a heat-safe bowl, melt 6 tablespoons of butter and 2 cups of chocolate chips together. This is where the magic begins! You can do this by placing the bowl over a double boiler or if you prefer the microwave method, heat the mixture in 30-second intervals at 50% power, stirring after each interval until it’s smooth and fully melted. If you’re using a microwave, be sure to stir gently to prevent the chocolate from burning. Once melted, set the mixture aside to cool slightly. This step is important because you don’t want to add hot chocolate to your egg mixture, as it could scramble the eggs and ruin the smooth texture.
-
- Mix eggs, sugar, and vanilla: Using an electric mixer, beat the 3 eggs, 1 cup of sugar, and 1 teaspoon of vanilla extract together on medium-high speed. Continue beating for about 3 minutes until the mixture becomes light and fluffy. This step helps create a nice, airy texture in your pie. The sugar will dissolve into the eggs, creating a silky smooth base for the chocolate.
-
- Add the chocolate mixture: Slowly mix in the cooled chocolate-butter mixture into the egg-sugar mixture. It’s essential to do this slowly to ensure the mixture remains smooth and fully incorporated. The chocolate will blend with the eggs, creating a rich, chocolatey batter that looks almost too good to bake!
-
- Incorporate dry ingredients: Gently fold in 1/2 cup of flour, 1/4 teaspoon of baking powder, and 1/4 teaspoon of salt. Do this gently until just combined. Overmixing the batter can result in a denser pie, so mix just enough to incorporate everything. The flour should be well-distributed but still retain a soft, moist texture. If you’re unsure, it’s better to under-mix than over-mix.
-
- Add the remaining chocolate chips: Finally, fold in the remaining 1 cup of chocolate chips. These chips are essential for that extra burst of gooey chocolate throughout the pie. Don’t be afraid to mix them in thoroughly—they’ll add pockets of melted chocolate goodness as they bake.
-
- Pour and bake: Pour the batter into your prepared pan. Be sure to spread the batter evenly to ensure an even bake. Bake in the preheated oven for 35-40 minutes. The top should form a crackly layer, and the center will be puffed. This is the signature feature of a gooey brownie pie. You can test for doneness by inserting a toothpick into the center – it should come out with just a few moist crumbs (not wet batter). If it comes out completely clean, the pie may be overbaked.
-
- Cool completely: Once the brownie pie is baked, remove it from the oven and let it cool completely in the pan. It’s important to allow the pie to set before cutting. Cooling helps the brownie set to that perfect gooey consistency. Plus, it makes the pie easier to slice and serve.
-
- Top with hot fudge: For the finishing touch, top the cooled brownie pie with your favorite hot fudge sauce. You can either purchase it or make your own. Pour generously over the top and serve immediately, or allow the fudge to cool and harden a bit for a more decadent topping.
Notes
- Baking Time: Ovens vary, so keep an eye on your pie. If the edges are starting to darken but the center is still too soft, cover the edges with aluminum foil and continue baking. This will help prevent overbaking while allowing the center to set. Another tip is to start checking the pie at around 30 minutes—this gives you a chance to monitor the progress and make sure it doesn’t overbake.
- Cooling the Chocolate: After melting the butter and chocolate, be sure to let it cool before adding it to the egg mixture. If it’s too hot, it could cook the eggs, which might result in a curdled texture. Allow the mixture to cool for at least 10-15 minutes before mixing it into the eggs. Patience is key!
- Avoid Overmixing: As tempting as it may be to keep stirring, overmixing the batter will affect the final texture. The key is to mix just enough to combine the ingredients and get a smooth batter. If you’re not sure, it’s always better to under-mix than over-mix. A slightly lumpy batter will still yield a delicious pie!
- Test for Doneness: Since ovens vary, it’s important to test for doneness using a toothpick or a cake tester. If the center is slightly gooey but not wet, you’ve got the perfect brownie pie.
Baking doesn’t have to be complicated, and this gooey brownie pie is the perfect example. The ingredients are simple, the steps are easy to follow, and the end result will wow your guests every time. As a beginner cook, it’s essential to have recipes that allow you to build confidence in the kitchen, and this brownie pie is a great starting point. It’s fuss-free, requires minimal equipment, and guarantees a sweet, indulgent treat.
I remember the first time I baked this gooey brownie pie. I was a beginner baker at the time, and I wanted something that didn’t require a lot of fancy techniques but still felt like an impressive dessert. I decided on this recipe, and when it came out of the oven with that perfect crackly top, I was thrilled. The best part? It tasted even better than it looked! From that moment on, it became a go-to dessert for gatherings, family dinners, and even just a sweet treat to enjoy on my own.
Let’s dive into how you can make this gooey brownie pie that’s sure to be a hit at your next gathering or as a cozy dessert after dinner!
Ingredients and Preparation
To get started, you’ll need the following ingredients, which are easy to find in most grocery stores:
- 6 Tbsp butter (unsalted)
- 3 cups semi-sweet chocolate chips (divided into two parts)
- 3 eggs
- 1 cup sugar
- 1 tsp vanilla extract
- 1/2 cup flour
- 1/4 tsp baking powder
- 1/4 tsp salt
These ingredients are not only accessible but also versatile. You’ll probably already have most of them in your kitchen, and the few additions (like the semi-sweet chocolate chips) bring out that signature chocolatey, rich flavor.
Ingredient Substitutions and Flexibility
One of the best things about this recipe is its flexibility. You can make small tweaks based on your preferences or dietary needs. Here are a few ideas for ingredient substitutions:
- Butter: If you prefer a dairy-free version, you can swap butter with margarine or a plant-based butter alternative. For those on a vegan diet, coconut oil works well as a substitute.
- Semi-Sweet Chocolate Chips: If you prefer darker chocolate, feel free to use bittersweet chocolate chips. You could also swap in milk chocolate chips for a sweeter flavor, but this may alter the texture slightly. If you want to experiment further, you could try a mix of dark and white chocolate chips for a different aesthetic and flavor profile.
- Flour: For a gluten-free version, substitute regular flour with a gluten-free all-purpose flour blend. Make sure the blend contains a binding agent like xanthan gum to help with texture.
- Sugar: To reduce the sweetness or use healthier options, try substituting sugar with a natural sweetener like stevia or monk fruit sweetener (note that this may alter the consistency). For a more natural option, honey or maple syrup can also be used, though this may slightly affect the texture.
The flexibility in ingredients makes this dessert adaptable to your taste or dietary preferences, so don’t hesitate to experiment!
Step-by-Step Instructions
Now, let’s go through the simple process of creating your gooey brownie pie. As you follow the steps, you’ll notice that this recipe doesn’t require complicated techniques, making it perfect for beginners.
- Preheat the oven: Start by preheating your oven to 350°F (175°C). It’s always a good idea to preheat the oven while you’re preparing the batter so that the oven is fully heated when it’s time to bake. Grease a 9-inch pie plate or a springform pan. Greasing the pan thoroughly is crucial to ensure the pie slides out easily once baked. If you’re using a springform pan, line the base with parchment paper to avoid any sticking.
- Melt butter and chocolate: In a heat-safe bowl, melt 6 tablespoons of butter and 2 cups of chocolate chips together. This is where the magic begins! You can do this by placing the bowl over a double boiler or if you prefer the microwave method, heat the mixture in 30-second intervals at 50% power, stirring after each interval until it’s smooth and fully melted. If you’re using a microwave, be sure to stir gently to prevent the chocolate from burning. Once melted, set the mixture aside to cool slightly. This step is important because you don’t want to add hot chocolate to your egg mixture, as it could scramble the eggs and ruin the smooth texture.
- Mix eggs, sugar, and vanilla: Using an electric mixer, beat the 3 eggs, 1 cup of sugar, and 1 teaspoon of vanilla extract together on medium-high speed. Continue beating for about 3 minutes until the mixture becomes light and fluffy. This step helps create a nice, airy texture in your pie. The sugar will dissolve into the eggs, creating a silky smooth base for the chocolate.
- Add the chocolate mixture: Slowly mix in the cooled chocolate-butter mixture into the egg-sugar mixture. It’s essential to do this slowly to ensure the mixture remains smooth and fully incorporated. The chocolate will blend with the eggs, creating a rich, chocolatey batter that looks almost too good to bake!
- Incorporate dry ingredients: Gently fold in 1/2 cup of flour, 1/4 teaspoon of baking powder, and 1/4 teaspoon of salt. Do this gently until just combined. Overmixing the batter can result in a denser pie, so mix just enough to incorporate everything. The flour should be well-distributed but still retain a soft, moist texture. If you’re unsure, it’s better to under-mix than over-mix.
- Add the remaining chocolate chips: Finally, fold in the remaining 1 cup of chocolate chips. These chips are essential for that extra burst of gooey chocolate throughout the pie. Don’t be afraid to mix them in thoroughly—they’ll add pockets of melted chocolate goodness as they bake.
- Pour and bake: Pour the batter into your prepared pan. Be sure to spread the batter evenly to ensure an even bake. Bake in the preheated oven for 35-40 minutes. The top should form a crackly layer, and the center will be puffed. This is the signature feature of a gooey brownie pie. You can test for doneness by inserting a toothpick into the center – it should come out with just a few moist crumbs (not wet batter). If it comes out completely clean, the pie may be overbaked.
- Cool completely: Once the brownie pie is baked, remove it from the oven and let it cool completely in the pan. It’s important to allow the pie to set before cutting. Cooling helps the brownie set to that perfect gooey consistency. Plus, it makes the pie easier to slice and serve.
- Top with hot fudge: For the finishing touch, top the cooled brownie pie with your favorite hot fudge sauce. You can either purchase it or make your own. Pour generously over the top and serve immediately, or allow the fudge to cool and harden a bit for a more decadent topping.
Beginner Tips and Notes
While this recipe is beginner-friendly, there are a few tips and notes to keep in mind to make sure you get the perfect brownie pie every time:
- Baking Time: Ovens vary, so keep an eye on your pie. If the edges are starting to darken but the center is still too soft, cover the edges with aluminum foil and continue baking. This will help prevent overbaking while allowing the center to set. Another tip is to start checking the pie at around 30 minutes—this gives you a chance to monitor the progress and make sure it doesn’t overbake.
- Cooling the Chocolate: After melting the butter and chocolate, be sure to let it cool before adding it to the egg mixture. If it’s too hot, it could cook the eggs, which might result in a curdled texture. Allow the mixture to cool for at least 10-15 minutes before mixing it into the eggs. Patience is key!
- Avoid Overmixing: As tempting as it may be to keep stirring, overmixing the batter will affect the final texture. The key is to mix just enough to combine the ingredients and get a smooth batter. If you’re not sure, it’s always better to under-mix than over-mix. A slightly lumpy batter will still yield a delicious pie!
- Test for Doneness: Since ovens vary, it’s important to test for doneness using a toothpick or a cake tester. If the center is slightly gooey but not wet, you’ve got the perfect brownie pie.
These tips will help you avoid common pitfalls and ensure your brownie pie comes out perfect every time.
Serving Suggestions
This gooey brownie pie can be served in many different ways to elevate the flavor and texture. Here are some ideas:
- Vanilla ice cream: The warm gooey brownie pie pairs wonderfully with a scoop of vanilla ice cream. The cold ice cream contrasts with the warm, fudgy pie, making each bite more delicious. If you’re feeling adventurous, try adding some cinnamon or caramel ice cream for an extra flavor twist.
- Whipped cream: If you prefer something lighter, a dollop of freshly whipped cream will add a nice touch to your dessert. It complements the richness of the pie without overpowering it.
- Fresh berries: For a fruity twist, serve the brownie pie with fresh strawberries, raspberries, or blueberries. The tartness of the fruit balances the richness of the brownie, creating a delightful contrast.
- Extra chocolate: If you love chocolate, drizzle more hot fudge sauce or melted chocolate over the top for an indulgent finish. You could also sprinkle chocolate shavings or mini chocolate chips over the top for an extra touch of decadence.
Storing Leftovers
If you’re lucky enough to have any leftovers (which is rare for this indulgent dessert!), here’s how to store them:
- Room temperature: Keep the brownie pie covered at room temperature for up to 2 days. Make sure to cover it with plastic wrap or store it in an airtight container to keep it fresh.
- Refrigerator: If you want to extend its shelf life, store it in the refrigerator for up to 5 days. Just make sure to let it come to room temperature before serving for the best taste.
- Freezer: For long-term storage, you can freeze individual slices wrapped tightly in plastic wrap and foil. Reheat them in the microwave for a quick treat whenever you’re craving chocolate!

Conclusion
This Easy Gooey Brownie Pie is the ultimate chocolate lover’s dream, and its simplicity makes it perfect for beginner bakers. With just a few ingredients and straightforward steps, you can create a rich, fudgy dessert that’s sure to impress. Whether you’re preparing it for a special occasion or just because, this recipe is sure to become a staple in your baking repertoire.
We’d love to hear how it turns out for you! If you make this brownie pie, let us know how it went in the comments. What did you top it with? Did you try any ingredient substitutions? Share your experience and inspire other beginner bakers to give this recipe a try. Enjoy your sweet creation and happy baking!


