Are you looking for a quick yet mouthwatering dinner that will make your taste buds dance in delight? If so, this crispy honey butter chicken is exactly what you need. With a deliciously crispy exterior and a sweet, savory honey butter sauce, this dish brings together the best of both worlds—flavor and convenience. What makes it even better is that this recipe comes together in just 30 minutes! Yes, you can enjoy a restaurant-quality meal without spending hours in the kitchen.

Crispy Honey Butter Chicken: A 30-Minute Delight You’ll Love

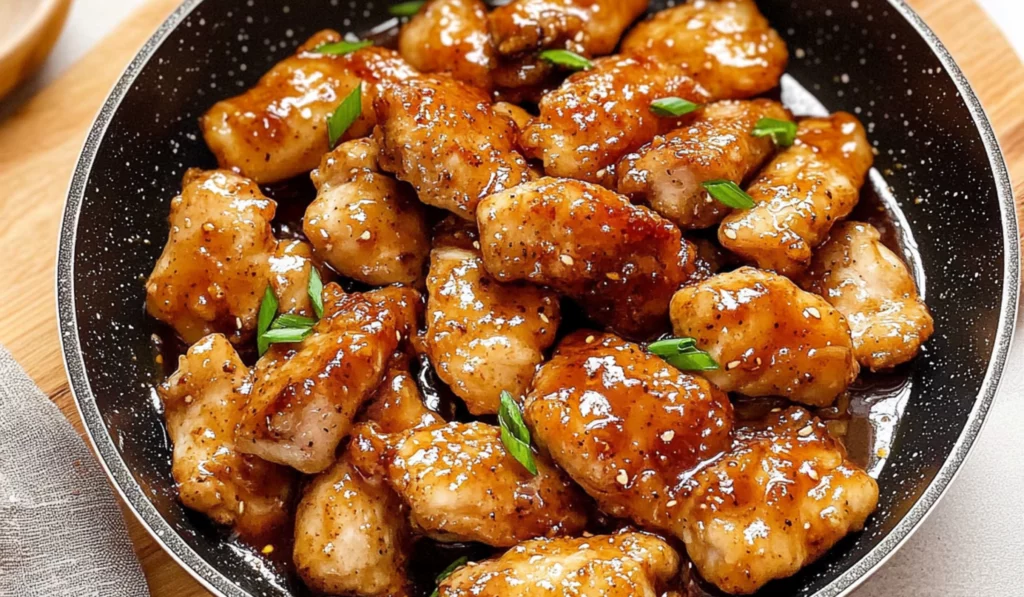
Craving something quick, crispy, and delicious? This honey butter chicken is the answer! In just 30 minutes, you’ll have tender, golden chicken coated in a sweet and savory sauce. With simple ingredients and easy steps, this recipe is perfect for beginner cooks looking to impress. The best part? It’s shallow-fried, so it’s lighter yet still incredibly flavorful. Ready to dig in?
- Prep Time: 10 minutes
- Cook Time: 20 minutes
- Total Time: 30 minutes
- Yield: 5 servings 1x
- Category: Dinner, Main Course
- Method: Shallow Frying
- Cuisine: American
Ingredients
- 800g (about 1.75 lbs) boneless chicken thighs or chicken tenders
- ⅔ cup flour (for coating the chicken)
- 1 teaspoon kosher salt
- ½ teaspoon black pepper
- 1 teaspoon garlic powder
- 3 tablespoons olive oil (or canola oil or vegetable oil)
For the Honey Butter Sauce:
- ⅓ cup honey
- 100g (about 7 tablespoons) unsalted butter
- 2 cloves garlic, minced
- 2 tablespoons light soy sauce (or regular soy sauce)
Instructions
Step 1: Coat the Chicken
To begin, we need to coat the chicken to ensure it turns crispy when cooked. Take a large bowl or a shallow plate and mix together the flour, kosher salt, black pepper, and garlic powder. This simple mixture will give your chicken a flavorful, golden-brown coating when fried. Next, cut the chicken into bite-sized pieces, if using chicken thighs, or use chicken tenders as they are. Add the chicken to the flour mixture and toss it well to ensure each piece is evenly coated. The more thorough you are with this step, the crispier your chicken will be!
Step 2: Fry the Chicken
Once the chicken is coated, it’s time to fry it. Heat a large pan over medium-high heat and add 3 tablespoons of olive oil (or your choice of oil). The oil should be hot enough that it sizzles when you add the chicken, but not smoking. Carefully add the chicken pieces in batches to the pan, making sure not to overcrowd it, as that can lead to soggy chicken. Fry the chicken for about 4-5 minutes on each side until it’s golden and crispy. If using a meat thermometer, ensure the chicken has reached an internal temperature of 165°F (75°C) to guarantee it’s fully cooked.
Step 3: Prepare the Honey Butter Sauce
While the chicken is frying, it’s a good idea to prepare the honey butter sauce. In the same pan, reduce the heat to medium and add the unsalted butter. Let the butter melt slowly, then add the honey, light soy sauce, and minced garlic. Stir everything together and let it simmer for 2-3 minutes until the sauce thickens slightly and becomes bubbly. The honey will give the sauce its sweetness, while the soy sauce adds depth and a bit of savory flavor. The garlic enhances the richness of the sauce, creating a wonderful balance of flavors.
Step 4: Combine the Chicken with the Sauce
Once the chicken is crispy and golden brown, it’s time to combine it with the sauce. Add the fried chicken back into the pan with the honey butter sauce, making sure to coat each piece evenly. Stir gently to ensure the chicken absorbs the sauce, and let it cook for an additional minute or so. The sauce will thicken slightly and cling to the crispy coating, turning the chicken into a sweet and savory masterpiece.
Step 5: Serve and Enjoy!
Finally, it’s time to enjoy your honey butter chicken! Transfer the chicken to a serving platter and garnish with some fresh herbs, like parsley or thyme, for an added burst of color and flavor. Serve it hot alongside your favorite sides, such as mashed potatoes, rice, or a fresh green salad. This dish is perfect for a quick weeknight dinner, but it’s also impressive enough to serve for a special occasion.
Notes
- Don’t Overcrowd the Pan: When frying the chicken, make sure there’s enough space between each piece so that it crisps up evenly. If you overcrowd the pan, the chicken will steam rather than fry, resulting in a less crispy coating. If necessary, cook the chicken in batches.
- Ensure the Oil is Hot Enough: If the oil isn’t hot enough when you add the chicken, the coating may become soggy instead of crispy. If it’s too hot, the chicken could burn on the outside before fully cooking through. You can test the oil by dropping a small piece of chicken or flour into it—if it sizzles right away, it’s ready for frying.
- Check for Doneness: The best way to ensure your chicken is fully cooked is by using a meat thermometer. Insert it into the thickest part of the chicken, and it should read 165°F (75°C) when done. If you don’t have a thermometer, you can cut into the chicken to make sure there’s no pink in the center.
- Customize the Sauce: The beauty of this honey butter sauce is its versatility. If you prefer a spicier kick, add a pinch of red pepper flakes or a drizzle of hot sauce. If you want a more savory version, you can add a dash of Worcestershire sauce or swap the honey for maple syrup for a different sweetness.
I first tried making honey butter chicken on a particularly hectic evening when I wanted something quick yet satisfying. I didn’t have the time or energy for a complicated recipe, but I still craved something full of flavor. The results? A perfectly crispy chicken with a rich honey butter glaze that was both sweet and savory—exactly what I had been hoping for. From that moment on, this recipe became my go-to whenever I was craving something indulgent but didn’t want to commit to deep frying or long cooking times.
Not only is this honey butter chicken perfect for beginner cooks, but it’s also a great dish for busy weeknights or even casual weekend dinners. The simplicity of the ingredients, coupled with the ease of preparation, makes it an accessible dish for anyone in the kitchen, regardless of skill level. Let’s break it down and get you cooking!
Ingredients and Preparation
The key to a fantastic honey butter chicken lies in the simplicity of the ingredients. You don’t need anything fancy, just a few staple pantry items that will come together beautifully to create a juicy, crispy chicken coated in a rich honey butter sauce. Let’s go over the main components of the dish:
Ingredients:
- 800g (about 1.75 lbs) boneless chicken thighs or chicken tenders
- ⅔ cup flour (for coating the chicken)
- 1 teaspoon kosher salt
- ½ teaspoon black pepper
- 1 teaspoon garlic powder
- 3 tablespoons olive oil (or canola oil or vegetable oil)
For the Honey Butter Sauce:
- ⅓ cup honey
- 100g (about 7 tablespoons) unsalted butter
- 2 cloves garlic, minced
- 2 tablespoons light soy sauce (or regular soy sauce)
Alternative Ingredients:
- You can substitute chicken thighs with boneless chicken breasts or even chicken tenders if you prefer. Keep in mind that chicken breasts may require a slightly longer cooking time to stay juicy.
- For a gluten-free version of this recipe, you can swap the regular flour with a gluten-free flour blend.
- If you don’t have light soy sauce, you can use regular soy sauce, but be mindful of the saltiness. You could also use coconut aminos as a soy sauce alternative for a lighter flavor.
- The recipe calls for unsalted butter to allow the honey and soy sauce to shine without being overwhelmed by the salt. However, if you only have salted butter on hand, you can reduce or omit the additional salt in the coating mixture.
By using just a few basic ingredients, you can create a meal that feels indulgent but is surprisingly easy to prepare. This simplicity makes it an excellent recipe for beginner cooks or those looking for a quick, comforting meal after a long day.
Step-by-Step Instructions
Now that we have the ingredients ready, let’s break down the steps to prepare this honey butter chicken. Whether you’re a first-time cook or an experienced chef, these easy-to-follow instructions will ensure your chicken turns out crispy, juicy, and coated in the most delicious honey butter sauce.
Step 1: Coat the Chicken
To begin, we need to coat the chicken to ensure it turns crispy when cooked. Take a large bowl or a shallow plate and mix together the flour, kosher salt, black pepper, and garlic powder. This simple mixture will give your chicken a flavorful, golden-brown coating when fried. Next, cut the chicken into bite-sized pieces, if using chicken thighs, or use chicken tenders as they are. Add the chicken to the flour mixture and toss it well to ensure each piece is evenly coated. The more thorough you are with this step, the crispier your chicken will be!
Step 2: Fry the Chicken
Once the chicken is coated, it’s time to fry it. Heat a large pan over medium-high heat and add 3 tablespoons of olive oil (or your choice of oil). The oil should be hot enough that it sizzles when you add the chicken, but not smoking. Carefully add the chicken pieces in batches to the pan, making sure not to overcrowd it, as that can lead to soggy chicken. Fry the chicken for about 4-5 minutes on each side until it’s golden and crispy. If using a meat thermometer, ensure the chicken has reached an internal temperature of 165°F (75°C) to guarantee it’s fully cooked.
Step 3: Prepare the Honey Butter Sauce
While the chicken is frying, it’s a good idea to prepare the honey butter sauce. In the same pan, reduce the heat to medium and add the unsalted butter. Let the butter melt slowly, then add the honey, light soy sauce, and minced garlic. Stir everything together and let it simmer for 2-3 minutes until the sauce thickens slightly and becomes bubbly. The honey will give the sauce its sweetness, while the soy sauce adds depth and a bit of savory flavor. The garlic enhances the richness of the sauce, creating a wonderful balance of flavors.
Step 4: Combine the Chicken with the Sauce
Once the chicken is crispy and golden brown, it’s time to combine it with the sauce. Add the fried chicken back into the pan with the honey butter sauce, making sure to coat each piece evenly. Stir gently to ensure the chicken absorbs the sauce, and let it cook for an additional minute or so. The sauce will thicken slightly and cling to the crispy coating, turning the chicken into a sweet and savory masterpiece.
Step 5: Serve and Enjoy!
Finally, it’s time to enjoy your honey butter chicken! Transfer the chicken to a serving platter and garnish with some fresh herbs, like parsley or thyme, for an added burst of color and flavor. Serve it hot alongside your favorite sides, such as mashed potatoes, rice, or a fresh green salad. This dish is perfect for a quick weeknight dinner, but it’s also impressive enough to serve for a special occasion.
Beginner Tips and Notes
While this recipe is simple and beginner-friendly, there are always ways to make the cooking process smoother and ensure everything turns out just right. Here are some tips to help you along the way:
- Don’t Overcrowd the Pan: When frying the chicken, make sure there’s enough space between each piece so that it crisps up evenly. If you overcrowd the pan, the chicken will steam rather than fry, resulting in a less crispy coating. If necessary, cook the chicken in batches.
- Ensure the Oil is Hot Enough: If the oil isn’t hot enough when you add the chicken, the coating may become soggy instead of crispy. If it’s too hot, the chicken could burn on the outside before fully cooking through. You can test the oil by dropping a small piece of chicken or flour into it—if it sizzles right away, it’s ready for frying.
- Check for Doneness: The best way to ensure your chicken is fully cooked is by using a meat thermometer. Insert it into the thickest part of the chicken, and it should read 165°F (75°C) when done. If you don’t have a thermometer, you can cut into the chicken to make sure there’s no pink in the center.
- Customize the Sauce: The beauty of this honey butter sauce is its versatility. If you prefer a spicier kick, add a pinch of red pepper flakes or a drizzle of hot sauce. If you want a more savory version, you can add a dash of Worcestershire sauce or swap the honey for maple syrup for a different sweetness.
Serving Suggestions
While this honey butter chicken is flavorful on its own, pairing it with the right sides can take your meal to the next level. Here are a few complementary side dishes that would pair wonderfully with this dish:
- Mashed Potatoes: Creamy mashed potatoes with a touch of butter and garlic are the perfect side to soak up the sweet and savory honey butter sauce.
- Roasted Vegetables: Roasted veggies like carrots, Brussels sprouts, or sweet potatoes add a savory and healthy balance to the richness of the chicken.
- Rice: A simple bowl of white or brown rice can serve as the perfect base to enjoy the honey butter chicken, soaking up the delicious sauce.
- Side Salad: For a lighter option, serve the chicken with a fresh salad of mixed greens, cherry tomatoes, and a tangy vinaigrette. The freshness of the salad will balance out the richness of the chicken.

Conclusion
Crispy honey butter chicken is a perfect 30-minute meal that’s packed with flavor and incredibly easy to make. Whether you’re a beginner cook or a seasoned chef, this recipe is simple, quick, and absolutely delicious. The sweet and savory honey butter sauce will make every bite of crispy chicken irresistible, and it’s a dish that everyone in your family will love. Don’t be afraid to experiment with different sides or variations of the sauce to suit your taste. Give this recipe a try, and I’d love to hear how it turns out for you. Share your thoughts and any tweaks you made in the comments below—I can’t wait to see how you enjoy this honey butter chicken!


