Crème brûlée is one of those desserts that instantly evoke feelings of indulgence and elegance. The smooth, rich custard with its signature caramelized sugar topping is often reserved for fine dining establishments or special occasions. However, what if I told you that you could recreate this delightful treat at home with minimal effort? And not just the classic crème brûlée, but a version that’s even easier to make and just as satisfying—a Crème Brûlée Cheesecake Bar! These bars combine the best of both worlds: the rich, creamy texture of cheesecake and the decadent burnt sugar topping of crème brûlée.

Crème Brûlée Cheesecake Bars: The Ultimate Dessert for Beginners

Crème brûlée is the epitome of indulgence—a creamy, smooth custard crowned with a golden, crispy layer of caramelized sugar. While this dessert often seems like a treat reserved for special occasions or fine dining, imagine taking its rich flavors and transforming it into a simpler, more approachable treat. Enter Crème Brûlée Cheesecake Bars—a delightful twist on the beloved French classic that’s both easy to make and incredibly delicious.
- Prep Time: 15 minutes
- Cook Time: 45 minutes
- Total Time: 5 hours (including chilling time)
- Yield: 9 bars 1x
- Category: Dessert
- Method: Baking
- Cuisine: French-American
- Diet: Vegetarian
Ingredients
For the Crust:
- 9 whole graham crackers (135 grams)
- 5 tablespoons unsalted butter, melted (72 grams)
For the Filling:
- 16 ounces (454 grams) cream cheese, completely softened at room temperature
- 1 cup (200 grams) granulated sugar
- 1/4 cup heavy cream
- 2 large eggs, at room temperature
- 1 large egg yolk, at room temperature
- 2 teaspoons vanilla bean paste
- 1/2 teaspoon fine sea salt
For the Brûlée Topping:
- 1/4 cup (50 grams) granulated sugar
Instructions
Step 1: Prepare the Graham Cracker Crust
- Preheat the oven to 350°F (175°C). Line an 8-inch square baking pan with foil, leaving an overhang on all sides. This will make it easier to remove the bars later once they’ve set.
- Prepare the crust: In the bowl of a food processor, pulse the graham crackers until they are finely ground. If you don’t have a food processor, you can place the crackers in a zip-top bag and crush them with a rolling pin until finely crushed. You want a crumbly texture for your crust.
- Add the butter: Pour in the melted butter and pulse again until the mixture is moistened and crumbly. If the mixture seems too dry, you can add a little more melted butter to get the right consistency.
- Press into the pan: Transfer the graham cracker mixture into the prepared baking dish. Use your fingers or the back of a spoon to press the crumbs evenly into the bottom of the pan, making sure to pack it down firmly. This will help the crust hold together once baked.
- Bake the crust: Place the pan in the preheated oven and bake for 8 to 10 minutes or until the crust is lightly browned and set. The crust should be firm to the touch. Once done, remove the pan from the oven and allow the crust to cool completely. While the crust is cooling, reduce the oven temperature to 300°F (150°C).
Step 2: Make the Cheesecake Filling
- Beat the cream cheese: In a large bowl, use an electric mixer to beat the softened cream cheese on medium-high speed until smooth and creamy. This process should only take 1 to 2 minutes. Make sure your cream cheese is at room temperature for the best texture.
- Add the sugar: Add the granulated sugar to the cream cheese and continue beating until the mixture is smooth and fully incorporated. Scrape down the sides of the bowl as needed to ensure all the ingredients are well mixed.
- Add the heavy cream: Pour in the heavy cream and mix until fully incorporated. This will give the cheesecake filling its rich, smooth texture.
- Add the eggs and vanilla: Add the eggs, egg yolk, vanilla bean paste, and salt one at a time, mixing well after each addition. Be careful not to overmix; you want the batter to be smooth, but you don’t want to incorporate too much air.
- Pour the filling: Once all the ingredients are fully combined, pour the cheesecake mixture into the prepared pan over the cooled graham cracker crust. Smooth the top with a spatula to ensure even distribution.
Step 3: Bake the Cheesecake
- Bake the cheesecake: Place the pan in the oven and bake the cheesecake at 300°F (150°C) for about 35 minutes. The edges should be set, but the center should still be slightly jiggly when you give the pan a gentle shake. This slight jiggle means the cheesecake is perfectly cooked and will firm up as it cools.
- Cool the cheesecake: Once the cheesecake is done baking, remove it from the oven and place it on a cooling rack. Allow it to cool completely in the pan. Once it has cooled to room temperature, cover it with plastic wrap or foil and refrigerate it for at least 4 hours, or until it is firm.
Step 4: Add the Brûlée Topping
- Prepare the brûlée topping: Once the cheesecake has chilled and set, it’s time to add the signature brûlée topping. Carefully remove the cheesecake from the pan using the foil overhang and place it on a heat-safe surface.
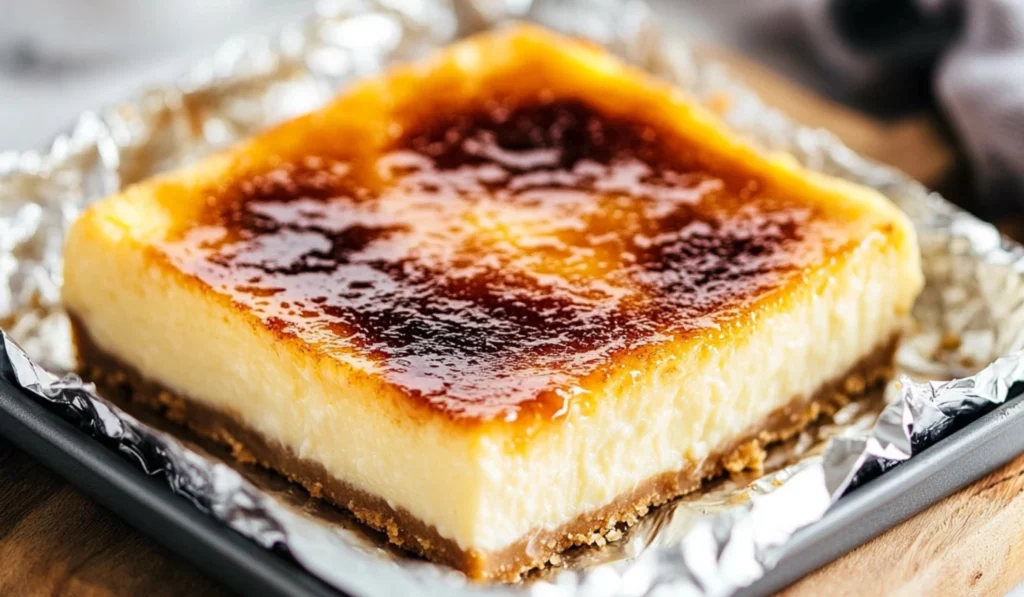
- Cut into squares: Using a sharp knife, cut the cheesecake into squares. Depending on your preference, you can cut them into 9 larger squares or 16 smaller ones.
- Sprinkle the sugar: Sprinkle about 1 tablespoon of granulated sugar evenly over the top of each square. You want to cover the surface of the cheesecake with a thin, even layer of sugar. Be generous, but don’t pile it on too thick.
- Torch the sugar: Using a kitchen torch, carefully caramelize the sugar by moving the torch in a circular motion over the surface of each square. The sugar should melt and turn into a deep amber color. Be careful not to burn the sugar. If you don’t have a kitchen torch, you can use a broiler to caramelize the sugar. Just be sure to keep a close eye on it, as it can go from perfect to burnt very quickly.
- Cool and serve: Once the sugar is caramelized, allow the bars to cool for a few minutes. This step is important because the brûlée topping will be very hot right after torching. Once cooled, serve and enjoy!
Notes
- Don’t overmix: When mixing the cheesecake filling, avoid overmixing the batter. Overmixing can incorporate too much air into the batter, which can result in cracks in the cheesecake after baking.
- Watch your baking time: Keep a close eye on the cheesecake while it’s baking. The edges should be firm, but the center should still be slightly jiggly. This ensures that the cheesecake is perfectly baked and will set properly when chilled.
- Use room temperature ingredients: Be sure to use room temperature cream cheese, eggs, and egg yolk when making the cheesecake filling. This helps everything combine smoothly and prevents a lumpy filling.
- Be careful with the torch: If you’re using a kitchen torch, be sure to move it in small circular motions to avoid burning any one spot. If you don’t have a torch, the broiler works fine, but make sure you stay close to monitor the process.
The best part? This recipe is perfect for beginner bakers! It requires simple ingredients, easy-to-follow steps, and a lot less time and effort than making individual crème brûlées. As someone who loves desserts but doesn’t always have hours to spend in the kitchen, these cheesecake bars were a revelation. They are as delicious as they are visually stunning, making them the perfect showstopper for any occasion, whether you’re hosting a dinner party or simply craving something sweet.
If you’re a beginner in the kitchen, you’ll find that these bars are not only accessible but also forgiving. The process is broken down into manageable steps, and you don’t need to be an expert to achieve that crispy, golden brûléed top. This is an easy, yet impressive dessert that will surely become a staple in your baking repertoire. Let’s dive into how to make these irresistible Crème Brûlée Cheesecake Bars!
Ingredients and Preparation
Before you get started, gather all the ingredients needed for this dessert. The beauty of this recipe is that it uses simple ingredients you likely already have in your kitchen, with a few specialty items that will elevate the flavors, such as vanilla bean paste for that authentic crème brûlée taste.
For the Crust:
- 9 whole graham crackers (135 grams)
- 5 tablespoons unsalted butter, melted (72 grams)
The graham cracker crust serves as a sturdy base for the creamy cheesecake filling. It provides a sweet, buttery crunch that pairs perfectly with the rich filling.
For the Filling:
- 16 ounces (454 grams) cream cheese, completely softened at room temperature
- 1 cup (200 grams) granulated sugar
- 1/4 cup heavy cream
- 2 large eggs, at room temperature
- 1 large egg yolk, at room temperature
- 2 teaspoons vanilla bean paste
- 1/2 teaspoon fine sea salt
The filling for these bars is a simple, velvety cheesecake batter, flavored with vanilla bean paste for a deeper, richer taste. The combination of whole eggs and egg yolk ensures the filling has the perfect texture, smooth and creamy but not too runny.
For the Brûlée Topping:
- 1/4 cup (50 grams) granulated sugar
The brûlée topping is what gives these cheesecake bars their signature finish. The sugar caramelizes when torched, creating a crispy, golden-brown layer that adds a satisfying crunch and sweetness to each bite.
Step-by-Step Instructions
Now that you have all your ingredients prepared, let’s break the recipe down step-by-step. If you’re a beginner, don’t worry—each step is easy to follow, and I’ll provide helpful tips along the way.
Step 1: Prepare the Graham Cracker Crust
- Preheat the oven to 350°F (175°C). Line an 8-inch square baking pan with foil, leaving an overhang on all sides. This will make it easier to remove the bars later once they’ve set.
- Prepare the crust: In the bowl of a food processor, pulse the graham crackers until they are finely ground. If you don’t have a food processor, you can place the crackers in a zip-top bag and crush them with a rolling pin until finely crushed. You want a crumbly texture for your crust.
- Add the butter: Pour in the melted butter and pulse again until the mixture is moistened and crumbly. If the mixture seems too dry, you can add a little more melted butter to get the right consistency.
- Press into the pan: Transfer the graham cracker mixture into the prepared baking dish. Use your fingers or the back of a spoon to press the crumbs evenly into the bottom of the pan, making sure to pack it down firmly. This will help the crust hold together once baked.
- Bake the crust: Place the pan in the preheated oven and bake for 8 to 10 minutes or until the crust is lightly browned and set. The crust should be firm to the touch. Once done, remove the pan from the oven and allow the crust to cool completely. While the crust is cooling, reduce the oven temperature to 300°F (150°C).
Step 2: Make the Cheesecake Filling
- Beat the cream cheese: In a large bowl, use an electric mixer to beat the softened cream cheese on medium-high speed until smooth and creamy. This process should only take 1 to 2 minutes. Make sure your cream cheese is at room temperature for the best texture.
- Add the sugar: Add the granulated sugar to the cream cheese and continue beating until the mixture is smooth and fully incorporated. Scrape down the sides of the bowl as needed to ensure all the ingredients are well mixed.
- Add the heavy cream: Pour in the heavy cream and mix until fully incorporated. This will give the cheesecake filling its rich, smooth texture.
- Add the eggs and vanilla: Add the eggs, egg yolk, vanilla bean paste, and salt one at a time, mixing well after each addition. Be careful not to overmix; you want the batter to be smooth, but you don’t want to incorporate too much air.
- Pour the filling: Once all the ingredients are fully combined, pour the cheesecake mixture into the prepared pan over the cooled graham cracker crust. Smooth the top with a spatula to ensure even distribution.
Step 3: Bake the Cheesecake
- Bake the cheesecake: Place the pan in the oven and bake the cheesecake at 300°F (150°C) for about 35 minutes. The edges should be set, but the center should still be slightly jiggly when you give the pan a gentle shake. This slight jiggle means the cheesecake is perfectly cooked and will firm up as it cools.
- Cool the cheesecake: Once the cheesecake is done baking, remove it from the oven and place it on a cooling rack. Allow it to cool completely in the pan. Once it has cooled to room temperature, cover it with plastic wrap or foil and refrigerate it for at least 4 hours, or until it is firm.
Step 4: Add the Brûlée Topping
- Prepare the brûlée topping: Once the cheesecake has chilled and set, it’s time to add the signature brûlée topping. Carefully remove the cheesecake from the pan using the foil overhang and place it on a heat-safe surface.
- Cut into squares: Using a sharp knife, cut the cheesecake into squares. Depending on your preference, you can cut them into 9 larger squares or 16 smaller ones.
- Sprinkle the sugar: Sprinkle about 1 tablespoon of granulated sugar evenly over the top of each square. You want to cover the surface of the cheesecake with a thin, even layer of sugar. Be generous, but don’t pile it on too thick.
- Torch the sugar: Using a kitchen torch, carefully caramelize the sugar by moving the torch in a circular motion over the surface of each square. The sugar should melt and turn into a deep amber color. Be careful not to burn the sugar. If you don’t have a kitchen torch, you can use a broiler to caramelize the sugar. Just be sure to keep a close eye on it, as it can go from perfect to burnt very quickly.
- Cool and serve: Once the sugar is caramelized, allow the bars to cool for a few minutes. This step is important because the brûlée topping will be very hot right after torching. Once cooled, serve and enjoy!
Beginner Tips and Notes
If you’re new to making desserts like these Crème Brûlée Cheesecake Bars, here are some helpful tips to ensure that your dessert turns out perfectly:
- Don’t overmix: When mixing the cheesecake filling, avoid overmixing the batter. Overmixing can incorporate too much air into the batter, which can result in cracks in the cheesecake after baking.
- Watch your baking time: Keep a close eye on the cheesecake while it’s baking. The edges should be firm, but the center should still be slightly jiggly. This ensures that the cheesecake is perfectly baked and will set properly when chilled.
- Use room temperature ingredients: Be sure to use room temperature cream cheese, eggs, and egg yolk when making the cheesecake filling. This helps everything combine smoothly and prevents a lumpy filling.
- Be careful with the torch: If you’re using a kitchen torch, be sure to move it in small circular motions to avoid burning any one spot. If you don’t have a torch, the broiler works fine, but make sure you stay close to monitor the process.
Serving Suggestions
While these Crème Brûlée Cheesecake Bars are delicious on their own, you can elevate them with a few additional touches:
- Serve with fresh fruit: A handful of fresh berries, such as raspberries or strawberries, pairs beautifully with the richness of the cheesecake.
- Top with whipped cream: For an extra indulgent treat, serve the bars with a dollop of freshly whipped cream.
- Pair with coffee or tea: These bars are perfect for an afternoon tea or coffee break. The creamy cheesecake and crispy brûlée topping pair wonderfully with a hot beverage like espresso or chai tea.
Storage Tips
These cheesecake bars can be stored in the refrigerator for up to 3 days. Be sure to cover them tightly with plastic wrap or store them in an airtight container to prevent them from drying out. If you have leftover brûlée topping, it’s best to torch it just before serving, as the sugar can lose its crispness over time.

Conclusion
Crème Brûlée Cheesecake Bars are the perfect dessert for beginners and seasoned bakers alike. With their easy-to-make graham cracker crust, creamy cheesecake filling, and deliciously crispy caramelized sugar topping, they are sure to impress anyone who tastes them. These bars combine the elegance of crème brûlée with the richness of cheesecake, creating a dessert that is both indulgent and approachable. Whether you’re hosting a special occasion or simply treating yourself, these Crème Brûlée Cheesecake Bars will quickly become your go-to dessert. Happy baking!


