The holiday season is a time of warmth, joy, and of course, indulgent treats. Whether you’re hosting a Christmas party, looking for a fun family project, or seeking the perfect gift for a loved one, these Coconut Ice Christmas Trees will certainly add a touch of sparkle to your festive celebrations. Inspired by the vibrant spirit of Christmas, this treat is both visually stunning and mouthwateringly delicious. It combines the creamy sweetness of coconut ice with the festive charm of a Christmas tree, creating a dessert that’s not only a feast for the taste buds but also a visual showstopper.
PrintCoconut Ice Christmas Trees: A Sweet Holiday Delight

The holiday season is a time of warmth, joy, and of course, indulgent treats. Whether you’re hosting a Christmas party, looking for a fun family project, or seeking the perfect gift for a loved one, these Coconut Ice Christmas Trees will certainly add a touch of sparkle to your festive celebrations. Inspired by the vibrant spirit of Christmas, this treat is both visually stunning and mouthwateringly delicious. It combines the creamy sweetness of coconut ice with the festive charm of a Christmas tree, creating a dessert that’s not only a feast for the taste buds but also a visual showstopper.
- Prep Time: 15 minutes
- Cook Time: 30 minutes
- Total Time: 45 minutes
- Yield: 8 servings 1x
- Category: Christmas Treat, Dessert
- Method: Mixing, Piping, Refrigerating
- Cuisine: Christmas, Holiday
- Diet: Vegetarian
Ingredients
2 1/3 cups pure icing sugar, sifted: The foundation of this coconut ice is icing sugar, which gives it a smooth, sweet texture and helps the coconut mixture hold together. Sifting it ensures that no lumps remain, making your coconut ice nice and smooth.
1/4 tsp cream of tartar: This ingredient helps stabilize the mixture and prevents it from becoming too grainy, ensuring that your coconut ice holds its shape perfectly.
395g can sweetened condensed milk: The rich and creamy base of this dessert, sweetened condensed milk is what binds the ingredients together and adds a decadent sweetness that complements the coconut.
3 1/2 cups desiccated coconut: The star ingredient! Desiccated coconut provides the texture and flavor that makes coconut ice so irresistible. Make sure to use desiccated coconut, which is finely shredded, rather than shredded coconut, which can be too chunky for this recipe.
2 tsp vanilla essence: Vanilla essence adds a rich, warm flavor that deepens the sweetness of the coconut mixture and balances out the sugary sweetness of the condensed milk and icing sugar.
Few drops pink food coloring: To create the delightful pink-and-white color scheme for your trees, a few drops of pink food coloring are used. The soft, pastel hue of the pink coconut ice adds a festive charm to these Christmas trees.
8 large waffle ice-cream cones: These cones form the base of your coconut ice Christmas trees. They add a crunchy texture that contrasts beautifully with the smooth, sweet coconut ice.
50g white chocolate melts, melted: White chocolate is used to pipe tinsel onto the coconut ice trees, giving them a shimmery effect. It also adds an extra layer of sweetness that complements the coconut ice.
Gold and white cachous, edible gold stars, to decorate: These edible decorations are what really elevate your coconut ice trees, making them look like something straight out of a Christmas wonderland. The gold and white cachous add a festive sparkle, while the edible stars top off the trees with a touch of glamour.
Instructions
Step 1: Start by sifting the icing sugar and cream of tartar into a large bowl. This step ensures that your coconut ice mixture will be smooth and free of lumps. Next, add the sweetened condensed milk, desiccated coconut, and vanilla essence to the bowl. Stir everything together until well combined. You’ll see the mixture start to come together into a thick, sticky paste.
Step 2: Divide the mixture in half. In one half, add a few drops of pink food coloring. Mix well until the pink coconut is evenly tinted. Don’t worry if the color is a bit uneven—this is part of the charm of the speckled effect! Once the pink mixture is ready, wear some plastic gloves (this part can get a little sticky) and crumble the pink mixture over the white mixture. Use your hands to gently combine the two mixtures, creating a speckled pink-and-white effect. Be careful not to overmix—this should look like a marbled effect.
Step 3: Now for the fun part! Take your waffle ice-cream cones and fill them with the coconut ice mixture. Start by sprinkling a little of the mixture into the tip of the cone, using the back of a spoon to push it down firmly. This will help form a solid base for your tree. Continue filling the cone with the mixture, pressing it down as you go to ensure the coconut ice is compact. Once the cones are filled, arrange them on a tray and place them in the refrigerator to set for 30 minutes. This will allow the coconut ice to firm up slightly so that it can easily be removed from the cone.
Step 4: After the coconut ice has chilled for 30 minutes, gently break the cones away from the coconut ice. Don’t worry if the tips of the trees get a little misshapen; you can easily remold them to your desired shape. Arrange the coconut ice trees on a lined oven tray, and chill them again for another 30 minutes to ensure they are fully set and firm.
Step 5: While the coconut ice trees are chilling, it’s time to prepare the decorations. Melt the white chocolate melts in a heatproof bowl, either in the microwave or over a pot of simmering water. Once melted, transfer the white chocolate to a piping bag fitted with a piping nozzle, or use a plastic bag with the tip snipped off. Working quickly, pipe the melted chocolate in a zigzag pattern over each tree to create tinsel. Before the chocolate sets, hold the tree over a bowl and sprinkle it with gold and white cachous. Some will stick to the chocolate, while the rest will fall into the bowl, allowing you to reuse it. If you prefer, you can arrange the cachous in a more deliberate pattern on the trees.
Step 6: Finally, use a little extra melted white chocolate to attach edible gold stars to the top of each tree. These little stars will add a touch of elegance and a bit of festive sparkle to your finished treat.
Notes
- Make sure to sift the icing sugar and cream of tartar thoroughly. This helps create a smooth texture for the coconut ice and ensures the mixture will set properly.
- When mixing the pink and white coconut ice, be gentle. You want to create a marbled effect, not a fully blended mixture, so don’t overmix.
- If you want your trees to look extra polished, consider using a silicone mold for the coconut ice. This will help them retain a perfect tree shape, especially if you’re gifting them.
- Make sure to refrigerate the coconut ice for at least 30 minutes after assembling the cones. This helps the coconut ice firm up enough to remove from the cones easily.
- Use high-quality white chocolate for the best results. You want it to melt smoothly and pipe well for the tinsel.
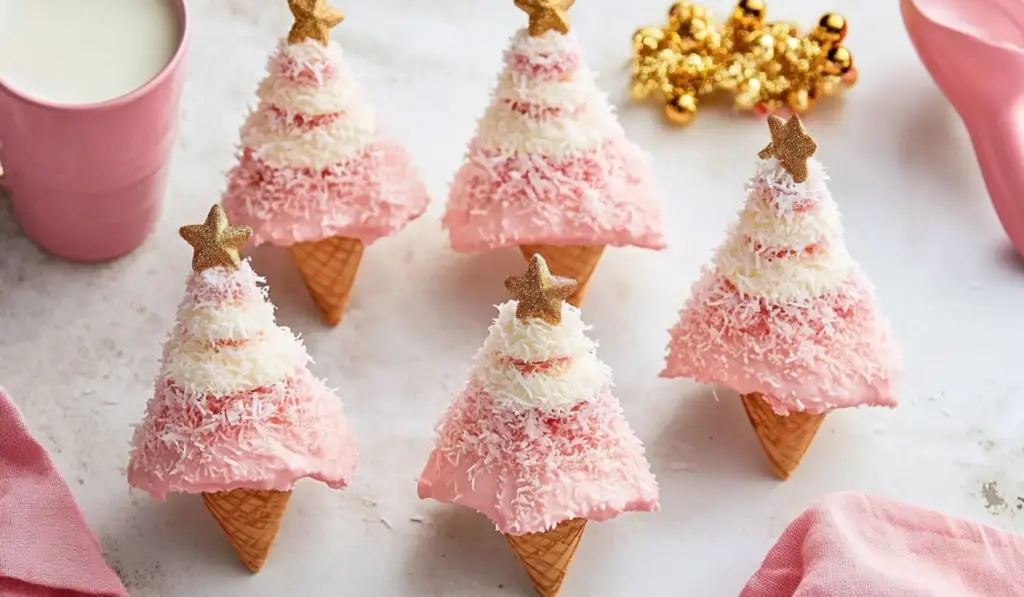
What makes these mini coconut trees so special is their simple yet striking appearance. The blend of pink and white coconut ice, molded into miniature trees atop crunchy waffle cones, creates a fun, edible decoration perfect for any Christmas table. The finishing touch—melted white chocolate tinsel, gold and white cachous, and edible gold stars—adds the ideal festive sparkle. These mini coconut Christmas trees are not just desserts; they’re a way to bring a little extra magic to your holiday season. Plus, they’re incredibly easy to make, which means you can spend more time enjoying the holidays and less time in the kitchen.
Ingredients Breakdown
To create these gorgeous mini coconut Christmas trees, you’ll need a few key ingredients. Let’s break them down for a smoother cooking experience:
2 1/3 cups pure icing sugar, sifted: The foundation of this coconut ice is icing sugar, which gives it a smooth, sweet texture and helps the coconut mixture hold together. Sifting it ensures that no lumps remain, making your coconut ice nice and smooth.
1/4 tsp cream of tartar: This ingredient helps stabilize the mixture and prevents it from becoming too grainy, ensuring that your coconut ice holds its shape perfectly.
395g can sweetened condensed milk: The rich and creamy base of this dessert, sweetened condensed milk is what binds the ingredients together and adds a decadent sweetness that complements the coconut.
3 1/2 cups desiccated coconut: The star ingredient! Desiccated coconut provides the texture and flavor that makes coconut ice so irresistible. Make sure to use desiccated coconut, which is finely shredded, rather than shredded coconut, which can be too chunky for this recipe.
2 tsp vanilla essence: Vanilla essence adds a rich, warm flavor that deepens the sweetness of the coconut mixture and balances out the sugary sweetness of the condensed milk and icing sugar.
Few drops pink food coloring: To create the delightful pink-and-white color scheme for your trees, a few drops of pink food coloring are used. The soft, pastel hue of the pink coconut ice adds a festive charm to these Christmas trees.
8 large waffle ice-cream cones: These cones form the base of your coconut ice Christmas trees. They add a crunchy texture that contrasts beautifully with the smooth, sweet coconut ice.
50g white chocolate melts, melted: White chocolate is used to pipe tinsel onto the coconut ice trees, giving them a shimmery effect. It also adds an extra layer of sweetness that complements the coconut ice.
Gold and white cachous, edible gold stars, to decorate: These edible decorations are what really elevate your coconut ice trees, making them look like something straight out of a Christmas wonderland. The gold and white cachous add a festive sparkle, while the edible stars top off the trees with a touch of glamour.
Step-by-Step Instructions
Now that we’ve got the ingredients covered, it’s time to dive into the step-by-step instructions. This process is simple and fun, perfect for all ages to join in on.
Step 1: Start by sifting the icing sugar and cream of tartar into a large bowl. This step ensures that your coconut ice mixture will be smooth and free of lumps. Next, add the sweetened condensed milk, desiccated coconut, and vanilla essence to the bowl. Stir everything together until well combined. You’ll see the mixture start to come together into a thick, sticky paste.
Step 2: Divide the mixture in half. In one half, add a few drops of pink food coloring. Mix well until the pink coconut is evenly tinted. Don’t worry if the color is a bit uneven—this is part of the charm of the speckled effect! Once the pink mixture is ready, wear some plastic gloves (this part can get a little sticky) and crumble the pink mixture over the white mixture. Use your hands to gently combine the two mixtures, creating a speckled pink-and-white effect. Be careful not to overmix—this should look like a marbled effect.
Step 3: Now for the fun part! Take your waffle ice-cream cones and fill them with the coconut ice mixture. Start by sprinkling a little of the mixture into the tip of the cone, using the back of a spoon to push it down firmly. This will help form a solid base for your tree. Continue filling the cone with the mixture, pressing it down as you go to ensure the coconut ice is compact. Once the cones are filled, arrange them on a tray and place them in the refrigerator to set for 30 minutes. This will allow the coconut ice to firm up slightly so that it can easily be removed from the cone.
Step 4: After the coconut ice has chilled for 30 minutes, gently break the cones away from the coconut ice. Don’t worry if the tips of the trees get a little misshapen; you can easily remold them to your desired shape. Arrange the coconut ice trees on a lined oven tray, and chill them again for another 30 minutes to ensure they are fully set and firm.
Step 5: While the coconut ice trees are chilling, it’s time to prepare the decorations. Melt the white chocolate melts in a heatproof bowl, either in the microwave or over a pot of simmering water. Once melted, transfer the white chocolate to a piping bag fitted with a piping nozzle, or use a plastic bag with the tip snipped off. Working quickly, pipe the melted chocolate in a zigzag pattern over each tree to create tinsel. Before the chocolate sets, hold the tree over a bowl and sprinkle it with gold and white cachous. Some will stick to the chocolate, while the rest will fall into the bowl, allowing you to reuse it. If you prefer, you can arrange the cachous in a more deliberate pattern on the trees.
Step 6: Finally, use a little extra melted white chocolate to attach edible gold stars to the top of each tree. These little stars will add a touch of elegance and a bit of festive sparkle to your finished treat.
Serving Suggestions and Variations
These Coconut Ice Christmas Trees make for the perfect holiday treat, whether you’re serving them at a Christmas party, gifting them to loved ones, or simply enjoying them with your family. Their striking appearance and delectable coconut flavor are sure to impress. Serve them on a beautiful platter, and watch as everyone marvels at these edible holiday decorations.
If you want to mix things up a bit, there are plenty of variations you can try. For instance, you could use different food coloring to create other pastel shades for the coconut ice. Or, you could add a bit of peppermint extract to the coconut mixture for a refreshing twist on the classic coconut flavor. To make the trees even more festive, you could sprinkle them with edible glitter or add a few extra decorations like mini candy canes or silver beads.
For those who prefer a less sweet dessert, you can experiment with using unsweetened shredded coconut instead of desiccated coconut. Just be sure to balance the sweetness with a little extra sugar or sweetened condensed milk.
Tips for Success
To ensure your Coconut Ice Christmas Trees turn out perfectly, here are a few helpful tips:
- Make sure to sift the icing sugar and cream of tartar thoroughly. This helps create a smooth texture for the coconut ice and ensures the mixture will set properly.
- When mixing the pink and white coconut ice, be gentle. You want to create a marbled effect, not a fully blended mixture, so don’t overmix.
- If you want your trees to look extra polished, consider using a silicone mold for the coconut ice. This will help them retain a perfect tree shape, especially if you’re gifting them.
- Make sure to refrigerate the coconut ice for at least 30 minutes after assembling the cones. This helps the coconut ice firm up enough to remove from the cones easily.
- Use high-quality white chocolate for the best results. You want it to melt smoothly and pipe well for the tinsel.

Final Thoughts
Coconut Ice Christmas Trees are a delightful treat that will add a touch of festive magic to your holiday celebrations. They’re fun to make, beautiful to look at, and irresistibly delicious to eat. Whether you’re making them as a gift, serving them at a party, or simply indulging in a little Christmas cheer, these mini coconut trees are sure to be a hit. With their delicate pink and white marbling, festive decorations, and delicious coconut flavor, they’re the perfect addition to your holiday dessert table.


