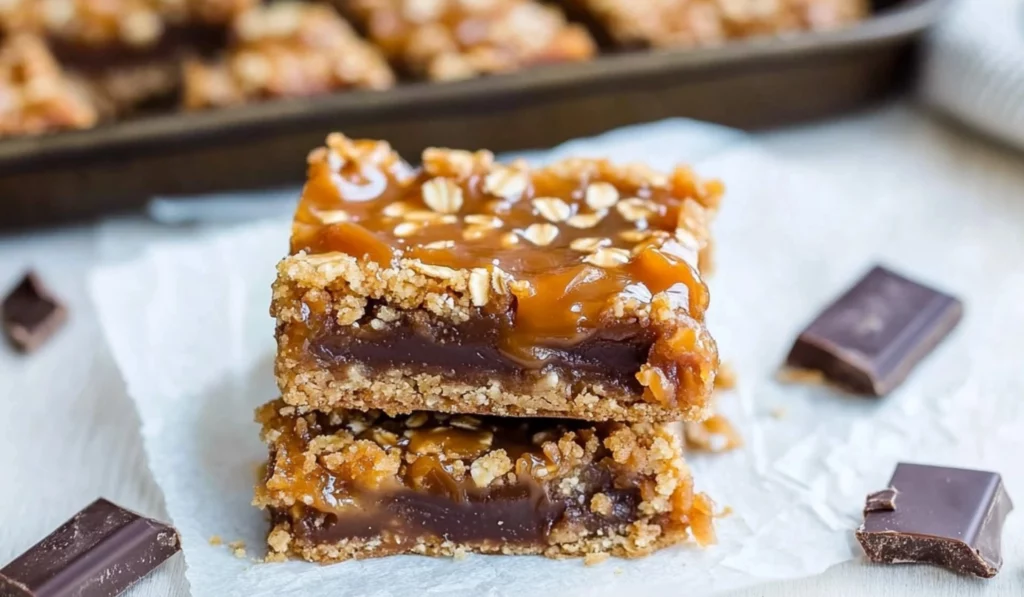
If there’s one dessert that will win over caramel lovers everywhere, it’s Carmelitas. These soft and chewy bars are an irresistible combination of rich caramel, melted chocolate, and a hearty oatmeal crust. The best part? They’re incredibly easy to make, requiring only one bowl and no mixer, yet they deliver a decadent, indulgent treat that feels as though you spent hours perfecting it. Carmelitas are the epitome of simple indulgence, and once you make them, you’ll want to bake them again and again.

Carmelitas: A Sweet and Chewy Caramel-Lover’s Dream

There’s something truly magical about the combination of soft, chewy bars filled with rich caramel and melting chocolate. For anyone with a sweet tooth, Carmelitas are a dream come true. These dessert bars are the perfect balance of buttery oatmeal crust, gooey caramel center, and decadent chocolate, making them the ideal treat for any occasion. What’s even better? They’re incredibly easy to make, with minimal ingredients and no fancy tools required.
- Prep Time: 15 minutes
- Cook Time: 25 minutes
- Total Time: 40 minutes
- Yield: 16 servings 1x
- Category: Dessert
- Method: Baking
- Cuisine: American
- Diet: Vegetarian
Ingredients
For the oatmeal base and topping:
- ¾ cup butter, melted (1 ½ sticks; I use unsalted butter, but salted butter will work just as well): The butter forms the rich base for the Carmelita dough. If you prefer a lighter option, you can substitute half of the butter with applesauce or Greek yogurt, although this will slightly alter the texture and flavor. However, I highly recommend using butter for that classic, rich taste.
- ¾ cup light brown sugar, packed: Brown sugar adds moisture and a deep, caramelized flavor that complements the sweetness of the caramel and chocolate. If you prefer a less sweet alternative, you can substitute with coconut sugar or maple sugar, though the flavor may differ slightly.
- 1 tablespoon vanilla extract: Vanilla is a key flavor in the oatmeal crust and adds depth to the overall flavor of the Carmelitas. Make sure to use pure vanilla extract for the best taste. For a twist, you can experiment with flavored extracts such as almond or hazelnut.
- 1 cup all-purpose flour: All-purpose flour provides structure to the oatmeal base. If you’re looking for a gluten-free option, you can swap the all-purpose flour with a gluten-free flour blend.
- 1 cup whole-rolled old-fashioned oats (ensure they’re not instant or quick-cooking oats): Oats are the heart of the Carmelita base, providing chewiness and texture. Use old-fashioned rolled oats to ensure the right consistency. Instant oats will work in a pinch, but they won’t have the same chewy texture.
- 1 teaspoon baking soda: Baking soda helps the dough rise and gives the Carmelitas a light texture. Make sure it’s fresh for the best results.
- ½ teaspoon salt (adjust to taste): Salt enhances the flavor of the caramel and chocolate. If you’re using salted butter, you may want to reduce the added salt to ¼ teaspoon.
For the caramel layer:
- 35 caramel squares, unwrapped (I recommend using Werther’s Originals Soft Caramels, which are slightly bigger than cellophane-wrapped caramels. If you use the smaller wrapped caramels, add a couple more): Caramel squares are the easiest way to make the caramel filling, and Werther’s Originals are a great choice due to their smooth texture. You can also use pre-made caramel sauce if you’re short on time, though homemade caramel will yield the best flavor.
- ½ cup heavy cream: Heavy cream is what makes the caramel smooth and velvety. If you prefer a lighter option, you can substitute with coconut cream, but the flavor and texture will vary slightly.
For the chocolate layer:
- 1 cup semi-sweet chocolate chips or chunks (you can use a combination of both, like I did, for added texture and flavor): The chocolate layer adds a rich, melty layer to the bars. Semi-sweet chocolate is ideal, but you can also experiment with milk or dark chocolate, depending on your preferences. Chopped chocolate bars or chocolate chunks also work well and can add a more rustic look to the bars.
Instructions
- Preheat and Prepare the Pan: Preheat your oven to 350°F (175°C). Line an 8×8-inch pan with aluminum foil, leaving some overhang on the sides. This makes it easy to lift the bars out of the pan later for easy slicing. Grease the foil with cooking spray to prevent sticking. Set the pan aside.
- Melt the Butter and Mix: In a large microwave-safe mixing bowl, melt the butter in the microwave for about 90 seconds. Once melted, add the brown sugar and vanilla extract. Whisk until the mixture is smooth and well-combined.
- Add Dry Ingredients: To the butter and sugar mixture, add the flour, oats, baking soda, and salt. Stir everything together until combined. The dough should be thick and slightly crumbly. Don’t worry if it’s a little difficult to mix—this is normal.
- Prepare the Bottom Layer: Take half of the oatmeal mixture and press it evenly into the bottom of your prepared pan. Use a spatula or the back of a spoon to smooth it down and create an even layer. The dough will be thick, but this is exactly what you want to form the base.
- Bake the Bottom Layer: Place the pan in the oven and bake for 10 minutes. This helps to firm up the base layer before adding the caramel and chocolate.
- Make the Caramel Sauce: While the base is baking, make the caramel sauce. In a microwave-safe bowl, combine the unwrapped caramel squares and heavy cream. Microwave on high for 60-second intervals, stirring after each interval, until the caramels are fully melted and the mixture is smooth. This process usually takes about 4-5 minutes, depending on the strength of your microwave.
- Assemble the Carmelitas: After the base has baked for 10 minutes, remove the pan from the oven. Sprinkle the chocolate chips evenly over the base layer. Slowly and evenly pour the caramel sauce over the chocolate, making sure it’s spread out over the entire surface.
- Add the Topping: Take the remaining oatmeal mixture and crumble it evenly over the caramel layer. Don’t press it down—just let it fall into place. This creates a crumbly topping that will form a golden crust once baked.
- Bake the Carmelitas: Return the pan to the oven and bake for another 15-18 minutes. The edges should be lightly browned, and the center should be bubbling slightly. Keep an eye on them as the caramel can burn if baked too long.
- Cool and Slice: Let the Carmelitas cool completely in the pan. This may take up to 4 hours at room temperature, or you can speed up the process by placing them in the fridge. It’s important to let them cool completely before slicing to allow the caramel to firm up and make the bars easier to cut.
Notes
- How to Tell When They’re Done: The Carmelitas are done when the edges are lightly browned and the center is bubbling. The caramel will continue to firm up as the bars cool, so don’t worry if the caramel is still a little soft right out of the oven.
- Troubleshooting: If the caramel doesn’t melt smoothly, microwave it for a little longer in 30-second intervals. Stir well after each interval until the mixture is completely smooth. If using the stovetop, be sure to stir constantly to avoid burning the caramel.
- Making Clean Cuts: Allow the bars to cool completely before slicing. If you try to slice them too early, the caramel will be too gooey, and the bars will fall apart. Cooling them ensures they hold their shape and slice neatly.
- Storing Leftovers: Store leftover Carmelitas in an airtight container at room temperature for up to a week. If you want them to last longer, store them in the fridge, but be sure to let them come to room temperature before serving to restore their chewy texture.
As someone who has always been a huge fan of caramel (if it’s sweet and gooey, sign me up), I can tell you that Carmelitas hold a special place in my heart. The layers of soft caramel and chocolate are reminiscent of the best gooey cookies, but with the added bonus of a chewy oatmeal crust that provides just the right amount of texture. It’s the kind of treat that feels like it belongs at a special occasion but is so easy to make that you’ll find yourself baking them for no reason at all. Whether you’re new to baking or an experienced cook looking for a foolproof dessert, these Carmelitas are perfect for anyone who loves to enjoy a sweet, comforting treat with minimal effort.
What makes this recipe perfect for beginner bakers is its simplicity. You don’t need to worry about complicated techniques or fancy kitchen equipment—just a few basic ingredients and a little patience while the bars cool. If you’ve ever felt intimidated by the thought of making a dessert from scratch, this recipe is a great introduction. In this guide, I’ll walk you through each step, offer helpful tips, and provide ideas for variations to make your Carmelitas even more delicious.
Ingredients and Preparation
To create these delicious Carmelitas, you’ll need a handful of ingredients, most of which you likely already have in your pantry. Let’s go over each ingredient in detail, including suggestions for substitutions if you need them.
For the oatmeal base and topping:
- ¾ cup butter, melted (1 ½ sticks; I use unsalted butter, but salted butter will work just as well): The butter forms the rich base for the Carmelita dough. If you prefer a lighter option, you can substitute half of the butter with applesauce or Greek yogurt, although this will slightly alter the texture and flavor. However, I highly recommend using butter for that classic, rich taste.
- ¾ cup light brown sugar, packed: Brown sugar adds moisture and a deep, caramelized flavor that complements the sweetness of the caramel and chocolate. If you prefer a less sweet alternative, you can substitute with coconut sugar or maple sugar, though the flavor may differ slightly.
- 1 tablespoon vanilla extract: Vanilla is a key flavor in the oatmeal crust and adds depth to the overall flavor of the Carmelitas. Make sure to use pure vanilla extract for the best taste. For a twist, you can experiment with flavored extracts such as almond or hazelnut.
- 1 cup all-purpose flour: All-purpose flour provides structure to the oatmeal base. If you’re looking for a gluten-free option, you can swap the all-purpose flour with a gluten-free flour blend.
- 1 cup whole-rolled old-fashioned oats (ensure they’re not instant or quick-cooking oats): Oats are the heart of the Carmelita base, providing chewiness and texture. Use old-fashioned rolled oats to ensure the right consistency. Instant oats will work in a pinch, but they won’t have the same chewy texture.
- 1 teaspoon baking soda: Baking soda helps the dough rise and gives the Carmelitas a light texture. Make sure it’s fresh for the best results.
- ½ teaspoon salt (adjust to taste): Salt enhances the flavor of the caramel and chocolate. If you’re using salted butter, you may want to reduce the added salt to ¼ teaspoon.
For the caramel layer:
- 35 caramel squares, unwrapped (I recommend using Werther’s Originals Soft Caramels, which are slightly bigger than cellophane-wrapped caramels. If you use the smaller wrapped caramels, add a couple more): Caramel squares are the easiest way to make the caramel filling, and Werther’s Originals are a great choice due to their smooth texture. You can also use pre-made caramel sauce if you’re short on time, though homemade caramel will yield the best flavor.
- ½ cup heavy cream: Heavy cream is what makes the caramel smooth and velvety. If you prefer a lighter option, you can substitute with coconut cream, but the flavor and texture will vary slightly.
For the chocolate layer:
- 1 cup semi-sweet chocolate chips or chunks (you can use a combination of both, like I did, for added texture and flavor): The chocolate layer adds a rich, melty layer to the bars. Semi-sweet chocolate is ideal, but you can also experiment with milk or dark chocolate, depending on your preferences. Chopped chocolate bars or chocolate chunks also work well and can add a more rustic look to the bars.
Step-by-Step Instructions
Now that we’ve covered the ingredients, let’s dive into the step-by-step instructions. Carmelitas are deceptively simple to make, but the key is patience. This recipe takes about 40 minutes to prepare, but the cooling time is essential to ensure the caramel firms up and the bars slice neatly.
- Preheat and Prepare the Pan: Preheat your oven to 350°F (175°C). Line an 8×8-inch pan with aluminum foil, leaving some overhang on the sides. This makes it easy to lift the bars out of the pan later for easy slicing. Grease the foil with cooking spray to prevent sticking. Set the pan aside.
- Melt the Butter and Mix: In a large microwave-safe mixing bowl, melt the butter in the microwave for about 90 seconds. Once melted, add the brown sugar and vanilla extract. Whisk until the mixture is smooth and well-combined.
- Add Dry Ingredients: To the butter and sugar mixture, add the flour, oats, baking soda, and salt. Stir everything together until combined. The dough should be thick and slightly crumbly. Don’t worry if it’s a little difficult to mix—this is normal.
- Prepare the Bottom Layer: Take half of the oatmeal mixture and press it evenly into the bottom of your prepared pan. Use a spatula or the back of a spoon to smooth it down and create an even layer. The dough will be thick, but this is exactly what you want to form the base.
- Bake the Bottom Layer: Place the pan in the oven and bake for 10 minutes. This helps to firm up the base layer before adding the caramel and chocolate.
- Make the Caramel Sauce: While the base is baking, make the caramel sauce. In a microwave-safe bowl, combine the unwrapped caramel squares and heavy cream. Microwave on high for 60-second intervals, stirring after each interval, until the caramels are fully melted and the mixture is smooth. This process usually takes about 4-5 minutes, depending on the strength of your microwave.
- Assemble the Carmelitas: After the base has baked for 10 minutes, remove the pan from the oven. Sprinkle the chocolate chips evenly over the base layer. Slowly and evenly pour the caramel sauce over the chocolate, making sure it’s spread out over the entire surface.
- Add the Topping: Take the remaining oatmeal mixture and crumble it evenly over the caramel layer. Don’t press it down—just let it fall into place. This creates a crumbly topping that will form a golden crust once baked.
- Bake the Carmelitas: Return the pan to the oven and bake for another 15-18 minutes. The edges should be lightly browned, and the center should be bubbling slightly. Keep an eye on them as the caramel can burn if baked too long.
- Cool and Slice: Let the Carmelitas cool completely in the pan. This may take up to 4 hours at room temperature, or you can speed up the process by placing them in the fridge. It’s important to let them cool completely before slicing to allow the caramel to firm up and make the bars easier to cut.
Beginner Tips and Notes
- How to Tell When They’re Done: The Carmelitas are done when the edges are lightly browned and the center is bubbling. The caramel will continue to firm up as the bars cool, so don’t worry if the caramel is still a little soft right out of the oven.
- Troubleshooting: If the caramel doesn’t melt smoothly, microwave it for a little longer in 30-second intervals. Stir well after each interval until the mixture is completely smooth. If using the stovetop, be sure to stir constantly to avoid burning the caramel.
- Making Clean Cuts: Allow the bars to cool completely before slicing. If you try to slice them too early, the caramel will be too gooey, and the bars will fall apart. Cooling them ensures they hold their shape and slice neatly.
- Storing Leftovers: Store leftover Carmelitas in an airtight container at room temperature for up to a week. If you want them to last longer, store them in the fridge, but be sure to let them come to room temperature before serving to restore their chewy texture.
Serving Suggestions
Carmelitas are delicious on their own, but you can pair them with a variety of options to elevate the experience. Here are a few ideas:
- Vanilla Ice Cream: A warm Carmelita with a scoop of vanilla ice cream is a match made in heaven. The contrast between the warm bars and cold ice cream is irresistible.
- Whipped Cream: Serve your Carmelitas with a dollop of freshly whipped cream or a dusting of powdered sugar for a lighter, airy addition.
- Hot Chocolate or Coffee: Carmelitas pair wonderfully with a cup of hot chocolate or rich coffee. The sweetness of the bars and the warmth of the drink complement each other perfectly.

Conclusion
Carmelitas are the ultimate dessert for anyone who loves caramel, chocolate, and the heartiness of oatmeal. They’re rich, indulgent, and surprisingly easy to make, even for beginner bakers. With just a few simple ingredients and straightforward instructions, you can create a treat that’s sure to impress friends and family. Whether you’re baking for a special occasion or just craving a sweet treat, Carmelitas will become your go-to dessert. I hope you enjoy making them as much as I do—don’t forget to share your experience in the comments below! Happy baking!


