Banana pudding has always been a classic comfort food, one that brings back fond memories of family gatherings and sunny afternoons. It’s that sweet, creamy dessert that everyone loves, with layers of soft vanilla pudding, ripe bananas, and crunchy Nilla Wafers. But what if you could take that beloved dessert and turn it into something even more indulgent? That’s where this Banana Pudding Cheesecake comes in. Imagine the smooth, rich texture of cheesecake, combined with the classic flavors of banana pudding, all sitting on top of a buttery, crunchy Nilla Wafer crust. This dessert is the perfect mashup, taking the best of both worlds and transforming them into a showstopper treat. If you’re a beginner in the kitchen and looking for an easy yet impressive dessert to make, this Banana Pudding Cheesecake is the perfect choice. Not only is it delicious, but it’s also simple to prepare and requires minimal baking skills. Each step has been broken down into manageable instructions, making it ideal for anyone just starting to explore the world of baking.

Banana Pudding Cheesecake: A Beginner-Friendly Recipe for a Decadent Dessert
Banana pudding is a classic dessert, but imagine turning it into a creamy, indulgent cheesecake. This Banana Pudding Cheesecake combines the smooth richness of cheesecake with the comforting flavors of banana pudding, creating a treat that’s both familiar and luxurious. Perfect for beginners, this easy-to-follow recipe delivers a show-stopping dessert that’s sure to impress. Let’s dive in and learn how to make this irresistible dessert step by step!
- Prep Time: 1 hour
- Cook Time: 1 hour 25 minutes
- Total Time: 8 hours 25 minutes
- Yield: 16 slices 1x
- Category: Dessert
- Method: Baking, Chilling
- Cuisine: American
- Diet: Vegetarian
Ingredients
For the Nilla Wafer Crust:
- 1 box Nilla Wafers (about 11 oz)
- 2 tablespoons brown sugar (light or dark)
- ½ cup unsalted butter (melted)
For the Banana Cheesecake:
- 24 oz cream cheese (room temperature)
- ¾ cup white granulated sugar
- 1 teaspoon pure vanilla extract
- 2 ripe bananas (mashed)
- ½ cup sour cream (room temperature)
- ¼ cup heavy cream (room temperature)
- 4 large eggs (room temperature)
- 1 cup crushed Nilla Wafers
- 2 bananas (sliced thinly for layering)
For the Whipped Vanilla Pudding:
- 1 package instant vanilla pudding (3.4 oz)
- 1 cup cold milk
- 1 teaspoon pure vanilla extract
- 1 cup cold heavy cream
- Crushed Nilla Wafers for decorating
Instructions
1. Prepare the Nilla Wafer Crust: Preheat your oven to 325°F (165°C). Spray a 9-inch springform pan with non-stick baking spray, and then line the bottom with a 9-inch parchment paper circle. Spray the parchment paper as well to ensure that the crust doesn’t stick. Using a food processor, crush the Nilla Wafers into fine crumbs. Add the brown sugar and melted butter to the crumbs, mixing until well combined. If you don’t have a food processor, you can place the Nilla Wafers in a plastic bag and crush them with a rolling pin—just make sure the crumbs are fine and even. Pour the crumb mixture into the prepared springform pan and press it halfway up the sides of the pan. Use the bottom of a measuring cup to compact the crumbs tightly, ensuring a firm crust. Bake the crust for 11 minutes, then remove it from the oven and let it cool while you make the cheesecake filling.
2. Make the Banana Cheesecake Filling: In a stand mixer or using a hand mixer, beat the room-temperature cream cheese and granulated sugar on high speed for about 2 minutes, until smooth and creamy. Scrape the bowl with a rubber spatula to make sure everything is mixed evenly. Add the mashed bananas, vanilla extract, sour cream, and heavy cream to the cream cheese mixture. Mix on medium speed until everything is well combined. The mixture might be a little lumpy from the bananas, and that’s okay—this will give the cheesecake its signature banana flavor and texture. Add the eggs, one at a time, mixing on low speed after each addition just until incorporated. Scrape the bowl again to ensure all the ingredients are evenly distributed. Pour half of the cheesecake batter over the prepared crust. Layer the sliced bananas on top of the batter, and then sprinkle half of the crushed Nilla Wafers on top of the bananas. Pour the remaining cheesecake batter over the bananas and wafers, spreading it out evenly with a spatula.
3. Bake the Cheesecake in a Water Bath: To prevent cracks and ensure even cooking, we’ll bake the cheesecake in a water bath. There are two methods to do this:
- Method 1: Place the springform pan inside a 10-inch cake pan. Then, place the cake pan inside a large roasting pan. Carefully pour hot water into the roasting pan until it reaches halfway up the sides of the cake pan. This method prevents any water from getting into the cheesecake crust.
- Method 2: Wrap the springform pan tightly in two layers of aluminum foil to prevent water from leaking into the pan. Place the wrapped pan inside the roasting pan and fill it with hot water until it reaches halfway up the sides of the springform pan. Bake the cheesecake for 80-90 minutes, or until the edges are set, but the center is still slightly jiggly. The cheesecake will continue to cook after you remove it from the oven, so don’t worry if the center isn’t fully set. Once the cheesecake is done, turn off the oven, crack the oven door, and let it cool in the oven for about 30 minutes. This gradual cooling process helps prevent the cheesecake from cracking. After 30 minutes, remove the cheesecake from the water bath and place it on a cooling rack. Allow it to cool completely, then wrap it in foil and refrigerate for at least 6 hours, or overnight.
4. Make the Whipped Vanilla Pudding: While the cheesecake is chilling, it’s time to make the whipped vanilla pudding topping. In a large bowl, whisk together the instant vanilla pudding mix and cold milk. Use a hand mixer to beat the pudding on medium speed for about 2 minutes until it thickens. Place the pudding in the fridge while you prepare the whipped cream. In a separate chilled metal bowl, beat the cold heavy cream and vanilla extract on high speed until stiff peaks form. Be careful not to overwhip the cream, or it may turn into butter. Gently fold the whipped cream into the prepared vanilla pudding using a rubber spatula. Be gentle when folding to avoid deflating the whipped cream. Once fully combined, set the whipped vanilla pudding aside.
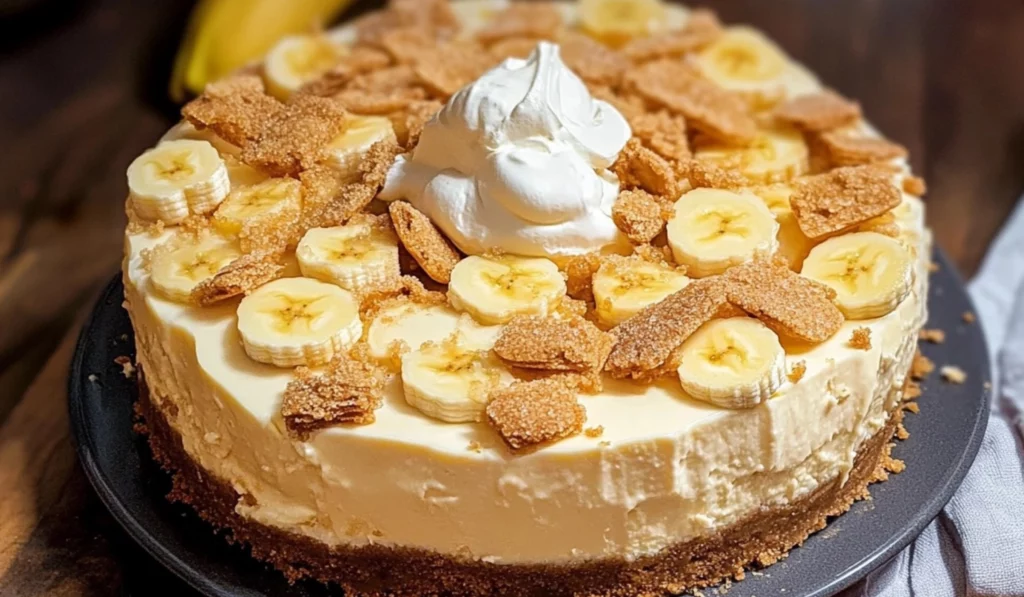
5. Assemble the Banana Pudding Cheesecake: Once the cheesecake has chilled, carefully remove the springform pan and parchment paper. Spread the whipped vanilla pudding evenly over the top of the cheesecake, covering it completely. Sprinkle the remaining crushed Nilla Wafers on top for added texture and decoration. The crushed Nilla Wafers will give the topping a delightful crunch that contrasts beautifully with the creamy pudding and cheesecake layers.
Notes
- Use room-temperature ingredients: This is crucial for achieving a smooth, lump-free cheesecake batter. Cold ingredients can cause the batter to curdle or result in a lumpy texture.
- Don’t overmix the eggs: When adding the eggs to the cheesecake batter, mix them in on low speed just until combined. Overmixing can cause the cheesecake to crack during baking.
- Check for doneness: The cheesecake should have a slight jiggle in the center when it’s done. If the edges are set but the center is still wobbly, it’s perfect. Overbaking can lead to a dry texture.
- Use a water bath: A water bath helps to evenly cook the cheesecake and prevent cracking. If you’re worried about water leaking into the pan, double-wrap the springform pan in foil or use the cake pan method.
In this recipe, I’ll walk you through the process of creating this dreamy dessert, from the Nilla Wafer crust to the fluffy whipped vanilla pudding topping. This dessert is a guaranteed crowd-pleaser that will leave your guests asking for the recipe. Whether you’re looking to impress at a dinner party or simply want to treat yourself and your loved ones to something special, this Banana Pudding Cheesecake delivers. It’s a dessert that feels like a celebration, yet it’s easy enough for beginners to make with confidence. It’s a dessert that brings people together, evoking the warmth of home and the joy of sharing good food. So, let’s get started!
Ingredients and Preparation
Before you start, make sure you have all the ingredients on hand. This recipe might look like it has a lot of components, but don’t let that intimidate you. With a little prep and some patience, you’ll have a gorgeous dessert that will impress everyone who tries it. Here’s what you’ll need for each layer of this Banana Pudding Cheesecake:
For the Nilla Wafer Crust:
- 1 box Nilla Wafers (about 11 oz)
- 2 tablespoons brown sugar (light or dark)
- ½ cup unsalted butter (melted)
For the Banana Cheesecake:
- 24 oz cream cheese (room temperature)
- ¾ cup white granulated sugar
- 1 teaspoon pure vanilla extract
- 2 ripe bananas (mashed)
- ½ cup sour cream (room temperature)
- ¼ cup heavy cream (room temperature)
- 4 large eggs (room temperature)
- 1 cup crushed Nilla Wafers
- 2 bananas (sliced thinly for layering)
For the Whipped Vanilla Pudding:
- 1 package instant vanilla pudding (3.4 oz)
- 1 cup cold milk
- 1 teaspoon pure vanilla extract
- 1 cup cold heavy cream
- Crushed Nilla Wafers for decorating
Each ingredient plays an important role in building the layers of flavor and texture. The Nilla Wafers bring that familiar crunch, while the bananas and cream cheese create the creamy, fruity layers that make this dessert so irresistible. The whipped vanilla pudding topping adds the perfect finishing touch, making the cheesecake even more indulgent. If you’re a beginner cook, don’t worry—this recipe uses common ingredients that you can easily find at your local grocery store. It’s simple, but the end result is something truly spectacular.
Step-by-Step Instructions
Once you have all the ingredients ready, it’s time to get baking! I’ve broken down each step for you, so you can follow along with ease. Don’t worry if you’re new to baking—this recipe is beginner-friendly and perfect for those just starting out in the kitchen. Just take it one step at a time, and you’ll be amazed by the result.
1. Prepare the Nilla Wafer Crust: Preheat your oven to 325°F (165°C). Spray a 9-inch springform pan with non-stick baking spray, and then line the bottom with a 9-inch parchment paper circle. Spray the parchment paper as well to ensure that the crust doesn’t stick. Using a food processor, crush the Nilla Wafers into fine crumbs. Add the brown sugar and melted butter to the crumbs, mixing until well combined. If you don’t have a food processor, you can place the Nilla Wafers in a plastic bag and crush them with a rolling pin—just make sure the crumbs are fine and even. Pour the crumb mixture into the prepared springform pan and press it halfway up the sides of the pan. Use the bottom of a measuring cup to compact the crumbs tightly, ensuring a firm crust. Bake the crust for 11 minutes, then remove it from the oven and let it cool while you make the cheesecake filling.
2. Make the Banana Cheesecake Filling: In a stand mixer or using a hand mixer, beat the room-temperature cream cheese and granulated sugar on high speed for about 2 minutes, until smooth and creamy. Scrape the bowl with a rubber spatula to make sure everything is mixed evenly. Add the mashed bananas, vanilla extract, sour cream, and heavy cream to the cream cheese mixture. Mix on medium speed until everything is well combined. The mixture might be a little lumpy from the bananas, and that’s okay—this will give the cheesecake its signature banana flavor and texture. Add the eggs, one at a time, mixing on low speed after each addition just until incorporated. Scrape the bowl again to ensure all the ingredients are evenly distributed. Pour half of the cheesecake batter over the prepared crust. Layer the sliced bananas on top of the batter, and then sprinkle half of the crushed Nilla Wafers on top of the bananas. Pour the remaining cheesecake batter over the bananas and wafers, spreading it out evenly with a spatula.
3. Bake the Cheesecake in a Water Bath: To prevent cracks and ensure even cooking, we’ll bake the cheesecake in a water bath. There are two methods to do this:
- Method 1: Place the springform pan inside a 10-inch cake pan. Then, place the cake pan inside a large roasting pan. Carefully pour hot water into the roasting pan until it reaches halfway up the sides of the cake pan. This method prevents any water from getting into the cheesecake crust.
- Method 2: Wrap the springform pan tightly in two layers of aluminum foil to prevent water from leaking into the pan. Place the wrapped pan inside the roasting pan and fill it with hot water until it reaches halfway up the sides of the springform pan. Bake the cheesecake for 80-90 minutes, or until the edges are set, but the center is still slightly jiggly. The cheesecake will continue to cook after you remove it from the oven, so don’t worry if the center isn’t fully set. Once the cheesecake is done, turn off the oven, crack the oven door, and let it cool in the oven for about 30 minutes. This gradual cooling process helps prevent the cheesecake from cracking. After 30 minutes, remove the cheesecake from the water bath and place it on a cooling rack. Allow it to cool completely, then wrap it in foil and refrigerate for at least 6 hours, or overnight.
4. Make the Whipped Vanilla Pudding: While the cheesecake is chilling, it’s time to make the whipped vanilla pudding topping. In a large bowl, whisk together the instant vanilla pudding mix and cold milk. Use a hand mixer to beat the pudding on medium speed for about 2 minutes until it thickens. Place the pudding in the fridge while you prepare the whipped cream. In a separate chilled metal bowl, beat the cold heavy cream and vanilla extract on high speed until stiff peaks form. Be careful not to overwhip the cream, or it may turn into butter. Gently fold the whipped cream into the prepared vanilla pudding using a rubber spatula. Be gentle when folding to avoid deflating the whipped cream. Once fully combined, set the whipped vanilla pudding aside.
5. Assemble the Banana Pudding Cheesecake: Once the cheesecake has chilled, carefully remove the springform pan and parchment paper. Spread the whipped vanilla pudding evenly over the top of the cheesecake, covering it completely. Sprinkle the remaining crushed Nilla Wafers on top for added texture and decoration. The crushed Nilla Wafers will give the topping a delightful crunch that contrasts beautifully with the creamy pudding and cheesecake layers.
Beginner Tips and Notes
As you make this Banana Pudding Cheesecake, here are some tips to ensure it turns out perfectly:
- Use room-temperature ingredients: This is crucial for achieving a smooth, lump-free cheesecake batter. Cold ingredients can cause the batter to curdle or result in a lumpy texture.
- Don’t overmix the eggs: When adding the eggs to the cheesecake batter, mix them in on low speed just until combined. Overmixing can cause the cheesecake to crack during baking.
- Check for doneness: The cheesecake should have a slight jiggle in the center when it’s done. If the edges are set but the center is still wobbly, it’s perfect. Overbaking can lead to a dry texture.
- Use a water bath: A water bath helps to evenly cook the cheesecake and prevent cracking. If you’re worried about water leaking into the pan, double-wrap the springform pan in foil or use the cake pan method.
Serving Suggestions
This Banana Pudding Cheesecake is perfect on its own, but if you want to take it up a notch, here are a few ideas:
- Top with fresh banana slices: Garnish the cheesecake with fresh banana slices just before serving for an extra burst of banana flavor.
- Pair with a hot beverage: The creamy texture of the cheesecake pairs wonderfully with a cup of hot coffee, tea, or even a glass of iced tea.
- Storage tips: If you have leftovers, store the cheesecake in an airtight container in the fridge for up to 4 days. You can also freeze it for up to 3 months. Just wrap it tightly in plastic wrap and foil before freezing.

Conclusion
This Banana Pudding Cheesecake is a beginner-friendly dessert that will surely impress everyone at your next gathering. With its layers of creamy banana cheesecake, Nilla Wafer crust, and fluffy vanilla pudding topping, it’s a dessert that’s as delicious as it is beautiful. Whether you’re an experienced baker or a beginner just starting out, this recipe is simple to follow and guarantees fantastic results. So, grab your ingredients, roll up your sleeves, and get ready to create a showstopper dessert that everyone will love. Don’t forget to share your experience in the comments—I’d love to hear how your cheesecake turned out! Happy baking!


