White Chocolate Raspberry Cheesecake: A Luxurious Treat for Every Occasion
White Chocolate Raspberry Cheesecake is the epitome of elegance and indulgence. This creamy, dreamy dessert marries the richness of white chocolate with the tart sweetness of raspberries for a flavor combination that’s absolutely irresistible. Whether it’s a holiday gathering, birthday celebration, or simply an evening treat, this cheesecake guarantees smiles all around. With a buttery Oreo crust, a smooth cheesecake filling, and a vibrant raspberry swirl, it’s a showstopper that tastes just as good as it looks.
- Prep Time: 15 minutes
- Cook Time: 1 hour
- Total Time: 7 hours 15 minutes (including cooling time)
- Yield: 10-12 servings 1x
- Category: Cake, Dessert
- Method: Baking
- Cuisine: American
- Diet: Vegetarian
Ingredients
For the Crust
- 26–30 Oreo cookies, finely crushed (about 2 cups)
- 1/4 cup salted butter, melted
For the Raspberry Swirl
- 12 ounces fresh or frozen raspberries
- 1/3 cup water
- 2 tablespoons granulated sugar
- 3 teaspoons cornstarch
For the Filling
- 1 1/2 cups white chocolate chips
- 1/2 cup cream or half-and-half
- 32 ounces cream cheese, softened
- 1 cup granulated sugar
- 1/3 cup sour cream
- 2 tablespoons all-purpose flour
- 2 teaspoons vanilla extract
- 4 large eggs, room temperature
For the Topping
- 2 ounces white chocolate, grated or shaved
- 1 1/4 cups heavy cream
- 1/4 cup powdered sugar
- 1 teaspoon vanilla extract
Instructions
Preparing the Crust
Start by preheating your oven to 325°F. Combine the crushed Oreo cookies and melted butter in a medium-sized mixing bowl. Stir until the crumbs are evenly moistened, then press the mixture firmly into the bottom and up the sides of a tall 9×3-inch springform pan. This will create the perfect foundation for your cheesecake. Bake the crust for 8 to 10 minutes, then set it aside to cool while you prepare the filling.
The crust serves as the foundation of your cheesecake, so it’s important to press it in firmly for maximum stability. The crushed Oreos add a deep, chocolatey flavor that contrasts beautifully with the creamy filling. If you prefer, you can substitute Oreos with any chocolate cookies of your choice, though the classic Oreo crust is hard to beat.
Creating the Raspberry Swirl
In a medium saucepan, combine the raspberries, water, granulated sugar, and cornstarch. Cook the mixture over medium heat, stirring frequently, until it thickens and comes to a gentle boil—this should take about 5 minutes. The raspberries break down and release their natural sugars, creating a vibrant, slightly tart sauce. Once the sauce thickens, strain the mixture through a wire mesh strainer to remove the seeds, leaving you with a smooth, silky raspberry sauce. Set this aside to cool completely.
The raspberry swirl is what gives the cheesecake its signature burst of color and flavor. By straining the mixture, you eliminate the seeds, which makes for a smooth and elegant swirl in your cheesecake. If you want a bolder raspberry flavor, you can skip the straining step, but this will result in a slightly seedier texture.
Making the Filling
Melt the white chocolate chips and cream (or half-and-half) together in the microwave. Use short, 20-second bursts, stirring between each interval, until the mixture is smooth and creamy. This is the moment where the rich sweetness of the white chocolate begins to shine through, infusing the cheesecake with a luxurious flavor.
In a large mixing bowl, beat the softened cream cheese using an electric mixer until it’s light and fluffy. Gradually add the granulated sugar, sour cream, and flour, mixing well after each addition. The cream cheese provides the cheesecake with its signature smooth texture, while the sour cream adds a tangy element that balances the richness of the filling.
With the mixer on low speed, add the eggs one at a time, mixing just until each egg is fully incorporated. Avoid overbeating the batter, as this can introduce excess air and cause cracks during baking. The eggs bind the ingredients together, helping the cheesecake set into a firm, smooth consistency.
Finally, mix in the melted white chocolate and vanilla extract until smooth and evenly blended. The white chocolate will add a velvety sweetness, while the vanilla extract enhances the overall flavor profile.
Assembling the Cheesecake
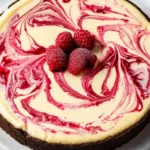
Pour half of the cheesecake filling into the prepared crust. Dollop half of the raspberry sauce over the batter in small spoonfuls, then use a skewer or knife to create gentle swirls. This step allows you to create a marbled effect that’s both visually stunning and flavorful. The raspberry swirl will melt into the white chocolate filling, creating a beautiful contrast.
Add the remaining cheesecake filling, repeating the process with the remaining raspberry sauce to create a beautifully marbled effect. The final result will be a striking combination of creamy white chocolate and vibrant raspberry.
Baking the Cheesecake
Place a shallow pan of water on the oven rack below the cheesecake to create steam, which helps prevent cracks. Bake the cheesecake for 60 to 70 minutes, or until the edges are set but the center still jiggles slightly. The cheesecake will continue to firm up as it cools, so don’t worry if it’s a little soft in the center at this stage.
Once the cheesecake is done baking, turn off the oven and crack the door open, leaving the cheesecake inside to cool for an hour. This gradual cooling process helps prevent the surface from cracking. Afterward, let the cheesecake cool at room temperature for another hour before transferring it to the refrigerator. Chill for at least 3 to 4 hours, or overnight, to ensure the filling is fully set.
Adding the Finishing Touches
Beat the heavy cream, powdered sugar, and vanilla extract together until stiff peaks form. This whipped cream topping adds a light, airy contrast to the dense, rich cheesecake. Use a piping bag fitted with a decorative tip to pipe swirls of whipped cream around the edges of the cheesecake. Sprinkle the top with grated or shaved white chocolate for a final touch of elegance.
The whipped cream topping not only adds a visually appealing touch but also provides a creamy balance to the richness of the cheesecake. The white chocolate shavings give the cheesecake a sophisticated look, enhancing its overall presentation.
Notes
- Crust Perfection: To ensure your crust holds together well, press it firmly into the pan using the back of a spoon or the bottom of a glass. This will help the crust maintain its shape when slicing the cheesecake.
- Preventing Cracks: Always bake the cheesecake with a pan of water in the oven. Additionally, avoid overmixing the batter to reduce the risk of cracks. The slow cooling process in the oven also helps prevent cracks from forming on the surface.
- Room Temperature Ingredients: Allow the cream cheese, eggs, and sour cream to come to room temperature before mixing. This helps create a smooth batter and prevents the ingredients from curdling.
- Customizing the Swirl: Try using other fruit sauces, such as strawberry or blackberry, for a different flavor profile. The bright colors of the fruit will still create a beautiful visual effect.
- Serving Suggestions: Pair each slice with a drizzle of extra raspberry sauce and a few fresh berries for an elevated presentation. You can also serve the cheesecake with a side of whipped cream or a scoop of vanilla ice cream for added indulgence.