Tall and Creamy New York Cheesecake: The Ultimate Dessert Experience
Cheesecake is a dessert that has stood the test of time, beloved for its rich, creamy texture and versatile flavor profile. Among the various styles of cheesecake, the New York cheesecake reigns supreme. Known for its dense yet creamy consistency and a subtle tang that perfectly balances its sweetness, the New York cheesecake is an indulgent treat that never fails to impress. This recipe for a Tall and Creamy New York Cheesecake takes decadence to the next level, offering a dessert that is both visually striking and absolutely delicious. With no crust to distract from the luscious filling, every bite delivers pure cheesecake bliss.
- Prep Time: 20 minutes
- Cook Time: 2 hours
- Total Time: 2 hours 20 minutes
- Yield: 12 servings 1x
- Category: Dessert
- Method: Baking
- Cuisine: American
- Diet: Vegetarian
Ingredients
- 32 ounces cream cheese (4 packages), room temperature: Cream cheese is the cornerstone of any cheesecake. Its rich, creamy texture provides the foundation for the dessert. Using room-temperature cream cheese ensures a smooth batter without lumps, making for a silky final product.
- 5 large eggs, room temperature: Eggs are essential for structure and creaminess. Incorporating them one at a time allows for even blending, resulting in a uniform texture. Room-temperature eggs mix more easily into the batter.
- 2 cups sour cream, room temperature: Sour cream adds a tangy note that balances the sweetness of the cheesecake. It also contributes to the luscious, creamy consistency of the filling.
- 8 tablespoons butter, room temperature: Butter enhances the richness of the cheesecake and ensures a smooth, luxurious texture. It also complements the tang of the cream cheese and sour cream.
- 1 ½ cups sugar: Sugar provides the sweetness that balances the tangy ingredients, making each bite perfectly satisfying without being overly sweet.
- 2 tablespoons cornstarch: Cornstarch helps stabilize the cheesecake and gives it a firmer texture. It also prevents cracking by binding the ingredients together during baking.
- 2 vanilla beans (or 1 ½ teaspoons pure vanilla extract): Vanilla beans provide a deep, aromatic flavor that enhances the creaminess of the cheesecake. If you don’t have vanilla beans, pure vanilla extract is a great substitute.
- 1 teaspoon fresh lemon juice: A hint of lemon juice brightens the flavors and adds a subtle citrus note that elevates the cheesecake without overpowering it.
Instructions
Step 1: Prepare the Springform Pan
Begin by tightly wrapping two layers of aluminum foil around the outside of a 10-inch springform pan. This will prevent water from seeping into the pan during the water bath. Generously coat the inside of the pan with butter, ensuring that the entire surface is well-greased. This will make it easier to remove the cheesecake once it’s baked and cooled.
Step 2: Preheat the Oven
Preheat your oven to 300°F (150°C). A low baking temperature is crucial for a New York cheesecake, as it allows the filling to cook slowly and evenly, resulting in a smooth, creamy texture.
Step 3: Prepare the Cheesecake Batter
Using an electric mixer fitted with a paddle attachment, beat the cream cheese and butter together on medium speed until smooth and creamy. Make sure to scrape down the sides of the bowl to incorporate all the ingredients evenly. Add the eggs one at a time, mixing after each addition until fully blended. This gradual incorporation ensures a smooth batter without overmixing.
Next, add the sour cream and mix until the batter is velvety and uniform. Gradually add the sugar, cornstarch, vanilla, and lemon juice, and beat the mixture on medium speed for about 2 minutes. The batter should be smooth, thick, and glossy, with no lumps or streaks.
Step 4: Assemble the Cheesecake
Pour the cheesecake batter into the prepared springform pan, spreading it evenly with a spatula. Place the springform pan inside a large roasting pan, ensuring there’s enough space between the sides of the two pans to prevent crowding.
Step 5: Create a Water Bath (Bain-Marie)
Carefully pour boiling water into the roasting pan until it reaches halfway up the sides of the springform pan. This water bath helps regulate the temperature and provides gentle, even heat during baking, which is key to preventing cracks in the cheesecake.
Step 6: Bake the Cheesecake
Place the roasting pan in the preheated oven and bake the cheesecake for 2 hours, or until the top is lightly browned and the edges are set. The center of the cheesecake should still have a slight jiggle—it will firm up as it cools. If you’re using a conventional oven, the baking time may be slightly longer than in a convection oven.
Step 7: Cool and Chill
Carefully remove the cheesecake from the water bath and discard the aluminum foil. Allow the cheesecake to cool completely at room temperature before unlatching and removing the rim of the springform pan. Once cooled, cover the cheesecake and refrigerate it for several hours, preferably overnight. Chilling allows the flavors to develop and ensures the cheesecake sets to the perfect consistency.
Step 8: Serve and Enjoy
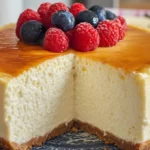
Serve the cheesecake plain to let its creamy, tangy flavor shine, or dress it up with your favorite toppings. Fresh berries, whipped cream, caramel sauce, or even a drizzle of chocolate can elevate this dessert to new heights. Each slice will be a rich, indulgent experience that’s sure to delight your taste buds.
Notes
- Room-Temperature Ingredients: Make sure all the ingredients are at room temperature before mixing. This ensures a smooth batter and prevents lumps.
- Water Bath Care: Be careful not to splash water onto the cheesecake when filling the roasting pan. If water seeps into the batter, it can affect the texture.
- Crust Option: If you prefer a crust, you can add a simple graham cracker or cookie crust to the base. Combine crushed graham crackers with melted butter and press it into the bottom of the springform pan before adding the batter.
- Flavor Variations: Experiment with different flavors by adding a swirl of fruit puree, chocolate ganache, or caramel to the batter before baking.
- Freezing: This cheesecake freezes beautifully. Wrap individual slices in plastic wrap and store them in an airtight container for up to three months.