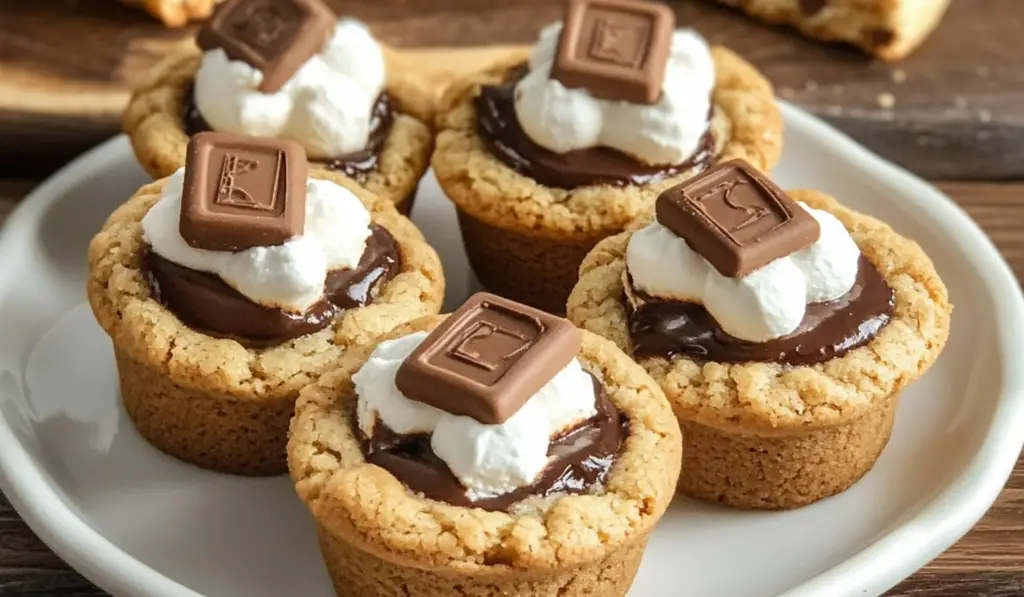
Few desserts capture the essence of summer more than s’mores. The gooey marshmallows, rich chocolate, and crunchy graham crackers evoke memories of campfires, cozy nights, and simple pleasures. But what if you could enjoy this classic treat without the need for a fire pit? Enter the delightful S’mores Cookie Cups. These bite-sized delights combine the crispy graham cracker crust of a traditional s’more with the soft, warm chewiness of a cookie. Topped with a fluffy, toasted marshmallow and a square of gooey chocolate, these mini desserts are perfect for any occasion—whether it’s a family gathering, a school party, or a cozy night in.
PrintS’mores Cookie Cups: A Perfect Blend of Classic Campfire Treats and Cookie Delights
Few desserts capture the essence of summer more than s’mores. The gooey marshmallows, rich chocolate, and crunchy graham crackers evoke memories of campfires, cozy nights, and simple pleasures. But what if you could enjoy this classic treat without the need for a fire pit? Enter the delightful S’mores Cookie Cups. These bite-sized delights combine the crispy graham cracker crust of a traditional s’more with the soft, warm chewiness of a cookie. Topped with a fluffy, toasted marshmallow and a square of gooey chocolate, these mini desserts are perfect for any occasion—whether it’s a family gathering, a school party, or a cozy night in.
- Prep Time: 10 minutes
- Cook Time: 8 minutes
- Total Time: 18 minutes
- Yield: 24 cookie cups 1x
- Category: Dessert
- Method: Baking
- Cuisine: American
- Diet: Vegetarian
Ingredients
- 1 cup graham cracker crumbs: This provides the signature graham cracker flavor of a traditional s’more. It also serves as the foundation of the cookie dough.
- 1 1/4 cups flour: A key ingredient for the structure of the cookie cups, ensuring they hold their shape while baking.
- 1/2 teaspoon baking soda: This helps the dough rise slightly during baking, creating a soft, chewy texture.
- 1/4 teaspoon salt: Salt brings out the sweetness of the other ingredients, balancing the flavor profile.
- 1/2 cup butter, softened: Butter adds richness and moisture to the dough, helping it come together beautifully.
- 1/2 cup brown sugar: The brown sugar not only sweetens the dough but also adds a slight caramel flavor that complements the graham crackers.
- 1/3 cup sugar: Regular granulated sugar sweetens the dough while keeping the texture light.
- 1 large egg: The egg binds the dough together and gives it the right consistency.
- 1 teaspoon vanilla extract: A dash of vanilla enhances the flavor, adding a warm and comforting aroma.
- 12 large marshmallows, cut in half: These are the star of the show. The marshmallows will melt beautifully and become golden brown when broiled.
- 2 Hershey’s (1.55 oz each) chocolate bars: Chocolate is a classic pairing with marshmallows, and using Hershey’s bars provides that perfect s’mores flavor. You can break the bars into smaller squares to top the marshmallows.
Instructions
Step 1: Preparing the Dough
Start by preheating your oven to 350°F (175°C). Then, spray a mini muffin pan with non-stick cooking spray. This ensures the cookies come out easily after baking.
In a small mixing bowl, combine the graham cracker crumbs, flour, baking soda, and salt. Stir everything together with a wire whisk to ensure the dry ingredients are evenly distributed. Set this dry mixture aside for now.
In a larger mixing bowl, use a handheld electric mixer to blend the softened butter, brown sugar, and granulated sugar until the mixture becomes creamy and smooth. This step is crucial for creating a soft, chewy texture for the cookie cups. Once the butter and sugar are well combined, add the egg and vanilla extract. Continue mixing until fully incorporated.
Now, gradually add the dry ingredients to the wet ingredients. Mix on low speed until the dough comes together. The dough should be slightly crumbly, but it will hold its shape when pressed. This is the perfect texture for pressing into the muffin pan.
Step 2: Shaping the Cookie Cups
Scoop the dough into each mini muffin tin, filling them generously. Don’t be shy about overfilling, as the dough will spread and create a nice, thick cookie base. Use your fingers or the back of a spoon to gently press the dough down, making sure the surface is even. You want the dough to be packed well enough so the cookies bake evenly, but not so tight that they’re difficult to remove from the pan after baking.
Once the dough is shaped in the muffin pan, place the pan in the oven and bake for 8 minutes. The cookies will look a little underdone when you take them out, but that’s exactly what you want. They will continue to set as they cool.
Step 3: Creating the Indent for the Marshmallow
Immediately after removing the pan from the oven, take a teaspoon-sized measuring spoon and gently press into the center of each cookie to form an indent. This is where the marshmallow will sit. Be careful not to press too hard, as you don’t want to break the cookie. The goal is to create just enough space to nestle the marshmallow inside. Once the indent is formed, place half of a marshmallow, sticky side down, into each cup. The heat from the freshly baked cookie will help the marshmallow adhere perfectly.
Let the cookie cups cool for about 20 minutes before proceeding to the next step. This gives the cookies time to firm up slightly, making them easier to handle.
Step 4: Toasting the Marshmallows
While the cookies are cooling, you can prepare for the final step: toasting the marshmallows. Take the muffin pan and place it under the broiler in your oven on high heat. Broil the marshmallows for 1 to 2 minutes, keeping a close eye on them to ensure they don’t burn. The marshmallows will quickly turn golden brown and bubbly. Remove the pan from the oven once the marshmallows have reached your desired level of toastiness.
Step 5: Adding the Chocolate
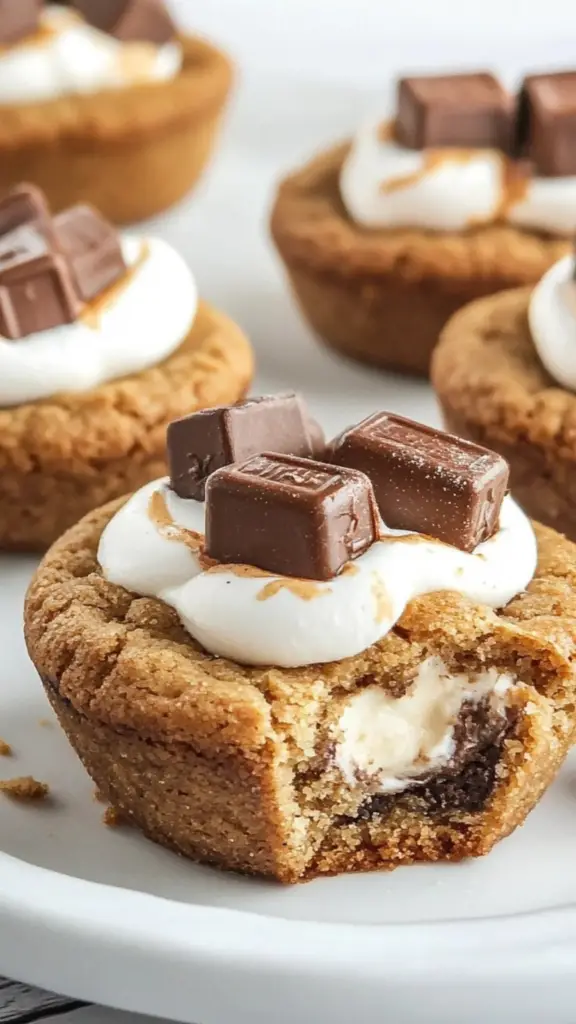
Once the marshmallows are perfectly toasted, it’s time to add the chocolate. Place one square of Hershey’s chocolate on top of each toasted marshmallow. The residual heat from the marshmallow will soften the chocolate, creating that delicious, melty center. If you prefer your chocolate less melted, you can broil the marshmallows first, then add the chocolate squares and let them soften on their own.
Allow the cookie cups to cool for about 10 minutes before serving. This step ensures the cookies hold their shape and are easier to handle.
Notes
- Marshmallow Tip: If you don’t have a broiler or prefer not to use it, you can toast the marshmallows using a kitchen torch for more control over the browning process.
- Chocolate Variations: While Hershey’s chocolate bars are the classic choice, you can experiment with other types of chocolate. Milk chocolate, dark chocolate, or even flavored chocolates (like caramel or almond) can add a unique twist to your s’mores cookie cups.
- Nutty Twist: Add chopped nuts, such as almonds, walnuts, or pecans, to the dough for an added crunch and flavor contrast.
- Gluten-Free Option: To make these cookie cups gluten-free, substitute the regular flour with a gluten-free flour blend. Ensure that your graham cracker crumbs are also gluten-free.
- No Mini Muffin Tin?: If you don’t have a mini muffin pan, you can use a regular muffin tin. However, the cookies will be larger and may require slightly longer baking time. Keep an eye on them to ensure they don’t overbake.
The beauty of these S’mores Cookie Cups lies in their ease of preparation, their irresistible texture contrast, and their nostalgic flavors. In just 18 minutes, you can enjoy these decadent little treats, offering a playful twist on a classic dessert. Let’s dive into the recipe and discover how to create these sweet, gooey bites of joy.
Ingredients Breakdown: A Sweet Symphony of Flavors
To create these S’mores Cookie Cups, you’ll need a few basic ingredients that come together to make the perfect cookie base and topping. Let’s break down what you’ll need for this treat:
- 1 cup graham cracker crumbs: This provides the signature graham cracker flavor of a traditional s’more. It also serves as the foundation of the cookie dough.
- 1 1/4 cups flour: A key ingredient for the structure of the cookie cups, ensuring they hold their shape while baking.
- 1/2 teaspoon baking soda: This helps the dough rise slightly during baking, creating a soft, chewy texture.
- 1/4 teaspoon salt: Salt brings out the sweetness of the other ingredients, balancing the flavor profile.
- 1/2 cup butter, softened: Butter adds richness and moisture to the dough, helping it come together beautifully.
- 1/2 cup brown sugar: The brown sugar not only sweetens the dough but also adds a slight caramel flavor that complements the graham crackers.
- 1/3 cup sugar: Regular granulated sugar sweetens the dough while keeping the texture light.
- 1 large egg: The egg binds the dough together and gives it the right consistency.
- 1 teaspoon vanilla extract: A dash of vanilla enhances the flavor, adding a warm and comforting aroma.
- 12 large marshmallows, cut in half: These are the star of the show. The marshmallows will melt beautifully and become golden brown when broiled.
- 2 Hershey’s (1.55 oz each) chocolate bars: Chocolate is a classic pairing with marshmallows, and using Hershey’s bars provides that perfect s’mores flavor. You can break the bars into smaller squares to top the marshmallows.
Instructions: How to Make the Perfect S’mores Cookie Cups
Step 1: Preparing the Dough
Start by preheating your oven to 350°F (175°C). Then, spray a mini muffin pan with non-stick cooking spray. This ensures the cookies come out easily after baking.
In a small mixing bowl, combine the graham cracker crumbs, flour, baking soda, and salt. Stir everything together with a wire whisk to ensure the dry ingredients are evenly distributed. Set this dry mixture aside for now.
In a larger mixing bowl, use a handheld electric mixer to blend the softened butter, brown sugar, and granulated sugar until the mixture becomes creamy and smooth. This step is crucial for creating a soft, chewy texture for the cookie cups. Once the butter and sugar are well combined, add the egg and vanilla extract. Continue mixing until fully incorporated.
Now, gradually add the dry ingredients to the wet ingredients. Mix on low speed until the dough comes together. The dough should be slightly crumbly, but it will hold its shape when pressed. This is the perfect texture for pressing into the muffin pan.
Step 2: Shaping the Cookie Cups
Scoop the dough into each mini muffin tin, filling them generously. Don’t be shy about overfilling, as the dough will spread and create a nice, thick cookie base. Use your fingers or the back of a spoon to gently press the dough down, making sure the surface is even. You want the dough to be packed well enough so the cookies bake evenly, but not so tight that they’re difficult to remove from the pan after baking.
Once the dough is shaped in the muffin pan, place the pan in the oven and bake for 8 minutes. The cookies will look a little underdone when you take them out, but that’s exactly what you want. They will continue to set as they cool.
Step 3: Creating the Indent for the Marshmallow
Immediately after removing the pan from the oven, take a teaspoon-sized measuring spoon and gently press into the center of each cookie to form an indent. This is where the marshmallow will sit. Be careful not to press too hard, as you don’t want to break the cookie. The goal is to create just enough space to nestle the marshmallow inside. Once the indent is formed, place half of a marshmallow, sticky side down, into each cup. The heat from the freshly baked cookie will help the marshmallow adhere perfectly.
Let the cookie cups cool for about 20 minutes before proceeding to the next step. This gives the cookies time to firm up slightly, making them easier to handle.
Step 4: Toasting the Marshmallows
While the cookies are cooling, you can prepare for the final step: toasting the marshmallows. Take the muffin pan and place it under the broiler in your oven on high heat. Broil the marshmallows for 1 to 2 minutes, keeping a close eye on them to ensure they don’t burn. The marshmallows will quickly turn golden brown and bubbly. Remove the pan from the oven once the marshmallows have reached your desired level of toastiness.
Step 5: Adding the Chocolate
Once the marshmallows are perfectly toasted, it’s time to add the chocolate. Place one square of Hershey’s chocolate on top of each toasted marshmallow. The residual heat from the marshmallow will soften the chocolate, creating that delicious, melty center. If you prefer your chocolate less melted, you can broil the marshmallows first, then add the chocolate squares and let them soften on their own.
Allow the cookie cups to cool for about 10 minutes before serving. This step ensures the cookies hold their shape and are easier to handle.
Tips and Variations
- Marshmallow Tip: If you don’t have a broiler or prefer not to use it, you can toast the marshmallows using a kitchen torch for more control over the browning process.
- Chocolate Variations: While Hershey’s chocolate bars are the classic choice, you can experiment with other types of chocolate. Milk chocolate, dark chocolate, or even flavored chocolates (like caramel or almond) can add a unique twist to your s’mores cookie cups.
- Nutty Twist: Add chopped nuts, such as almonds, walnuts, or pecans, to the dough for an added crunch and flavor contrast.
- Gluten-Free Option: To make these cookie cups gluten-free, substitute the regular flour with a gluten-free flour blend. Ensure that your graham cracker crumbs are also gluten-free.
- No Mini Muffin Tin?: If you don’t have a mini muffin pan, you can use a regular muffin tin. However, the cookies will be larger and may require slightly longer baking time. Keep an eye on them to ensure they don’t overbake.
Serving Suggestions
S’mores Cookie Cups are perfect for any occasion. Serve them as a dessert at your next barbecue, family gathering, or holiday party. They can also be enjoyed as a fun treat for kids’ parties or school events. To make them even more festive, you can sprinkle the tops with crushed graham crackers or add a drizzle of chocolate syrup.
For an extra indulgent experience, serve them with a scoop of vanilla ice cream on the side. The cold ice cream complements the warm, gooey s’mores perfectly, creating a delicious contrast of temperatures and textures.
Final Thoughts
S’mores Cookie Cups are the ultimate fusion of a classic camping treat and a comforting cookie dessert. With their easy-to-make graham cracker base, gooey marshmallow center, and rich chocolate topping, these little cups of sweetness will surely become a family favorite. Whether you’re looking to impress guests at a party or satisfy a sweet craving at home, these s’mores-inspired treats are a guaranteed hit. Try them out, and prepare to enjoy the nostalgic flavors of s’mores in a whole new way!
