When it comes to making a dessert that impresses without overwhelming, raspberry mousse is a standout choice. Light, fluffy, and bursting with fresh berry flavor, it’s the perfect way to end any meal on a sweet note. For me, this raspberry mousse always brings back fond memories of family gatherings, where we’d finish dinner with something that felt both indulgent and refreshing. It’s a simple, yet elegant dessert that anyone can make—even those who are new to the kitchen. If you’re a beginner, don’t worry! This recipe is surprisingly easy, requires minimal equipment, and takes just a bit of patience to set.
Raspberry Mousse Recipe: A Delightful Dessert for Beginners

Raspberry mousse is the perfect dessert for any occasion—light, airy, and bursting with fresh fruity flavor. When I first made it, I was amazed at how easy it was to create something so impressive. Whether you’re a beginner or experienced cook, this simple recipe guarantees a delicious result every time. Let’s dive into making this delightful treat!
- Prep Time: 20 minutes
- Cook Time: 10 minutes
- Total Time: 30 minutes
- Yield: 6 servings 1x
- Category: Dessert
- Method: Chilling, No-bake, Whisking
- Cuisine: American
- Diet: Vegetarian
Ingredients
- 2 1/3 teaspoons (7 grams) powdered gelatin (1 packet Knox)
- 3 tablespoons cold water
- 10 oz (2 1/2 cups) fresh or frozen raspberries, thawed
- 1/2 cup granulated sugar
- 2 tablespoons fresh lemon juice
- 2 cups heavy whipping cream
- 1/4 cup powdered sugar
- 8–12 fresh raspberries and extra whipped cream for garnish (optional)
Instructions
1. Bloom the Gelatin: Begin by pouring the cold water into a small bowl. Sprinkle the powdered gelatin over the water and allow it to sit for 5-10 minutes. This step is essential because it “blooms” the gelatin, which means it absorbs the water and softens, making it easier to dissolve later. The gelatin will absorb the water and form a gel-like consistency, ensuring it can be easily mixed into the raspberry syrup later on.
2. Cook the Raspberry Mixture: In a medium saucepan, combine the raspberries, granulated sugar, and lemon juice. Set the heat to low and cook, stirring frequently. The sugar should dissolve completely into the raspberries, and the berries will release their juices. As the mixture warms, the raspberries will break down and become a lovely syrup. Once the sugar has dissolved, pass the mixture through a fine mesh strainer into a heatproof bowl. This will remove the seeds and leave you with a smooth, fruity syrup.
If you don’t have a fine mesh strainer, you can also use a cheesecloth or simply use a spoon to press the raspberry mixture against a sieve to extract the juices. The smoother the syrup, the smoother your mousse will be.
3. Dissolve the Gelatin: Return the strained raspberry syrup to the saucepan and add the bloomed gelatin. Warm the mixture over low heat, stirring occasionally, until the gelatin dissolves completely. Be sure not to let it come to a boil. If the syrup gets too hot, it may cause the gelatin to lose its setting power, which can result in a mousse that doesn’t firm up properly. Once the gelatin is dissolved, remove the saucepan from the heat, pour the syrup into a clean, large bowl, and set aside to cool.
It’s important to let the syrup cool to room temperature before proceeding. If the syrup is too warm when mixed with the whipped cream, it may cause the cream to deflate, resulting in a mousse that’s less airy.
4. Whip the Cream: In a separate mixing bowl, beat the heavy whipping cream and powdered sugar together. Start on low speed to prevent splattering, and gradually increase to medium speed. Continue whipping until soft peaks form. Soft peaks are when the cream holds a shape but falls over when the beaters are lifted. Then, turn the speed up to medium-high and whip until stiff peaks form. Stiff peaks hold their shape and stand upright when the beaters are lifted. This step is crucial—stiff peaks ensure that your mousse will hold its shape and have that lovely light, airy texture.
If you’re unsure about stiff peaks, just take a look at the whipped cream’s consistency. You should be able to lift the beaters out of the cream and have the peaks stand up straight without collapsing. Overwhipping will cause the cream to become too thick and buttery, so be cautious to stop at the right moment.
5. Combine the Raspberry Syrup and Whipped Cream: Once the raspberry syrup has cooled to room temperature but is still slightly warm, add 1/4 of the whipped cream to the mixture. Gently fold it in with a spatula until well combined. This helps lighten the syrup before you add the rest of the whipped cream. Then, gently fold in the remaining whipped cream until no white streaks remain. Be careful not to overmix, as you want to maintain the airy texture of the mousse. The goal is to create a smooth, light, and fluffy texture without deflating the whipped cream.
Remember, folding is a technique where you gently mix the ingredients using a spatula or spoon, turning the bowl as you go. This method helps preserve the air incorporated into the whipped cream, ensuring your mousse has the light texture you’re aiming for.
6. Set the Mousse: Divide the mousse mixture evenly between 4-6 individual serving dishes. Cover them with plastic wrap or a lid and refrigerate for at least 2 hours. During this time, the mousse will firm up and set, creating a light, airy texture that’s simply irresistible. If you’re in a hurry, you can chill the mousse in the freezer for about 30 minutes to speed up the process, but for the best results, allow the mousse to set in the refrigerator.
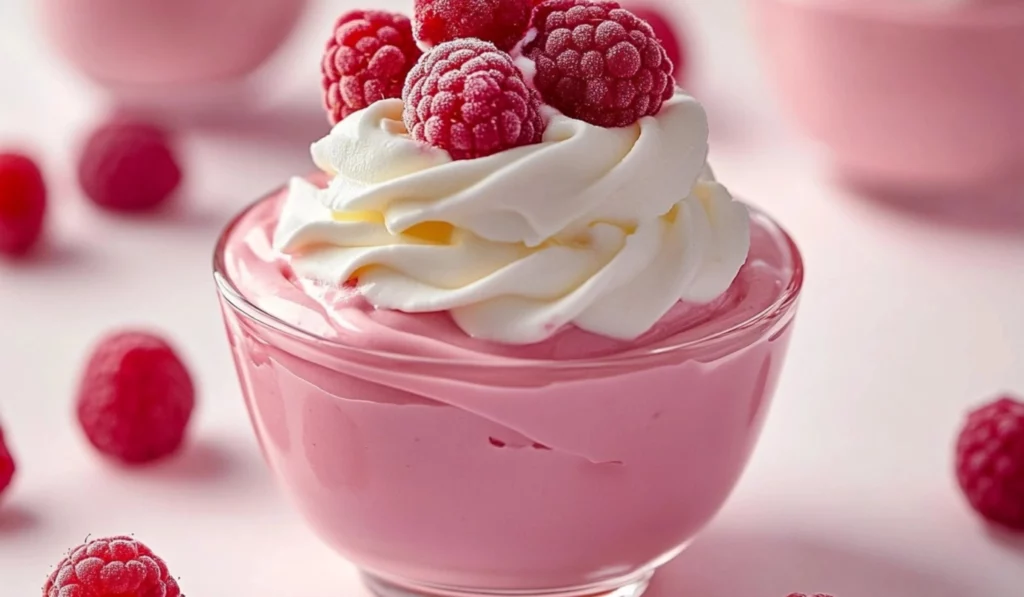
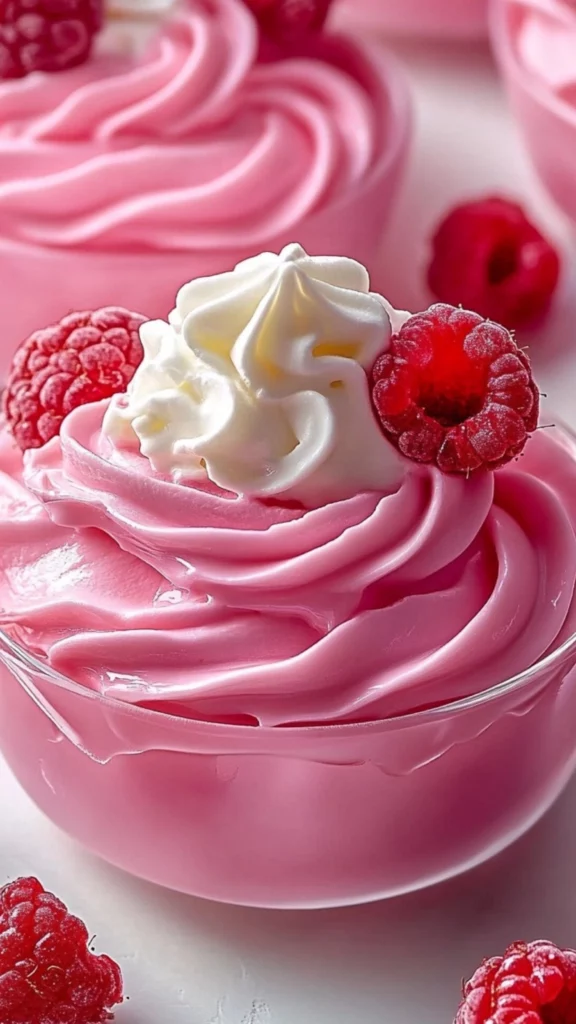
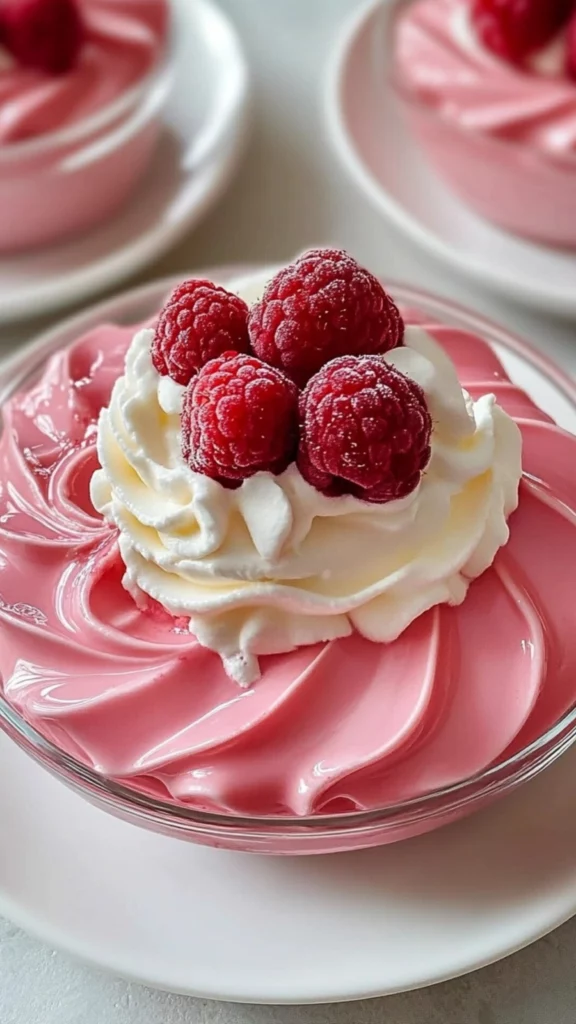
7. Garnish and Serve: Once the mousse is set, garnish each serving with fresh raspberries and a dollop of extra whipped cream for a finishing touch. The added berries not only enhance the look of the mousse but also give it a fresh burst of flavor with every bite. Serve and enjoy! The mousse should have a silky texture that gently melts in your mouth, with the bright and tangy flavor of the raspberries shining through.
Notes
- How to Tell If the Mousse is Set: When you gently shake the serving dishes, the mousse should wobble slightly but remain firm. If it moves too much, it may need more time to chill. The mousse will also firm up as it cools, so don’t worry if it seems a little loose initially.
- Whipping Cream: To help the cream whip more easily, make sure both your mixing bowl and beaters are chilled before you start. This can make a significant difference in how quickly and effectively the cream whips. You can place the bowl in the fridge for 10-15 minutes before starting.
- Avoid Overheating the Raspberry Syrup: When warming the raspberry syrup with the gelatin, always keep the heat low. If the syrup boils, it can cause the gelatin to lose its setting power, which will affect the mousse’s texture.
- Substituting for Gelatin: If you’re using agar-agar or another alternative, make sure to follow the instructions carefully. Agar-agar usually requires boiling to activate its setting power, so you may need to adjust the technique.
I remember the first time I made raspberry mousse. I was looking for a dessert that was both beautiful and simple, something I could make without a lot of special tools or complicated steps. I stumbled upon this recipe, and after trying it, I knew it was a keeper. The mousse turned out perfectly every time, and I’ve made it countless times for family events, dinner parties, and even just as a treat for myself. If you’ve never made mousse before, you’re in for a treat. It’s the kind of dessert that feels fancy but is incredibly easy to whip up.
Whether you’re looking to impress your guests or treat yourself to something sweet and satisfying, this raspberry mousse is an ideal choice. The best part? It’s not just a pretty dessert—it’s also a healthier alternative to many heavy treats, thanks to the fresh fruit and light whipped cream. Plus, the tangy lemon juice gives it a refreshing balance that makes it the perfect summer dessert, but it’s delicious all year round. Let’s dive into how to make this delightful raspberry mousse.
Ingredients and Preparation
For a delicious raspberry mousse, you’ll need the following ingredients:
- 2 1/3 teaspoons (7 grams) powdered gelatin (1 packet Knox)
- 3 tablespoons cold water
- 10 oz (2 1/2 cups) fresh or frozen raspberries, thawed
- 1/2 cup granulated sugar
- 2 tablespoons fresh lemon juice
- 2 cups heavy whipping cream
- 1/4 cup powdered sugar
- 8-12 fresh raspberries and extra whipped cream for garnish (optional)
This list of ingredients is straightforward, and you might already have most of them in your pantry. The gelatin, raspberries, and cream are the key components that come together to form this decadent mousse, but the lemon juice adds a lovely freshness that elevates the dish. The sugar gives the mousse just the right amount of sweetness, while the powdered sugar in the whipped cream ensures it stays light and airy.
Ingredient Substitutions:
- Gelatin: If you don’t have powdered gelatin, you can use agar-agar as a vegetarian alternative. However, note that you’ll need to adjust the quantity and preparation process. Agar-agar sets more firmly and may require boiling, so be sure to follow the specific instructions if you’re using this substitute.
- Sugar: You can substitute granulated sugar with a sugar substitute like stevia or monk fruit if you’re looking to reduce the sweetness or calories. Just make sure to check the conversion ratio for your specific substitute.
- Whipping Cream: For a lighter option, you can swap heavy whipping cream for a lower-fat alternative like double cream or even coconut cream. However, be aware the mousse may not be as rich or airy, and coconut cream will alter the flavor slightly.
- Fresh Lemon Juice: If you don’t have fresh lemon juice, bottled juice will work in a pinch. However, fresh lemon juice adds a vibrant, zesty flavor that’s hard to replicate. If you don’t have lemons, you can use lime juice for a slightly different citrus twist.
This mousse recipe is flexible and allows you to make small adjustments based on your preferences or what you have on hand. Don’t be afraid to experiment and tailor it to your liking!
Step-by-Step Instructions
1. Bloom the Gelatin: Begin by pouring the cold water into a small bowl. Sprinkle the powdered gelatin over the water and allow it to sit for 5-10 minutes. This step is essential because it “blooms” the gelatin, which means it absorbs the water and softens, making it easier to dissolve later. The gelatin will absorb the water and form a gel-like consistency, ensuring it can be easily mixed into the raspberry syrup later on.
2. Cook the Raspberry Mixture: In a medium saucepan, combine the raspberries, granulated sugar, and lemon juice. Set the heat to low and cook, stirring frequently. The sugar should dissolve completely into the raspberries, and the berries will release their juices. As the mixture warms, the raspberries will break down and become a lovely syrup. Once the sugar has dissolved, pass the mixture through a fine mesh strainer into a heatproof bowl. This will remove the seeds and leave you with a smooth, fruity syrup.
If you don’t have a fine mesh strainer, you can also use a cheesecloth or simply use a spoon to press the raspberry mixture against a sieve to extract the juices. The smoother the syrup, the smoother your mousse will be.
3. Dissolve the Gelatin: Return the strained raspberry syrup to the saucepan and add the bloomed gelatin. Warm the mixture over low heat, stirring occasionally, until the gelatin dissolves completely. Be sure not to let it come to a boil. If the syrup gets too hot, it may cause the gelatin to lose its setting power, which can result in a mousse that doesn’t firm up properly. Once the gelatin is dissolved, remove the saucepan from the heat, pour the syrup into a clean, large bowl, and set aside to cool.
It’s important to let the syrup cool to room temperature before proceeding. If the syrup is too warm when mixed with the whipped cream, it may cause the cream to deflate, resulting in a mousse that’s less airy.
4. Whip the Cream: In a separate mixing bowl, beat the heavy whipping cream and powdered sugar together. Start on low speed to prevent splattering, and gradually increase to medium speed. Continue whipping until soft peaks form. Soft peaks are when the cream holds a shape but falls over when the beaters are lifted. Then, turn the speed up to medium-high and whip until stiff peaks form. Stiff peaks hold their shape and stand upright when the beaters are lifted. This step is crucial—stiff peaks ensure that your mousse will hold its shape and have that lovely light, airy texture.
If you’re unsure about stiff peaks, just take a look at the whipped cream’s consistency. You should be able to lift the beaters out of the cream and have the peaks stand up straight without collapsing. Overwhipping will cause the cream to become too thick and buttery, so be cautious to stop at the right moment.
5. Combine the Raspberry Syrup and Whipped Cream: Once the raspberry syrup has cooled to room temperature but is still slightly warm, add 1/4 of the whipped cream to the mixture. Gently fold it in with a spatula until well combined. This helps lighten the syrup before you add the rest of the whipped cream. Then, gently fold in the remaining whipped cream until no white streaks remain. Be careful not to overmix, as you want to maintain the airy texture of the mousse. The goal is to create a smooth, light, and fluffy texture without deflating the whipped cream.
Remember, folding is a technique where you gently mix the ingredients using a spatula or spoon, turning the bowl as you go. This method helps preserve the air incorporated into the whipped cream, ensuring your mousse has the light texture you’re aiming for.
6. Set the Mousse: Divide the mousse mixture evenly between 4-6 individual serving dishes. Cover them with plastic wrap or a lid and refrigerate for at least 2 hours. During this time, the mousse will firm up and set, creating a light, airy texture that’s simply irresistible. If you’re in a hurry, you can chill the mousse in the freezer for about 30 minutes to speed up the process, but for the best results, allow the mousse to set in the refrigerator.
7. Garnish and Serve: Once the mousse is set, garnish each serving with fresh raspberries and a dollop of extra whipped cream for a finishing touch. The added berries not only enhance the look of the mousse but also give it a fresh burst of flavor with every bite. Serve and enjoy! The mousse should have a silky texture that gently melts in your mouth, with the bright and tangy flavor of the raspberries shining through.
Beginner Tips and Notes
- How to Tell If the Mousse is Set: When you gently shake the serving dishes, the mousse should wobble slightly but remain firm. If it moves too much, it may need more time to chill. The mousse will also firm up as it cools, so don’t worry if it seems a little loose initially.
- Whipping Cream: To help the cream whip more easily, make sure both your mixing bowl and beaters are chilled before you start. This can make a significant difference in how quickly and effectively the cream whips. You can place the bowl in the fridge for 10-15 minutes before starting.
- Avoid Overheating the Raspberry Syrup: When warming the raspberry syrup with the gelatin, always keep the heat low. If the syrup boils, it can cause the gelatin to lose its setting power, which will affect the mousse’s texture.
- Substituting for Gelatin: If you’re using agar-agar or another alternative, make sure to follow the instructions carefully. Agar-agar usually requires boiling to activate its setting power, so you may need to adjust the technique.
Serving Suggestions
This raspberry mousse can be enjoyed on its own or paired with complementary sides to make it a more substantial dessert. Here are a few ideas:
- Serve with Shortbread Cookies: The buttery, crumbly texture of shortbread pairs wonderfully with the smooth, creamy mousse. The contrast in textures will delight your taste buds.
- Top with a Fruit Compote: For an added burst of flavor, serve the mousse with a homemade or store-bought fruit compote—blueberries, strawberries, or mixed berries work best.
- Add Chocolate: If you’re a chocolate lover, drizzle some melted chocolate over the mousse before serving or sprinkle grated chocolate on top as a garnish. The richness of the chocolate complements the light and tangy mousse beautifully.
Storage Tips: If you have leftovers, store them in the refrigerator for up to 2 days. The mousse is best when it’s fresh, but it can still hold its texture and flavor for a short time. For the best results, keep the mousse covered to prevent it from absorbing odors from the fridge.
Conclusion
Now that you have this simple and delicious raspberry mousse recipe in your back pocket, you’ll be able to make a dessert that’s perfect for any occasion. Whether you’re hosting a dinner party, treating yourself, or sharing a sweet moment with loved ones, this mousse is guaranteed to wow. The best part is that it’s so easy to make and doesn’t require any special skills—just a few simple ingredients and some patience as it chills.
I’d love to hear how your raspberry mousse turns out! Don’t hesitate to leave a comment below if you have any questions or if you made any fun variations. Happy cooking, and enjoy your delightful creation!


