No-Bake Biscoff Cheesecake Cups: A Creamy Dream for Dessert Lovers
Indulge in the rich Biscoff flavor of these Cheesecake Cups. Biscoff cookies and spread blend for a creamy dessert.
- Prep Time: 20 minutes
- Cook Time: 0 minutes
- Total Time: 4 hours 20 minutes (including chilling time)
- Yield: 8 servings
- Category: Dessert
- Method: Mixing, Whipping, Chilling
- Cuisine: European Inspired, American
Ingredients
- Biscoff cookies (30)
- Melted butter (2 tbsp)
- Heavy cream (16 oz)
- Cream cheese (8 oz)
- Powdered sugar (1/2 cup)
- Biscoff spread (1/2 cup)
- Vanilla extract (1 tsp)
- Melted Biscoff spread (1/2 cup)
- Biscoff cookies (8)
Instructions
Make the Base (The Crumb Creation):
-
- Crush the Biscuits (The Crushing Commencement): Start by crushing the Lotus Biscoff biscuits into fine crumbs. You can use a food processor for a quick and even crush, or a rolling pin for a more hands-on approach. If using a rolling pin, place the biscuits in a zip-top bag and crush them until they are finely crumbled.
-
- Combine with Butter (The Binding Basics): In a medium bowl, combine the Biscoff crumbs with 2 tablespoons of melted unsalted butter. Mix until the crumbs are evenly coated with the butter and the mixture holds together when pressed.
-
- Reserve Crumbs (The Crumb Conservation): Reserve a few tablespoons of the crumb mixture for decoration. This will add a decorative touch and enhance the visual appeal of the finished cups.
-
- Divide into Cups (The Cup Distribution): Divide the remaining crumb mixture evenly into your serving cups. Add about 2-3 tablespoons of the mixture to each cup, depending on the size of your cups.
-
- Press Down (The Base Compaction): Press down on the crumb mixture in each cup to create an even, firm base. You can use the back of a spoon, a small glass, or your fingers to press it down firmly.
-
- Set Aside (The Base Backup): Set the cups aside while you prepare the cheesecake filling.
Make the Cheesecake Filling (The Filling Formation):
-
- Whip Heavy Cream (The Whipping Wonder): In a large bowl, whisk the heavy cream using an electric mixer or a stand mixer fitted with the whisk attachment until stiff peaks form. This creates a light and airy texture for the filling. Ensure the heavy cream is well chilled for optimal whipping.
-
- Cream Cheese Mixture (The Creaming Creation): In another bowl, whisk the cream cheese, powdered sugar, Biscoff spread, and vanilla extract until smooth and creamy. Ensure the cream cheese is at room temperature to avoid lumps. Use an electric mixer or a hand mixer for best results.
-
- Fold in Whipped Cream (The Folding Fusion): Gradually add the whipped heavy cream into the cream cheese mixture and fold gently until fully incorporated. Use a spatula to fold the cream, avoiding overmixing, which can deflate the cream and make the filling less airy.
Assemble (The Cup Construction):
-
- Prepare Piping Bag (The Piping Preparation): Add the cheesecake mixture to a large piping bag fitted with a large round tip or a star tip. This makes it easier to fill the cups evenly and neatly. If you don’t have a piping bag, you can use a zip-top bag with a corner snipped off.
-
- Pipe into Cups (The Piping Process): Pipe the cheesecake mixture into each dessert cup, filling them to the top. Ensure the filling is evenly distributed and reaches the top of each cup.
-
- Melt Biscoff Spread (The Melting Moment): Melt ½ cup of Biscoff spread in the microwave for 20 seconds or until liquidy. Be careful not to overheat it, as it can burn quickly.
-
- Top with Spread (The Topping Touch): Top each cup with a thin, even layer of melted Biscoff spread. Use a spoon or a small spatula to spread the melted spread smoothly.
-
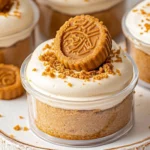
- Add Cookie Halves (The Cookie Completion): Add Biscoff cookie halves to decorate the top of each cup. Arrange them neatly on the surface of the melted Biscoff spread.
-
- Sprinkle Crumbs (The Crumb Climax): Sprinkle with a little reserved Biscoff crumb mixture for added texture and visual appeal. This enhances the Biscoff flavor and adds a decorative touch.
-
- Refrigerate (The Chilling Charm): Refrigerate the cups for at least 4 hours, or preferably overnight, until the cheesecake filling firms up and sets completely. This ensures the cups are firm and easy to serve.
Serve (The Serving Spectacle):
-
- Serve Chilled (The Chilling Choice): Serve the No-Bake Biscoff Cheesecake Cups chilled for the best taste and texture. The cold temperature enhances the creaminess of the filling and the crunchiness of the base.
Notes
- Use room temperature cream cheese.
- Whip cream to stiff peaks.
- Chill for 4 hours.