Remember those childhood days when pizza was synonymous with fun? Birthday parties, sleepovers, even just a simple weeknight dinner felt special with a slice (or three!) of cheesy goodness. These Heart-Shaped Mini Pizzas capture that same joy, but in a perfectly portioned, customizable, and utterly adorable way. They’re not just food; they’re an experience! Whether you’re celebrating Valentine’s Day, hosting a kids’ party, or simply want to add a touch of whimsy to your meal, these mini pizzas are a winner. And the best part? This recipe is so easy, even the most novice cook can whip up a batch in no time. If you’re looking for a quick, healthy-ish, and incredibly fun meal, these Heart-Shaped Mini Pizzas are your perfect match. This isn’t just a recipe; it’s an invitation to create, to share, and to savor the simple pleasures of delicious, homemade food.
Heart-Shaped Mini Pizzas: A Fun and Delicious Treat for All Ages – The Ultimate Guide to Pizza Perfection

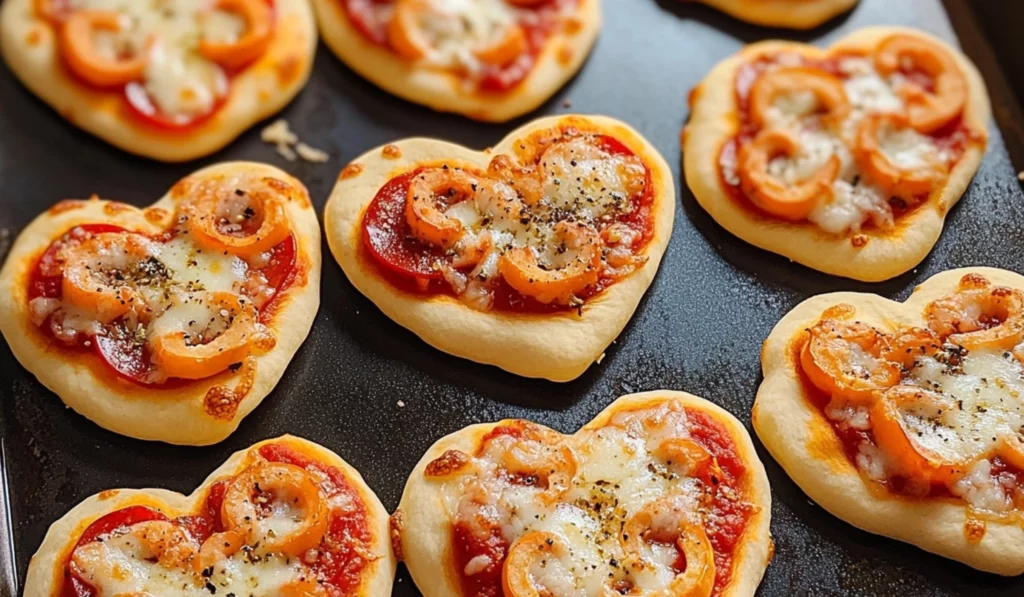
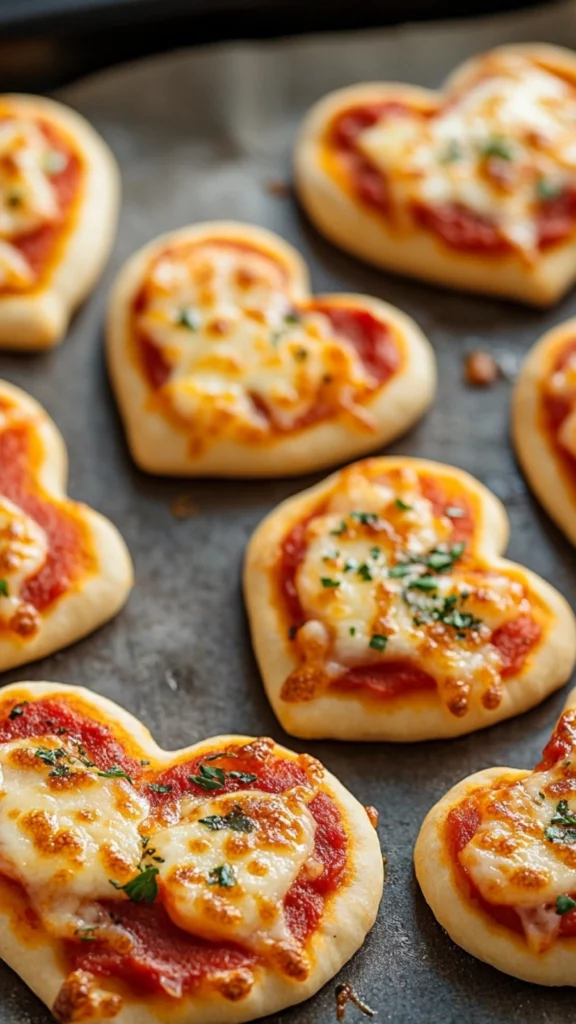
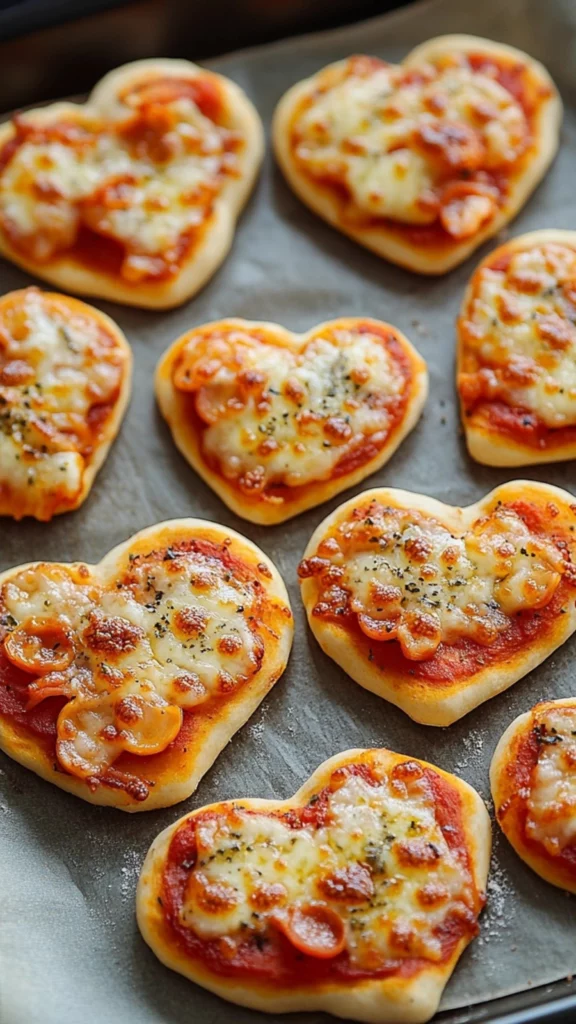
Looking for a fun and festive meal that’s easy to make? These Heart-Shaped Mini Pizzas are perfect for Valentine’s Day, kids’ parties, or any occasion that calls for a touch of whimsy. Imagine a plate full of adorable heart-shaped pizzas, customized with your favorite toppings and bursting with cheesy goodness. It’s a delightful and interactive meal that’s sure to be a hit with everyone. This easy recipe is ideal for beginner cooks, requiring minimal ingredients and delivering maximum flavor and fun!
- Prep Time: 20 minutes
- Cook Time: 10-12 minutes
- Total Time: 30-32 minutes
- Yield: 6–8 mini pizzas (depending on size) 1x
- Category: Appetizer
- Method: Baking
- Cuisine: Italian-American
Ingredients
- 1 pre-made pizza dough (about 1 pound)
- 1 cup pizza sauce
- 1 ½ cups shredded mozzarella cheese
- Toppings of choice (pepperoni, bell peppers, olives, mushrooms, onions, sausage, ham, pineapple, spinach, etc.)
- Olive oil for brushing
Instructions
-
Preheat and Prep: The First Step to Pizza Perfection: Preheat your oven to 450°F (230°C). This high temperature is key for getting a crispy crust, similar to a pizzeria-style pizza. Line a baking sheet with parchment paper for easy cleanup. Trust me, this step is a lifesaver and will prevent your pizzas from sticking to the pan.
-
Roll and Cut: Shaping Your Masterpieces: Roll out the pizza dough on a lightly floured surface to about ¼-inch thickness. Use a heart-shaped cookie cutter (or any shape you like – circles, squares, stars – the choice is yours!) to cut out the mini pizza bases. Pro Tip for Dough Handling: If your pre-made pizza dough is cold and stiff, let it sit at room temperature for about 30 minutes before rolling it out. This will make it much easier to work with and prevent it from tearing.
-
Assemble the Pizzas: The Art of Layering: Place the heart-shaped dough cutouts on the prepared baking sheet, leaving a little space between each one. Spread a layer of pizza sauce on each heart, leaving a small border for the crust. This border will become the delicious, crispy edge of your mini pizzas. Top with shredded mozzarella cheese, ensuring it’s evenly distributed, and your desired toppings. Pro Tip for Topping Placement: Don’t overload the pizzas with toppings, or they might become soggy. Arrange the toppings strategically to ensure each bite has a balanced flavor.
-
Brush and Bake: The Magic in the Oven: Brush the edges of the dough with olive oil. This will help them turn golden brown and crispy during baking. Bake for 10-12 minutes, or until the cheese is bubbly and golden and the crust is cooked through. Pro Tip for Baking Time: Keep a close eye on the pizzas as they bake, as oven temperatures can vary. The baking time may also depend on the thickness of your dough and the types of toppings you use. Check the pizzas frequently after 10 minutes to ensure they don’t overcook.
-
Cool and Serve: The Final Touch: Remove the baking sheet from the oven and let the mini pizzas cool slightly on the baking sheet before serving. This will prevent the cheese from being too runny and allow the pizzas to set slightly, making them easier to handle.
Notes
- Dough Handling: Mastering the Dough: If your pre-made pizza dough is cold and difficult to roll out, let it sit at room temperature for about 30 minutes before working with it. This will make it more pliable and prevent it from tearing.
- Topping Tips: Topping Techniques: Cut your toppings into small, uniform pieces so they cook evenly. Consider pre-cooking some toppings, like sausage, mushrooms, or onions, to ensure they are fully cooked by the time the pizzas are done. This is especially important for toppings that release a lot of moisture.
- Cheese Distribution: Cheesy Consistency: Distribute the cheese evenly over the sauce, ensuring each pizza has a good amount of cheesy goodness. You can even sprinkle a little extra cheese around the edges of the crust for extra crispiness.
- Baking Time: Oven Observations: Baking times may vary depending on your oven and the thickness of your dough. Check the pizzas frequently after 10 minutes to ensure they don’t overcook. A slightly underbaked pizza is better than an overbaked one!
Ingredients and Preparation: Your Pizza-Making Arsenal – Everything You Need
This recipe is wonderfully simple, requiring minimal ingredients and preparation. The key to successful pizza making, even mini pizzas, is having all your ingredients prepped and ready to go. This is called “mise en place” in the culinary world, and it’s a game-changer, especially for beginner cooks. Here’s what you’ll need:
- 1 pre-made pizza dough (about 1 pound) – Alternatives: You can use homemade pizza dough if you’re feeling ambitious! There are tons of easy homemade pizza dough recipes online. For a healthier option, try whole wheat dough, which adds a nutty flavor and more fiber. Cauliflower crust is another excellent healthy alternative, offering a low-carb and gluten-free option. Pita bread or English muffins can also be used as a quick and easy base for mini pizzas. Even tortillas can work in a pinch!
- 1 cup pizza sauce – Alternatives: Marinara sauce, which is a bit simpler, or pesto, for a more herbaceous flavor, can be used. A creamy white sauce, made with ricotta cheese and herbs, is a delicious and unexpected twist. Get creative with your sauce base! Consider a sun-dried tomato pesto or a roasted red pepper sauce for a unique flavor.
- 1 ½ cups shredded mozzarella cheese – Alternatives: Provolone, which melts beautifully and has a slightly sharper flavor, cheddar, for a classic pizza taste, or a blend of Italian cheeses, like Parmesan and Romano, can be used. For a dairy-free option, try using vegan mozzarella. Many vegan mozzarella options melt and stretch just like traditional mozzarella.
- Toppings of your choice (pepperoni, bell peppers, onions, mushrooms, olives, sausage, ham, pineapple, spinach, artichoke hearts, sun-dried tomatoes, roasted garlic, fresh basil, etc.) – Alternatives: The possibilities are endless! Let your imagination run wild and choose your favorite pizza toppings. Consider using fresh herbs like basil, oregano, rosemary, or thyme for added flavor and aroma. Don’t be afraid to experiment with different combinations – sweet and savory, spicy and mild – the choice is yours!
- Olive oil for brushing – Alternatives: Melted butter, for a richer flavor, or even a light spray of cooking oil can be used. Olive oil not only adds flavor but also helps the crust brown beautifully and become crispy.
Step-by-Step Instructions: Your Pizza-Making Adventure – A Beginner-Friendly Guide
- Preheat and Prep: The First Step to Pizza Perfection: Preheat your oven to 450°F (230°C). This high temperature is key for getting a crispy crust, similar to a pizzeria-style pizza. Line a baking sheet with parchment paper for easy cleanup. Trust me, this step is a lifesaver and will prevent your pizzas from sticking to the pan.
- Roll and Cut: Shaping Your Masterpieces: Roll out the pizza dough on a lightly floured surface to about ¼-inch thickness. Use a heart-shaped cookie cutter (or any shape you like – circles, squares, stars – the choice is yours!) to cut out the mini pizza bases. Pro Tip for Dough Handling: If your pre-made pizza dough is cold and stiff, let it sit at room temperature for about 30 minutes before rolling it out. This will make it much easier to work with and prevent it from tearing.
- Assemble the Pizzas: The Art of Layering: Place the heart-shaped dough cutouts on the prepared baking sheet, leaving a little space between each one. Spread a layer of pizza sauce on each heart, leaving a small border for the crust. This border will become the delicious, crispy edge of your mini pizzas. Top with shredded mozzarella cheese, ensuring it’s evenly distributed, and your desired toppings. Pro Tip for Topping Placement: Don’t overload the pizzas with toppings, or they might become soggy. Arrange the toppings strategically to ensure each bite has a balanced flavor.
- Brush and Bake: The Magic in the Oven: Brush the edges of the dough with olive oil. This will help them turn golden brown and crispy during baking. Bake for 10-12 minutes, or until the cheese is bubbly and golden and the crust is cooked through. Pro Tip for Baking Time: Keep a close eye on the pizzas as they bake, as oven temperatures can vary. The baking time may also depend on the thickness of your dough and the types of toppings you use. Check the pizzas frequently after 10 minutes to ensure they don’t overcook.
- Cool and Serve: The Final Touch: Remove the baking sheet from the oven and let the mini pizzas cool slightly on the baking sheet before serving. This will prevent the cheese from being too runny and allow the pizzas to set slightly, making them easier to handle.
Beginner Tips and Notes: Your Pizza-Making Companion – Advice from a Fellow Pizza Lover
- Dough Handling: Mastering the Dough: If your pre-made pizza dough is cold and difficult to roll out, let it sit at room temperature for about 30 minutes before working with it. This will make it more pliable and prevent it from tearing.
- Topping Tips: Topping Techniques: Cut your toppings into small, uniform pieces so they cook evenly. Consider pre-cooking some toppings, like sausage, mushrooms, or onions, to ensure they are fully cooked by the time the pizzas are done. This is especially important for toppings that release a lot of moisture.
- Cheese Distribution: Cheesy Consistency: Distribute the cheese evenly over the sauce, ensuring each pizza has a good amount of cheesy goodness. You can even sprinkle a little extra cheese around the edges of the crust for extra crispiness.
- Baking Time: Oven Observations: Baking times may vary depending on your oven and the thickness of your dough. Check the pizzas frequently after 10 minutes to ensure they don’t overcook. A slightly underbaked pizza is better than an overbaked one!
Serving Suggestions: Elevating Your Mini Pizza Experience – From Simple to Spectacular
These Heart-Shaped Mini Pizzas are delicious on their own, but you can also pair them with some complementary sides to create a complete and satisfying meal.
- Salad: A Refreshing Counterpoint: A simple green salad with a light vinaigrette dressing would be a refreshing and healthy addition to your mini pizzas. The crispness of the salad and the acidity of the dressing will balance the richness of the pizza.
- Vegetables: A Healthy Boost: Serve the pizzas with a side of roasted vegetables, such as broccoli, carrots, bell peppers, or zucchini. Roasting vegetables brings out their natural sweetness and adds a touch of elegance to the meal.
- Dipping Sauces: A Flavorful Dip: Offer a variety of dipping sauces, such as ranch dressing, marinara sauce, garlic sauce, pesto, or even a spicy aioli. Dipping sauces add extra flavor and make the mini pizzas even more fun to eat.
- Drinks: The Perfect Beverage: Pair the pizzas with a glass of milk, juice, soda, or even a light and refreshing white wine like Pinot Grigio. The beverage you choose will depend on the occasion and your personal preference.
Beyond the Mini Pizzas: Exploring the World of Pizza
These Heart-Shaped Mini Pizzas are a great starting point for exploring the world of pizza making. Once you’ve mastered this recipe, you can experiment with different crusts, sauces, toppings, and baking techniques.
Pizza Oven: If you’re serious about pizza making, consider investing in a pizza oven. Pizza ovens can reach incredibly high temperatures, which results in a perfectly crispy crust and a quickly cooked pizza.
Homemade Dough: Try making your own pizza dough from scratch. It’s easier than you think, and the results are incredibly rewarding.
Different Crusts: Explore different types of pizza crusts, such as thin crust, thick crust, stuffed crust, or even gluten-free crust.
Gourmet Toppings: Experiment with gourmet toppings, such as prosciutto, artichoke hearts, roasted red peppers, goat cheese, or fig jam.
Conclusion: Your Pizza-Making Triumph – A Culinary Milestone
These Heart-Shaped Mini Pizzas are a testament to the fact that cooking can be both fun and delicious. They’re a perfect project for beginner cooks, a delightful meal for families, and a guaranteed crowd-pleaser for parties. With just a few simple ingredients and a little creativity, you can transform ordinary pizza dough into adorable, personalized treats. So, gather your ingredients, preheat your oven, and get ready to embark on a pizza-making adventure! Don’t be afraid to experiment with different toppings and flavor combinations to create your own signature mini pizzas. The possibilities are endless! And most importantly, have fun!
Cooking should be an enjoyable experience, a chance to express your creativity and share delicious food with the people you love. We’d love to see your mini pizza masterpieces! Share your photos and any variations you try in the comments below. Happy pizza making! What other fun and easy recipes would you like to see us explore? Are you interested in learning more about different pizza-making techniques, perhaps mastering the art of homemade dough? Let us know in the comments! We’re here to support you on your culinary journey, one delicious bite at a time.


