
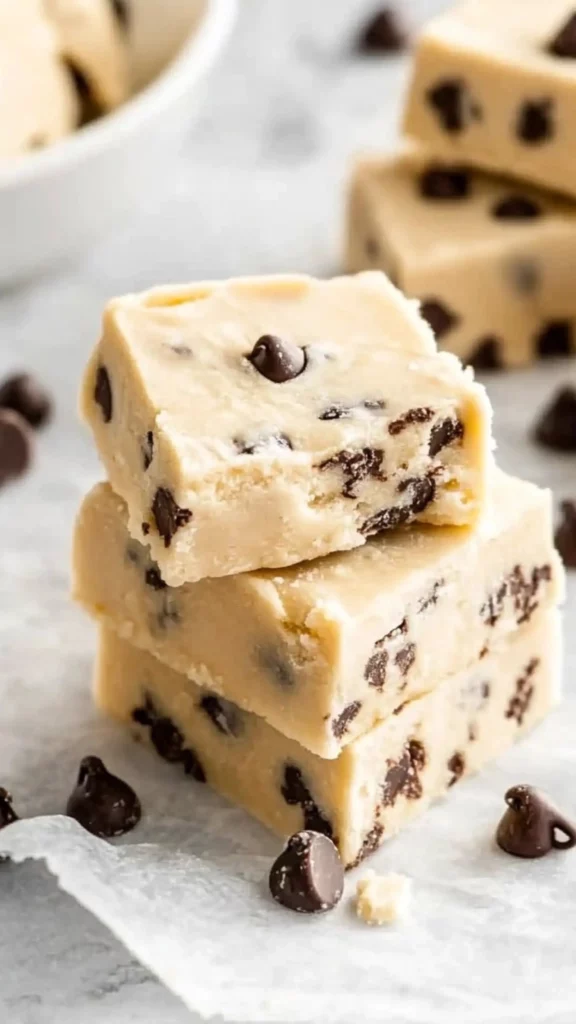
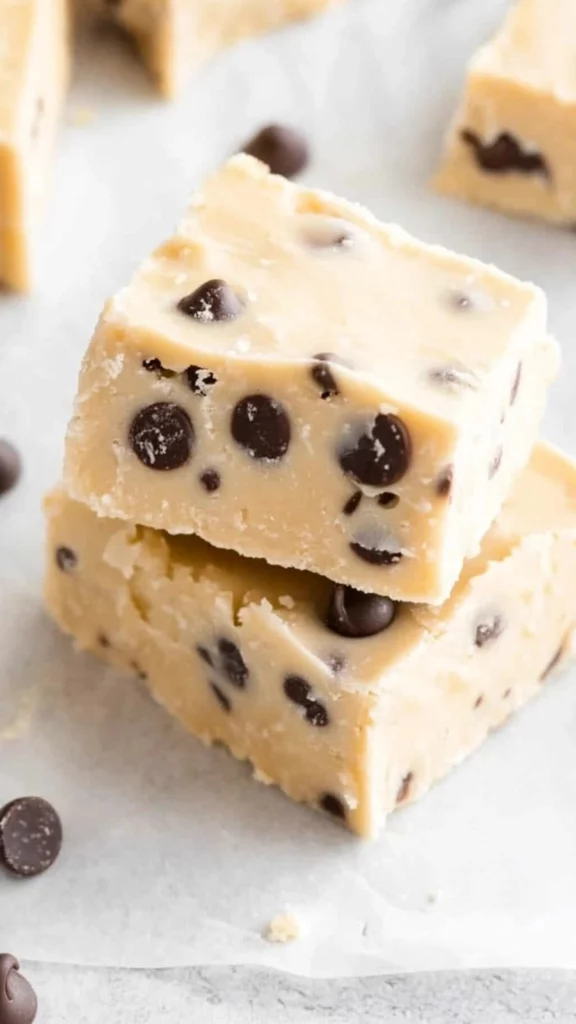
If you’re looking for a no-bake dessert that brings together the best of both worlds—cookie dough and fudge—then look no further than this indulgent Cookie Dough Fudge. Combining the rich, creamy texture of fudge with the nostalgic flavor of chocolate chip cookie dough, this treat is sure to be a hit with anyone who loves sweet and decadent desserts. Whether you’re craving something sweet for a special occasion or simply need a quick fix for your sweet tooth, this Cookie Dough Fudge delivers everything you could want: it’s easy to make, requires no baking, and is packed with all the flavors you love in cookie dough. Plus, it’s a perfect recipe for beginners!
Cookie Dough Fudge: A Delicious No-Bake Treat

Cookie Dough Fudge combines the best of both worlds: creamy fudge and cookie dough. This no-bake, beginner-friendly dessert is quick to make and packs a sweet punch, making it the perfect treat for any occasion. With minimal effort and a few simple ingredients, you’ll have a delicious, indulgent dessert everyone will love.
- Prep Time: 15 minutes
- Cook Time: 0 minutes
- Total Time: 2 hours 15 minutes
- Yield: 25 squares 1x
- Category: Dessert
- Method: No-bake
- Cuisine: American
- Diet: Vegetarian
Ingredients
- 1 cup (200g) mini chocolate chips
- 1/2 cup (111g) salted butter, softened
- 1/4 cup (58g) granulated sugar
- 1/2 cup (123g) brown sugar
- 2 tbsp milk
- 1 tsp vanilla extract
- 1 1/2 cup (228g) all-purpose flour, heat-treated
- 1/2 tsp salt
- 1 cup (200g) Ghirardelli white chocolate chips
- 1 14 oz can (193ml) sweetened condensed milk
Instructions
1. Prepare the Pan and Chocolate Chips:
Start by lining an 8×8-inch square pan with parchment paper. This will make it easier to remove the fudge once it’s set. Make sure the paper is large enough to cover the sides of the pan, so you can easily lift the fudge out later.
Place the mini chocolate chips in the freezer so they can firm up for later use. Freezing them helps them hold their shape better when mixed into the fudge, ensuring that each bite has a delightful burst of chocolate.
2. Heat the Flour:
Next, take the all-purpose flour and microwave it for 30 seconds to 1 minute, or until it reaches 165°F (74°C). Stir the flour, and set it aside to cool. This step is crucial for safety, as mentioned earlier. If you don’t have a thermometer, a general rule is that the flour should feel hot to the touch but not burning.
3. Cream the Butter and Sugars:
In a stand mixer or using an electric hand mixer, cream together the softened butter, granulated sugar, and brown sugar on medium speed until they are light and fluffy. Add the milk and vanilla extract, and continue mixing until everything is well combined. This step creates the base of your cookie dough fudge mixture.
If you find that the butter is too hard to cream, let it sit at room temperature for a few minutes before starting. Cold butter won’t blend as well and may result in a lumpy texture.
4. Mix in the Flour and Salt:
Once the butter and sugar mixture is creamy, add the heat-treated flour and salt to the bowl. Mix on low speed until everything is incorporated. The dough should be thick and resemble cookie dough. Set the mixture aside. At this point, the dough will start to look just like the cookie dough you would use for cookies, except we’re not baking it!
5. Prepare the White Chocolate Mixture:
In a separate glass bowl, microwave the white chocolate chips and sweetened condensed milk together for 2 minutes, stirring every 30 seconds. Once smooth, pour the white chocolate mixture into the cookie dough mixture. Mix until completely smooth and well combined. This white chocolate mixture adds the creamy fudge texture and helps bind everything together. Stir quickly to avoid any lumps or clumps in the fudge.
6. Fold in the Mini Chocolate Chips:
Quickly fold in the frozen mini chocolate chips using a spatula. The cold chocolate chips will keep their shape better when mixed in, giving your fudge a delightful texture with every bite. Be gentle when folding in the chocolate chips so you don’t lose any of their shape.
7. Spread the Fudge in the Pan:
Pour the fudge mixture into the prepared pan and spread it evenly using a spatula. Tap the pan gently on the counter to level out the fudge. This will help eliminate any air bubbles and ensure that your fudge sets evenly.
8. Refrigerate and Set:
Refrigerate the fudge for 2 hours, or until it has firmed up. Once it’s set, remove it from the refrigerator and cut it into squares. Be patient during this step; the fudge needs time to fully cool and solidify.
9. Serve and Enjoy:
Your Cookie Dough Fudge is now ready to be served! Store it in the refrigerator until you’re ready to enjoy, and keep leftovers chilled for the best texture. You can also serve it with a glass of milk or a warm cup of coffee for a comforting treat. This fudge is rich and decadent, so a little goes a long way.
Notes
- If the fudge doesn’t firm up: Make sure that the fudge has had enough time in the refrigerator. If it’s still too soft after 2 hours, give it some extra time to set. You could also pop it into the freezer for about 20-30 minutes to help it firm up more quickly.
- If the fudge is too sticky to cut: Let the fudge sit at room temperature for a few minutes before slicing. You can also use a sharp knife dipped in warm water to make cutting easier.
- Adjusting sweetness: If you find the fudge too sweet, try reducing the amount of sugar in the cookie dough mixture or using dark chocolate chips for a balance of sweetness.
I still remember the first time I made this fudge for a family gathering. I was looking for something that combined the comfort of cookie dough with the creamy richness of fudge. I’d seen many similar recipes online, but none of them seemed as simple and straightforward as this one. The fact that it requires no baking and can be prepared in just under three hours meant I could make it on a whim, even with a busy schedule. Everyone who tasted it immediately fell in love with the texture and flavors, and since then, this Cookie Dough Fudge has become a staple in my kitchen for everything from casual desserts to holiday parties.
The beauty of this recipe lies in its simplicity. You don’t need any fancy equipment or hours of prep work, making it ideal for beginner bakers. All you need is a few basic ingredients and a little patience while it firms up in the fridge. In under three hours, you’ll have a batch of chewy, sweet, and creamy fudge that everyone will love. Plus, this treat is a crowd-pleaser, whether you serve it at a family gathering, a party, or just enjoy it on a quiet evening with a cup of tea.
In this article, we’ll walk you through the entire process, offering step-by-step instructions, helpful tips for success, and some variations to make this fudge your own. Get ready to whip up one of the most delicious, melt-in-your-mouth treats you’ve ever made.
Ingredients and Preparation
Before diving into the instructions, let’s take a closer look at the ingredients that make this Cookie Dough Fudge so delicious. These ingredients combine perfectly to give the fudge its rich, creamy texture, and the subtle sweetness of cookie dough. You’ll notice that we’re using a combination of white chocolate chips and mini chocolate chips, which not only provide the perfect balance of sweetness but also give the fudge its signature chocolatey finish.
Ingredients:
- 1 cup (200g) mini chocolate chips
- 1/2 cup (111g) salted butter, softened
- 1/4 cup (58g) granulated sugar
- 1/2 cup (123g) brown sugar
- 2 tbsp milk
- 1 tsp vanilla extract
- 1 1/2 cup (228g) all-purpose flour, heat-treated
- 1/2 tsp salt
- 1 cup (200g) Ghirardelli white chocolate chips
- 1 14 oz can (193ml) sweetened condensed milk
Heat-Treating Flour:
One unique aspect of this recipe is the use of heat-treated flour. Raw flour can sometimes carry the risk of containing harmful bacteria, so it’s important to heat it before using it in no-bake desserts. To heat-treat the flour, simply microwave it for about 30 seconds to 1 minute until it reaches a temperature of 165°F (74°C). This step ensures that your fudge is safe to eat and will give it that authentic cookie dough flavor without any worries.
You might be wondering why this step is necessary, especially when many other recipes skip it. Well, heating the flour is a safety precaution. Raw flour has been linked to instances of foodborne illnesses caused by E. coli bacteria. It may not always be a concern, but it’s a good practice to heat-treat it, especially in recipes where the flour isn’t being cooked. Fortunately, this step is incredibly easy and adds just a few minutes to the overall preparation time, and it’s worth the peace of mind.
Substitutions and Flexibility:
While this recipe calls for specific ingredients like Ghirardelli white chocolate chips and mini chocolate chips, feel free to get creative and make substitutions based on what you have at home or your flavor preferences. For example:
- Chocolate chips: You can swap out mini chocolate chips for regular-sized chips if that’s what you have on hand. You could also use semisweet or dark chocolate chips for a richer, more intense chocolate flavor. Alternatively, add in some crushed chocolate bars or even peanut butter chips for a fun twist.
- Flour alternatives: If you’re looking for a gluten-free option, you can try using a gluten-free all-purpose flour blend. Just be sure the blend includes xanthan gum for the best texture. Or if you prefer to make a raw dough fudge without the flour altogether, you can try substituting with powdered oats or almond flour.
- Butter substitutes: You can substitute salted butter with unsalted butter and add a pinch of salt to taste if needed. For a dairy-free option, you could use vegan butter or coconut oil in place of the butter, though this will slightly alter the flavor.
Step-by-Step Instructions
Now, let’s walk through the process of making this no-bake Cookie Dough Fudge. The steps are simple, and we’ve broken them down so even beginner cooks can follow along easily. You don’t need to worry about overcomplicated techniques or special tools; just a few bowls, a microwave, and your trusty mixer will do the job.
1. Prepare the Pan and Chocolate Chips:
Start by lining an 8×8-inch square pan with parchment paper. This will make it easier to remove the fudge once it’s set. Make sure the paper is large enough to cover the sides of the pan, so you can easily lift the fudge out later.
Place the mini chocolate chips in the freezer so they can firm up for later use. Freezing them helps them hold their shape better when mixed into the fudge, ensuring that each bite has a delightful burst of chocolate.
2. Heat the Flour:
Next, take the all-purpose flour and microwave it for 30 seconds to 1 minute, or until it reaches 165°F (74°C). Stir the flour, and set it aside to cool. This step is crucial for safety, as mentioned earlier. If you don’t have a thermometer, a general rule is that the flour should feel hot to the touch but not burning.
3. Cream the Butter and Sugars:
In a stand mixer or using an electric hand mixer, cream together the softened butter, granulated sugar, and brown sugar on medium speed until they are light and fluffy. Add the milk and vanilla extract, and continue mixing until everything is well combined. This step creates the base of your cookie dough fudge mixture.
If you find that the butter is too hard to cream, let it sit at room temperature for a few minutes before starting. Cold butter won’t blend as well and may result in a lumpy texture.
4. Mix in the Flour and Salt:
Once the butter and sugar mixture is creamy, add the heat-treated flour and salt to the bowl. Mix on low speed until everything is incorporated. The dough should be thick and resemble cookie dough. Set the mixture aside. At this point, the dough will start to look just like the cookie dough you would use for cookies, except we’re not baking it!
5. Prepare the White Chocolate Mixture:
In a separate glass bowl, microwave the white chocolate chips and sweetened condensed milk together for 2 minutes, stirring every 30 seconds. Once smooth, pour the white chocolate mixture into the cookie dough mixture. Mix until completely smooth and well combined. This white chocolate mixture adds the creamy fudge texture and helps bind everything together. Stir quickly to avoid any lumps or clumps in the fudge.
6. Fold in the Mini Chocolate Chips:
Quickly fold in the frozen mini chocolate chips using a spatula. The cold chocolate chips will keep their shape better when mixed in, giving your fudge a delightful texture with every bite. Be gentle when folding in the chocolate chips so you don’t lose any of their shape.
7. Spread the Fudge in the Pan:
Pour the fudge mixture into the prepared pan and spread it evenly using a spatula. Tap the pan gently on the counter to level out the fudge. This will help eliminate any air bubbles and ensure that your fudge sets evenly.
8. Refrigerate and Set:
Refrigerate the fudge for 2 hours, or until it has firmed up. Once it’s set, remove it from the refrigerator and cut it into squares. Be patient during this step; the fudge needs time to fully cool and solidify.
9. Serve and Enjoy:
Your Cookie Dough Fudge is now ready to be served! Store it in the refrigerator until you’re ready to enjoy, and keep leftovers chilled for the best texture. You can also serve it with a glass of milk or a warm cup of coffee for a comforting treat. This fudge is rich and decadent, so a little goes a long way.
Beginner Tips and Notes
While this recipe is simple, there are a few things to keep in mind to ensure it turns out perfectly every time.
Troubleshooting Tips:
- If the fudge doesn’t firm up: Make sure that the fudge has had enough time in the refrigerator. If it’s still too soft after 2 hours, give it some extra time to set. You could also pop it into the freezer for about 20-30 minutes to help it firm up more quickly.
- If the fudge is too sticky to cut: Let the fudge sit at room temperature for a few minutes before slicing. You can also use a sharp knife dipped in warm water to make cutting easier.
- Adjusting sweetness: If you find the fudge too sweet, try reducing the amount of sugar in the cookie dough mixture or using dark chocolate chips for a balance of sweetness.
Kitchen Tips:
- Efficient prep: To save time, you can microwave the white chocolate and sweetened condensed milk while you’re mixing the dough. This will keep everything moving along smoothly and save you time.
- Perfect portioning: If you prefer smaller portions, you can cut the fudge into 1-inch squares for bite-sized treats. You can also use a larger pan if you want thinner fudge squares.
Serving Suggestions
Cookie Dough Fudge is rich and indulgent, so it’s perfect for serving at parties, potlucks, or family gatherings. Pair it with a cold glass of milk or a hot cup of coffee for the ultimate treat. You can also serve it alongside other desserts like brownies or cookies for a decadent dessert platter. Try pairing it with fresh berries or a scoop of vanilla ice cream for an extra indulgent treat.
Storage Tips:
Store your fudge in an airtight container in the refrigerator. It will stay fresh for up to one week. If you want to store it for a longer period, you can freeze the fudge in an airtight container for up to 3 months. Just be sure to let it thaw in the refrigerator before serving.
Conclusion
This Cookie Dough Fudge recipe is the perfect combination of creamy fudge and classic cookie dough flavors. It’s simple to make, requires no baking, and is sure to satisfy your sweet tooth with every bite. Whether you’re making it for a special occasion or just because, this treat will quickly become a favorite in your dessert repertoire. So, gather your ingredients, follow the steps, and enjoy the deliciousness that awaits. And don’t forget to share your experience in the comments—let me know how your fudge turned out and if you added any fun twists of your own!


