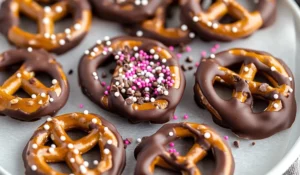
Remember those childhood days when a simple chocolate-covered pretzel felt like the ultimate indulgence? I do! My grandma used to make them for every holiday, and they were always the first treat to disappear. There’s something so inherently satisfying about the interplay of a salty pretzel and sweet, rich chocolate – a classic combination that just works. These Chocolate-Dipped Pretzels are a nostalgic treat that’s perfect for any occasion, especially Valentine’s Day. They’re incredibly easy to make, even for the most novice cook, and they’re a fun activity to do with kids, friends, or even as a relaxing solo project. Plus, they offer that delightful balance of sweet and salty, making them a crowd-pleasing snack or dessert. This recipe is a fantastic starting point for anyone new to working with chocolate. It’s simple, quick, and the results are both delicious and visually appealing, making them a perfect treat for sharing, gifting, or simply enjoying yourself.
Chocolate-Dipped Pretzels: A Sweet and Salty Symphony for Any Occasion

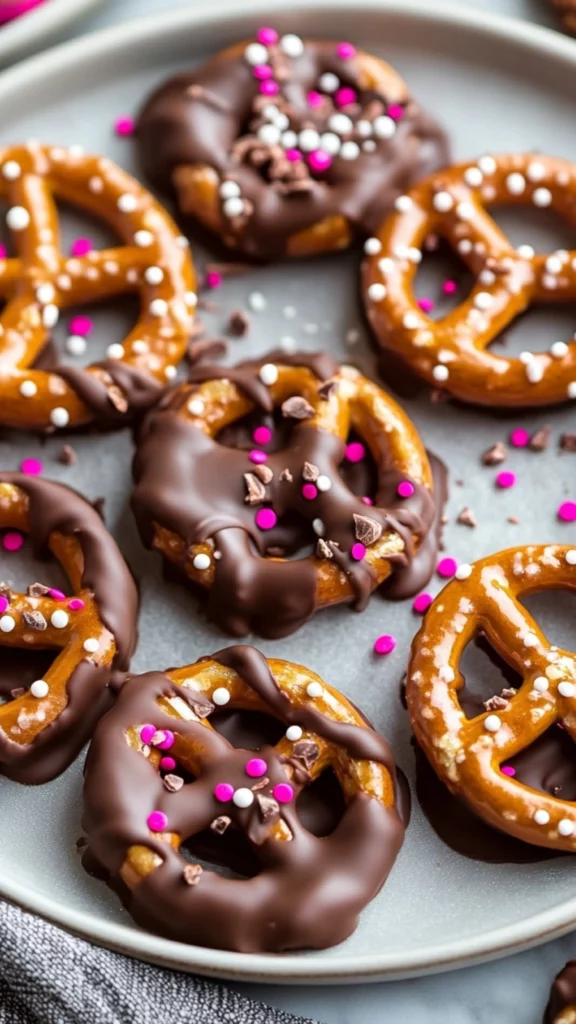
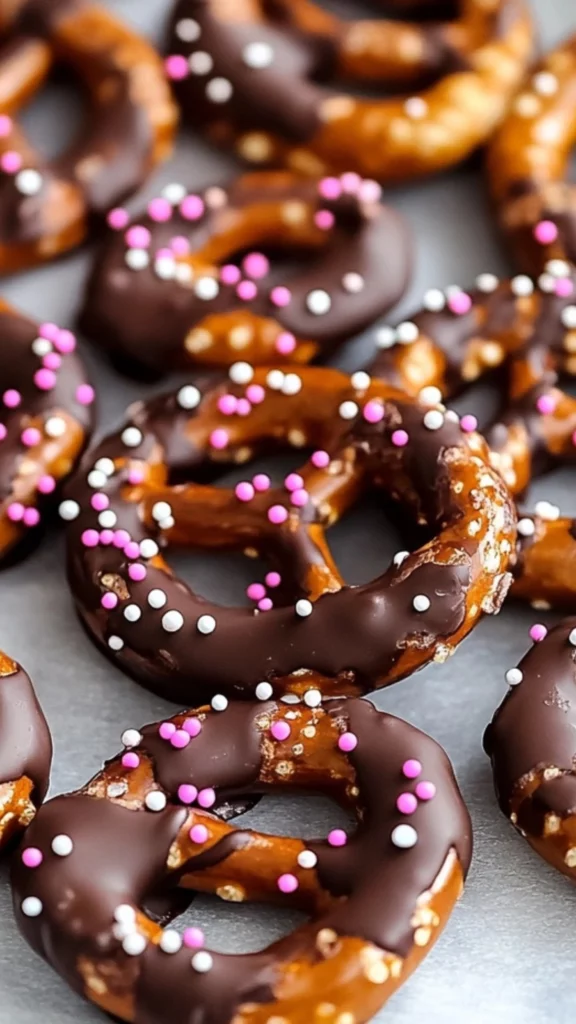
Valentine’s Day (or any day!) calls for a sweet and salty treat, and these Chocolate-Dipped Pretzels are the perfect way to satisfy that craving. Crunchy pretzels dipped in rich chocolate and sprinkled with festive toppings, they’re a simple yet impressive dessert that requires minimal effort. Imagine a plate of these beautifully decorated pretzels, ready to be shared with loved ones. It’s a treat for the eyes and the taste buds, perfect for any celebration or casual snack. This easy recipe is ideal for beginner cooks, requiring only a few readily available ingredients and delivering maximum flavor.
- Prep Time: 15 minutes
- Cook Time: 5 minutes (melting chocolate)
- Total Time: 50 minutes (includes chilling time)
- Yield: 12 pretzels 1x
- Category: Dessert
- Method: Dipping, No-Bake
- Cuisine: American
Ingredients
- 12 pretzel rods or twists
- 8 oz chocolate (dark or milk), chopped
- Sprinkles or crushed nuts for garnish
Instructions
- Melt the Chocolate: In a microwave-safe bowl, melt the chocolate in 30-second intervals, stirring after each interval until smooth. Important Note: Be careful not to overheat the chocolate, as it can burn and become unusable. Stirring after each interval helps to distribute the heat evenly and prevent burning. If the chocolate is still a little lumpy after a few intervals, you can add a teaspoon of vegetable oil or shortening to help smooth it out. Be patient and don’t rush the melting process.
- Dip the Pretzels: Dip each pretzel rod or twist into the melted chocolate, allowing any excess to drip off. Tip: Hold the pretzel by one end and gently twirl it in the chocolate to ensure it’s fully coated. You can also use a fork or dipping tools (available at most craft stores) to help coat the pretzels. For a more even coating, you can also use a double boiler to melt the chocolate and dip the pretzels in the melted chocolate. This will help the chocolate stay at a consistent temperature. If you want to create a marbled effect, you can drizzle melted white chocolate over the dark chocolate or vice versa before the chocolate sets.
- Add the Toppings: Place the chocolate-dipped pretzels on a parchment-lined baking sheet and immediately sprinkle them with your chosen toppings (sprinkles, crushed nuts, etc.). Pro Tip: Work quickly, as the chocolate will start to set. If the chocolate hardens too quickly, you can reheat it slightly in the microwave in 10-second intervals. You can also use a small spoon to drizzle melted white chocolate or another color of chocolate over the dipped pretzels for a beautiful decorative touch. Consider using a piping bag or a squeeze bottle for more precise drizzling.
- Chill and Set: Refrigerate the pretzels for about 30 minutes, or until the chocolate is completely set. Note: Chilling the pretzels helps the chocolate to harden and prevents it from melting when you handle them. If you’re in a hurry, you can place them in the freezer for about 15 minutes. Just be careful not to freeze them solid.
Notes
- Melting Chocolate Mastery: Melting chocolate in the microwave is quick, but it’s important to do it carefully. Use short intervals and stir frequently to prevent burning. You can also melt chocolate over a double boiler for more control. If you’re using a double boiler, make sure the water in the bottom pot is simmering, not boiling. The steam from the simmering water will gently melt the chocolate in the top bowl. Make sure the top bowl is completely dry before adding the chocolate.
- Preventing Chocolate Seizing: If your chocolate starts to seize up (become thick and grainy), it’s usually because it came into contact with even a tiny bit of moisture. Make sure your bowl and utensils are completely dry. If your chocolate does seize, you can try adding a tablespoon of vegetable oil or shortening and stirring vigorously. This sometimes helps to bring the chocolate back together. You can also try adding a tablespoon of warm milk or cream.
- Dipping Techniques: For a clean and even coating, dip the pretzels slowly and allow any excess chocolate to drip back into the bowl. You can also use a toothpick to smooth out any drips or uneven spots. If you want to create a thicker coating, you can dip the pretzels twice, allowing the first layer of chocolate to set before dipping them again. You can also try using a chocolate tempering machine to keep the chocolate at the perfect temperature for dipping.
- Topping Timing: Add your toppings immediately after dipping the pretzels in chocolate, while the chocolate is still wet. This will ensure the toppings adhere properly. If you’re using larger toppings, like nuts or candy pieces, you may need to gently press them into the chocolate to make sure they stick.
- Storage: Store leftover chocolate-dipped pretzels in an airtight container at room temperature. They will keep for several days, but they are best enjoyed fresh. If you live in a warm climate, you may want to store them in the refrigerator to prevent the chocolate from melting. Just be aware that storing them in the refrigerator can sometimes cause the chocolate to “bloom,” which means it develops a white or grayish coating. This is just cosmetic and doesn’t affect the flavor.
Ingredients and Preparation: The Foundation of Flavor
This recipe is wonderfully simple, requiring only a few readily available ingredients:
- The Pretzel Base:
- 12 pretzel rods or twists – You can use either rods or twists, depending on your preference. Rods are classic and provide a good canvas for decorating, while twists offer a fun and whimsical shape. Consider different sizes too – mini pretzels can be dipped for bite-sized treats, perfect for parties or snacking. You could even explore different flavored pretzels, like honey wheat, sourdough, or even rye, for an added layer of flavor complexity. Think about the texture as well. Some pretzels are more crunchy than others.
- The Chocolate Coating:
- 8 oz chocolate (dark or milk), chopped – Use high-quality chocolate for the best flavor and melting consistency. Chocolate chips can be used, but chopped chocolate melts more smoothly and evenly. Semi-sweet, milk chocolate, or dark chocolate all work well. You can even use white chocolate or flavored melting chocolate (like vanilla, strawberry, or even caramel) for a fun and colorful twist. Consider using couverture chocolate for a professional-looking shine and a satisfying “snap” when you bite into the pretzel.
- The Festive Finish:
- Sprinkles or crushed nuts for garnish – This is where you can truly let your creativity shine! Choose sprinkles that match the occasion (Valentine’s Day colors, holiday themes, birthday celebrations, etc.). Crushed nuts (almonds, pecans, walnuts, peanuts, pistachios) add a delightful crunch and nutty flavor. You can also use sea salt flakes for a more sophisticated sweet and salty combination, mini M&Ms for a pop of color, coconut flakes for a tropical vibe, dried fruit (like cranberries, cherries, or raisins) for a touch of elegance, or even edible glitter for a touch of sparkle.
Step-by-Step Instructions: From Pretzel to Perfection
These chocolate-dipped pretzels are so easy to make, you’ll be enjoying them in no time!
- Melt the Chocolate: In a microwave-safe bowl, melt the chocolate in 30-second intervals, stirring after each interval until smooth. Important Note: Be careful not to overheat the chocolate, as it can burn and become unusable. Stirring after each interval helps to distribute the heat evenly and prevent burning. If the chocolate is still a little lumpy after a few intervals, you can add a teaspoon of vegetable oil or shortening to help smooth it out. Be patient and don’t rush the melting process.
- Dip the Pretzels: Dip each pretzel rod or twist into the melted chocolate, allowing any excess to drip off. Tip: Hold the pretzel by one end and gently twirl it in the chocolate to ensure it’s fully coated. You can also use a fork or dipping tools (available at most craft stores) to help coat the pretzels. For a more even coating, you can also use a double boiler to melt the chocolate and dip the pretzels in the melted chocolate. This will help the chocolate stay at a consistent temperature. If you want to create a marbled effect, you can drizzle melted white chocolate over the dark chocolate or vice versa before the chocolate sets.
- Add the Toppings: Place the chocolate-dipped pretzels on a parchment-lined baking sheet and immediately sprinkle them with your chosen toppings (sprinkles, crushed nuts, etc.). Pro Tip: Work quickly, as the chocolate will start to set. If the chocolate hardens too quickly, you can reheat it slightly in the microwave in 10-second intervals. You can also use a small spoon to drizzle melted white chocolate or another color of chocolate over the dipped pretzels for a beautiful decorative touch. Consider using a piping bag or a squeeze bottle for more precise drizzling.
- Chill and Set: Refrigerate the pretzels for about 30 minutes, or until the chocolate is completely set. Note: Chilling the pretzels helps the chocolate to harden and prevents it from melting when you handle them. If you’re in a hurry, you can place them in the freezer for about 15 minutes. Just be careful not to freeze them solid.
Beginner Tips and Notes: Your Culinary Companion
Even the simplest recipes have some tips and tricks that can make the process easier and more successful:
- Melting Chocolate Mastery: Melting chocolate in the microwave is quick, but it’s important to do it carefully. Use short intervals and stir frequently to prevent burning. You can also melt chocolate over a double boiler for more control. If you’re using a double boiler, make sure the water in the bottom pot is simmering, not boiling. The steam from the simmering water will gently melt the chocolate in the top bowl. Make sure the top bowl is completely dry before adding the chocolate.
- Preventing Chocolate Seizing: If your chocolate starts to seize up (become thick and grainy), it’s usually because it came into contact with even a tiny bit of moisture. Make sure your bowl and utensils are completely dry. If your chocolate does seize, you can try adding a tablespoon of vegetable oil or shortening and stirring vigorously. This sometimes helps to bring the chocolate back together. You can also try adding a tablespoon of warm milk or cream.
- Dipping Techniques: For a clean and even coating, dip the pretzels slowly and allow any excess chocolate to drip back into the bowl. You can also use a toothpick to smooth out any drips or uneven spots. If you want to create a thicker coating, you can dip the pretzels twice, allowing the first layer of chocolate to set before dipping them again. You can also try using a chocolate tempering machine to keep the chocolate at the perfect temperature for dipping.
- Topping Timing: Add your toppings immediately after dipping the pretzels in chocolate, while the chocolate is still wet. This will ensure the toppings adhere properly. If you’re using larger toppings, like nuts or candy pieces, you may need to gently press them into the chocolate to make sure they stick.
- Storage: Store leftover chocolate-dipped pretzels in an airtight container at room temperature. They will keep for several days, but they are best enjoyed fresh. If you live in a warm climate, you may want to store them in the refrigerator to prevent the chocolate from melting. Just be aware that storing them in the refrigerator can sometimes cause the chocolate to “bloom,” which means it develops a white or grayish coating. This is just cosmetic and doesn’t affect the flavor.
Serving Suggestions: Elevating the Experience
These Chocolate-Dipped Pretzels are a delightful treat on their own, but here are some ways to make them even more special:
- Gift Giving: Package the pretzels in cellophane bags tied with a ribbon for a lovely homemade gift. You can also add a personalized tag to each bag, or include a small box of other homemade treats.
- Party Platters: Arrange the pretzels on a platter along with other Valentine’s Day treats for a festive dessert display. Consider adding other sweet and salty treats to the platter, like chocolate-covered strawberries, caramel popcorn, or a bowl of mixed nuts.
- Pairings: Serve the pretzels with a glass of milk, hot chocolate, or even a cup of coffee. They also pair well with a glass of wine or champagne for a more sophisticated treat. Consider pairing them with a sweet dessert wine or a sparkling rosé.
Conclusion: A Sweet and Salty Farewell
These Chocolate-Dipped Pretzels are a fun, easy, and delicious treat that’s perfect for any occasion, especially Valentine’s Day. They’re a great way to get kids involved in the kitchen, a delightful way to show your love, and a guaranteed crowd-pleaser. I encourage you to try this recipe and make it your own. Experiment with different types of chocolate, toppings, and even pretzel shapes. Don’t be afraid to get creative and have fun with it! The possibilities are endless.
These pretzels are more than just a snack; they’re a symbol of celebration, a gesture of love, and a reminder that sometimes the simplest treats are the most satisfying. So, gather your ingredients, put on some music, and get ready to create some sweet and salty magic. We can’t wait to see what you come up with! Share your photos and experiences in the comments below – we’d love to hear from you. Happy dipping!