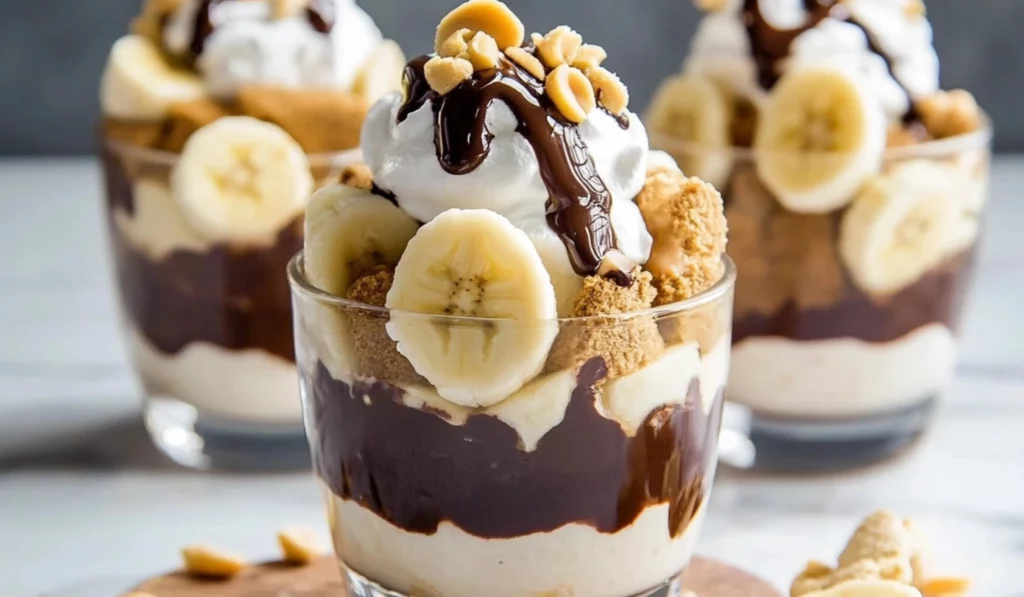
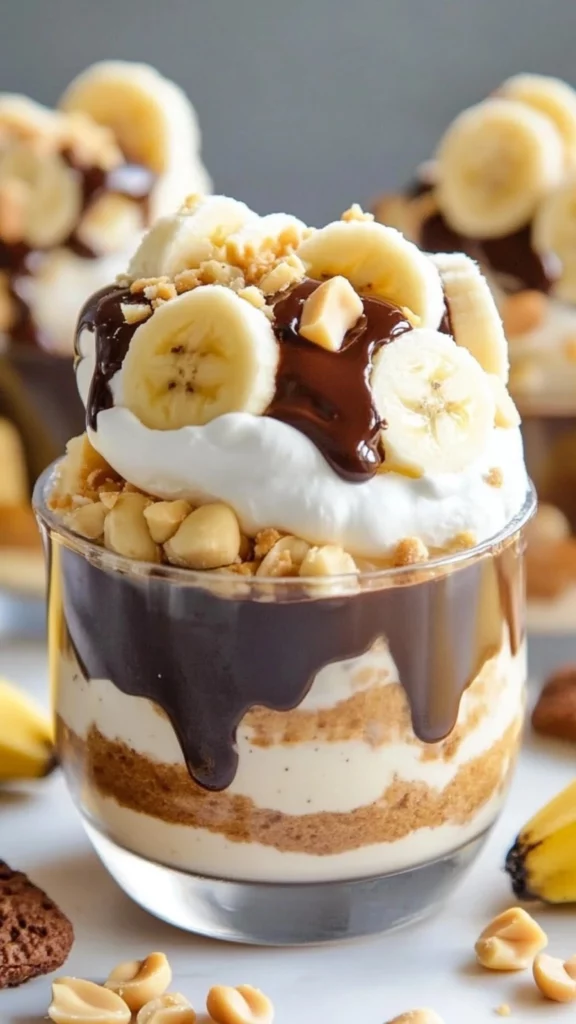
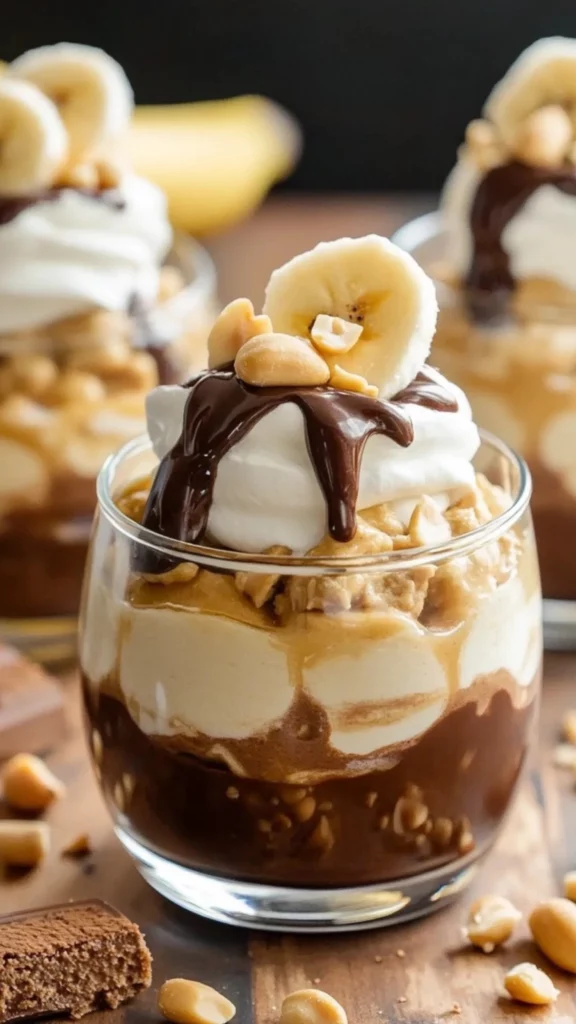
There’s a certain charm in revisiting classic desserts, especially when they’re presented in a fun and modern way. These Chocolate Covered Banana Pudding Cups are a perfect example, blending the familiar comfort of banana pudding with the delightful addition of rich chocolate. Imagine layers of creamy vanilla pudding, sweet banana slices, and crunchy vanilla wafers, all drizzled with decadent chocolate sauce and topped with fluffy whipped cream. It’s a dessert that’s both comforting and visually appealing, ideal for any occasion. I remember the first time I made these pudding cups for a casual get-together with friends. I wanted a dessert that was easy to prepare but still felt like a special treat. The individual cups allowed for perfect portion control, and the combination of flavors was universally loved. The ease of assembly and the delicious result made it clear that this was a recipe worth sharing. This recipe is an excellent choice for beginner cooks. It requires no baking, minimal preparation, and uses simple, readily available ingredients. The steps are straightforward and easy to follow, making it a stress-free dessert option. Plus, the individual portions make it perfect for parties, potlucks, or even a simple weeknight treat.
Chocolate Covered Banana Pudding Cups: A Nostalgic Indulgence
Indulge in layers of creamy vanilla pudding, sweet bananas, and rich chocolate. This no-bake dessert is perfect for beginners and a hit with everyone.
- Prep Time: 15 minutes
- Cook Time: 0 minutes
- Total Time: 15 minutes
- Yield: 4 servings 1x
- Category: Dessert
- Method: No-Bake
- Cuisine: American
Ingredients
- 1 box instant vanilla pudding mix, made according to package directions
- 3 bananas, sliced just before assembling
- ¼ cup chopped peanuts
- 16 vanilla wafers
- 1/4 cup chocolate sauce or warmed fudge sauce
- 1 cup whipped cream or Cool Whip
Instructions
- Prepare the Cups: Choose clear glasses or cups to showcase the beautiful layers of the dessert. Make sure they are clean and dry. Using clear cups enhances the visual appeal of the pudding cups.
- Swirl Chocolate Sauce: Drizzle a small amount of chocolate sauce into the bottom of each cup and swirl it around to coat the bottom. This creates a visually appealing base and adds a burst of chocolate flavor in every bite.
- Layer the Ingredients: Begin by layering a few vanilla wafers at the bottom of each cup. Then, add a layer of sliced bananas, followed by a layer of vanilla pudding. Repeat the layers until the cup is nearly full, ending with a layer of vanilla pudding. Building the layers carefully ensures an even distribution of flavors and textures.
- Top with Chocolate, Whipped Cream, and Peanuts: Drizzle more chocolate sauce over the top of each pudding cup. Then, add a dollop of whipped cream and sprinkle with chopped peanuts. These toppings add flavor, texture, and visual appeal.
- Garnish: For an extra touch of elegance, garnish each pudding cup with a vanilla wafer and a banana slice. This adds a final flourish and makes the dessert even more enticing.
Notes
- Slice bananas just before assembling to prevent browning.
- Use instant pudding for quick preparation.
- Warm fudge sauce for easier drizzling.
- Chill for a firmer texture if desired.
Ingredients and Preparation: The Building Blocks of Flavor
This recipe is built on a foundation of simple, everyday ingredients that, when combined, create a symphony of creamy, sweet, and chocolatey flavors. Here’s a detailed breakdown with added tips and tricks to ensure dessert success:
- Instant Vanilla Pudding Mix: 1 box, made according to package directions. Instant pudding mix serves as the smooth and creamy base for the dessert. Ensure you use instant pudding mix, not cook-and-serve, for quick and easy preparation. Follow the package directions for the liquid ratio to achieve the desired consistency.
- Bananas: 3, sliced just before assembling. Bananas add a natural sweetness and creamy texture to the pudding cups. Slice them just before assembling to prevent browning. If you’re concerned about browning, you can lightly toss the banana slices in lemon juice.
- Chopped Peanuts: ¼ cup. Chopped peanuts add a delightful crunch and nutty flavor that complements the sweetness of the pudding and bananas. You can use salted or unsalted peanuts, depending on your preference. If you prefer a finer texture, you can pulse the peanuts in a food processor.
- Vanilla Wafers: 16. Vanilla wafers provide a classic crunchy element and a subtle vanilla flavor. You can use store-bought vanilla wafers or make your own if you have the time and inclination.
- Chocolate Sauce or Warmed Fudge Sauce: ¼ cup. Chocolate sauce adds a rich, decadent flavor and a beautiful visual appeal. You can use store-bought chocolate sauce or make your own from scratch. If using fudge sauce, warm it slightly in the microwave or over a double boiler to make it easier to drizzle.
- Whipped Cream or Cool Whip: 1 cup. Whipped cream adds a light and airy topping, balancing the richness of the pudding and chocolate. You can use homemade whipped cream for a more luxurious touch or store-bought Cool Whip for convenience.
Alternative Ingredient Suggestions:
- Pudding Mix: You can experiment with other flavors of instant pudding mix, such as chocolate, butterscotch, or even pistachio. You can also use sugar-free or low-fat pudding mix for a healthier option.
- Bananas: If you don’t have bananas, you can substitute them with other soft fruits, such as sliced strawberries, raspberries, or mangoes.
- Peanuts: If you have a nut allergy or simply prefer a different texture, you can omit the peanuts or substitute them with other crunchy toppings, such as granola, crushed pretzels, or chopped chocolate.
- Vanilla Wafers: You can use other types of cookies, such as graham crackers, chocolate wafers, or even shortbread cookies.
- Chocolate Sauce: You can use melted chocolate chips, caramel sauce, or butterscotch sauce for a different flavor profile. You can also make your own chocolate sauce by melting chocolate with a little milk or cream.
- Whipped Cream: You can use coconut whipped cream for a dairy-free and vegan option. You can also use a store-bought whipped topping that is dairy free.
Step-by-Step Instructions: Creating Your Chocolate Covered Banana Pudding Cups Masterpiece
- Prepare the Cups: Choose clear glasses or cups to showcase the beautiful layers of the dessert. Make sure they are clean and dry. Using clear cups enhances the visual appeal of the pudding cups.
- Swirl Chocolate Sauce: Drizzle a small amount of chocolate sauce into the bottom of each cup and swirl it around to coat the bottom. This creates a visually appealing base and adds a burst of chocolate flavor in every bite.
- Layer the Ingredients: Begin by layering a few vanilla wafers at the bottom of each cup. Then, add a layer of sliced bananas, followed by a layer of vanilla pudding. Repeat the layers until the cup is nearly full, ending with a layer of vanilla pudding. Building the layers carefully ensures an even distribution of flavors and textures.
- Top with Chocolate, Whipped Cream, and Peanuts: Drizzle more chocolate sauce over the top of each pudding cup. Then, add a dollop of whipped cream and sprinkle with chopped peanuts. These toppings add flavor, texture, and visual appeal.
- Garnish: For an extra touch of elegance, garnish each pudding cup with a vanilla wafer and a banana slice. This adds a final flourish and makes the dessert even more enticing.
Beginner Tips and Notes: Mastering the Art of Chocolate Covered Banana Pudding Cups
- Pudding Consistency: Make sure the pudding is thick enough to hold its shape in the layers. If it’s too thin, you can chill it in the refrigerator for a few minutes to thicken it up.
- Banana Slicing: Slice the bananas just before assembling the pudding cups to prevent them from browning. You can also lightly toss the banana slices in lemon juice to prevent browning.
- Layering: Be gentle when layering the ingredients to avoid disturbing the previous layers and creating a messy presentation.
- Chocolate Sauce Drizzling: If your chocolate sauce is too thick, you can warm it slightly in the microwave or over a double boiler to make it easier to drizzle.
- Whipped Cream Piping: If you want to make your pudding cups look extra fancy, you can pipe the whipped cream using a piping bag and tip.
- Make-Ahead Tip: You can assemble the pudding cups a few hours ahead of time and store them in the refrigerator until ready to serve. This is a great time-saving tip for parties or gatherings.
- Individual Portions: This recipe is easily customizable for different serving sizes. Simply adjust the amount of ingredients accordingly.
- Creative Presentation: Get creative with the presentation by using different types of glasses or adding extra garnishes, such as chocolate shavings, sprinkles, or fresh mint leaves.
Serving Suggestions: Completing Your Chocolate Covered Banana Pudding Cups Experience
These Chocolate Covered Banana Pudding Cups are a delightful dessert on their own, but you can enhance the experience with a few thoughtful additions:
- Extra Chocolate: Serve the pudding cups with a side of extra chocolate sauce for dipping or drizzling.
- Fresh Fruit: Add a side of fresh fruit, such as strawberries, raspberries, or blueberries, for a refreshing contrast to the creamy pudding.
- Coffee or Tea: Pair the pudding cups with a cup of coffee or tea for a relaxing afternoon treat.
- Ice Cream: Add a scoop of vanilla ice cream or chocolate ice cream to the pudding cups for an extra indulgent dessert.
- Chocolate Shavings: Sprinkle chocolate shavings on top of the whipped cream for a decorative touch and extra chocolate flavor.
- Caramel Drizzle: Add a drizzle of caramel sauce for an extra layer of sweetness and flavor.
Storage Tips for Leftovers:
Store leftover Chocolate Covered Banana Pudding Cups in the refrigerator for up to 2 days. However, for the best flavor and texture, it’s recommended to enjoy them within 24 hours. If you need to store them longer, you can cover the cups tightly with plastic wrap to prevent the pudding from drying out and the bananas from browning further.
Conclusion: Share Your Culinary Creations!
These Chocolate Covered Banana Pudding Cups are a fun and easy way to enjoy a classic dessert with a delightful twist. I encourage you to try this recipe and share your creations in the comments below! I’d love to hear about your variations, tips, and tricks. Did you use a different flavor of pudding, add extra toppings, or get creative with the presentation? Your feedback is valuable and inspires other cooks. Let us know how your pudding cups turned out and what serving suggestions you enjoyed most. Share your photos and tag me on social media so I can see your Chocolate Covered Banana Pudding Cups masterpieces! Use #ChocolateBananaPuddingCups and #EasyDessertRecipes so I can find your creations. I also enjoy seeing your dessert adventures on Instagram stories, so feel free to tag me and show off your creations. Happy cooking, and I can’t wait to see what you create!