Cherry Cheesecake Fluff Recipe: Easy No-Bake Dessert
Looking for a quick, no-bake dessert that’s both easy and delicious? This Cherry Cheesecake Fluff is your answer! With creamy cheesecake, sweet cherry topping, and a crunchy graham cracker crumble, it’s the perfect dessert for any occasion. Whether you’re a beginner or just short on time, this simple, fuss-free treat will impress everyone—and leave them asking for the recipe!
- Prep Time: 15 minutes
- Cook Time: 0 minutes
- Total Time: 2 hours 15 minutes (for chilling)
- Yield: 8 servings 1x
- Category: Dessert
- Method: No-Bake
- Cuisine: American
- Diet: Vegetarian
Ingredients
For the Fluff:
- 1 (8 oz) package cream cheese, softened
- 1 cup powdered sugar
- 1 teaspoon vanilla extract
- 2 cups whipped topping (like Cool Whip), thawed
- 1 (21 oz) can cherry pie filling
For the Crumble:
- 1 cup graham cracker crumbs
- 1/4 cup unsalted butter, melted
- 2 tablespoons sugar
Instructions
1. Prepare the Crumble
Start by making the graham cracker crumble. In a medium-sized bowl, combine the graham cracker crumbs, melted butter, and sugar. Stir until everything is evenly mixed. You should have a moist, crumbly texture. This mixture will form the base of your fluff and add a satisfying crunch that contrasts beautifully with the creamy cheesecake filling.
Once everything is mixed together, set the crumble mixture aside for later.
2. Prepare the Fluff
Next, it’s time to make the creamy fluff filling. In a large mixing bowl, use a hand mixer (or a stand mixer if you have one) to beat the softened cream cheese until it’s smooth and creamy. This is an important step, so take your time to ensure there are no lumps. Once smooth, add the powdered sugar and vanilla extract, continuing to mix until the sugar is fully incorporated.
Afterward, fold in the whipped topping gently. Be careful not to overmix here. You want to maintain the fluffiness and lightness of the whipped topping, so use a spatula to gently fold until everything is smooth and combined.
3. Assemble the Layers
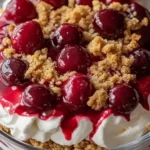
Now, it’s time to assemble the dessert! Grab your serving dish and start with half of the graham cracker crumble. Spread it evenly at the bottom of the dish. This will form the first layer of texture.
Next, spread the cream cheese mixture over the crumble layer. Use a spatula to smooth it out, making sure it’s even and covers the entire surface. You want the creamy cheesecake mixture to be thick and luscious, so don’t skimp on this step.
After the cream cheese layer, spoon the cherry pie filling over the top. Spread it out gently to cover the cream cheese layer completely. The cherries will give the dessert that sweet and tart kick, and the vibrant red color will make the dessert look even more appealing.
Finally, sprinkle the remaining graham cracker crumble over the cherry layer. This will give the fluff its final crunch and finish the dessert off beautifully.
4. Chill and Set
Cover the dessert with plastic wrap or a lid, and refrigerate it for at least 2 hours. Ideally, you want to let it chill for about 4 hours or even overnight for the best results. The longer it chills, the better the flavors meld together, and the fluff becomes firmer and easier to scoop.
Notes
- Cream Cheese Softening: Make sure your cream cheese is fully softened before you begin mixing. Cold cream cheese will make it harder to blend and may result in a lumpy texture. If you’re in a rush, you can soften cream cheese in the microwave by cutting it into small cubes and microwaving for 10-15 seconds at a time until soft.
- Folding Whipped Topping: When folding in the whipped topping, use a gentle folding motion to preserve the airiness. Avoid stirring too aggressively, as it can deflate the fluffiness.
- Chill Time: Don’t skip the chilling time! The dessert needs time to firm up and allow the layers to set. The longer it sits, the better it will taste.
- Serving: When serving, consider using a large spoon to scoop the layers and create an attractive presentation. If you’re making individual servings, parfait glasses or mason jars can make for a cute and personal touch.