If you’ve ever found yourself craving something sweet, creamy, and indulgent, but without the hassle of baking, then this Cherry Cheesecake Fluff recipe is going to be your new favorite. It’s everything you love about cheesecake—rich, creamy, and full of flavor—yet it’s incredibly easy to make. And the best part? No baking required!
Cherry Cheesecake Fluff Recipe: Easy No-Bake Dessert
Looking for a quick, no-bake dessert that’s both easy and delicious? This Cherry Cheesecake Fluff is your answer! With creamy cheesecake, sweet cherry topping, and a crunchy graham cracker crumble, it’s the perfect dessert for any occasion. Whether you’re a beginner or just short on time, this simple, fuss-free treat will impress everyone—and leave them asking for the recipe!
- Prep Time: 15 minutes
- Cook Time: 0 minutes
- Total Time: 2 hours 15 minutes (for chilling)
- Yield: 8 servings 1x
- Category: Dessert
- Method: No-Bake
- Cuisine: American
- Diet: Vegetarian
Ingredients
For the Fluff:
- 1 (8 oz) package cream cheese, softened
- 1 cup powdered sugar
- 1 teaspoon vanilla extract
- 2 cups whipped topping (like Cool Whip), thawed
- 1 (21 oz) can cherry pie filling
For the Crumble:
- 1 cup graham cracker crumbs
- 1/4 cup unsalted butter, melted
- 2 tablespoons sugar
Instructions
1. Prepare the Crumble
Start by making the graham cracker crumble. In a medium-sized bowl, combine the graham cracker crumbs, melted butter, and sugar. Stir until everything is evenly mixed. You should have a moist, crumbly texture. This mixture will form the base of your fluff and add a satisfying crunch that contrasts beautifully with the creamy cheesecake filling.
Once everything is mixed together, set the crumble mixture aside for later.
2. Prepare the Fluff
Next, it’s time to make the creamy fluff filling. In a large mixing bowl, use a hand mixer (or a stand mixer if you have one) to beat the softened cream cheese until it’s smooth and creamy. This is an important step, so take your time to ensure there are no lumps. Once smooth, add the powdered sugar and vanilla extract, continuing to mix until the sugar is fully incorporated.
Afterward, fold in the whipped topping gently. Be careful not to overmix here. You want to maintain the fluffiness and lightness of the whipped topping, so use a spatula to gently fold until everything is smooth and combined.
3. Assemble the Layers
Now, it’s time to assemble the dessert! Grab your serving dish and start with half of the graham cracker crumble. Spread it evenly at the bottom of the dish. This will form the first layer of texture.
Next, spread the cream cheese mixture over the crumble layer. Use a spatula to smooth it out, making sure it’s even and covers the entire surface. You want the creamy cheesecake mixture to be thick and luscious, so don’t skimp on this step.
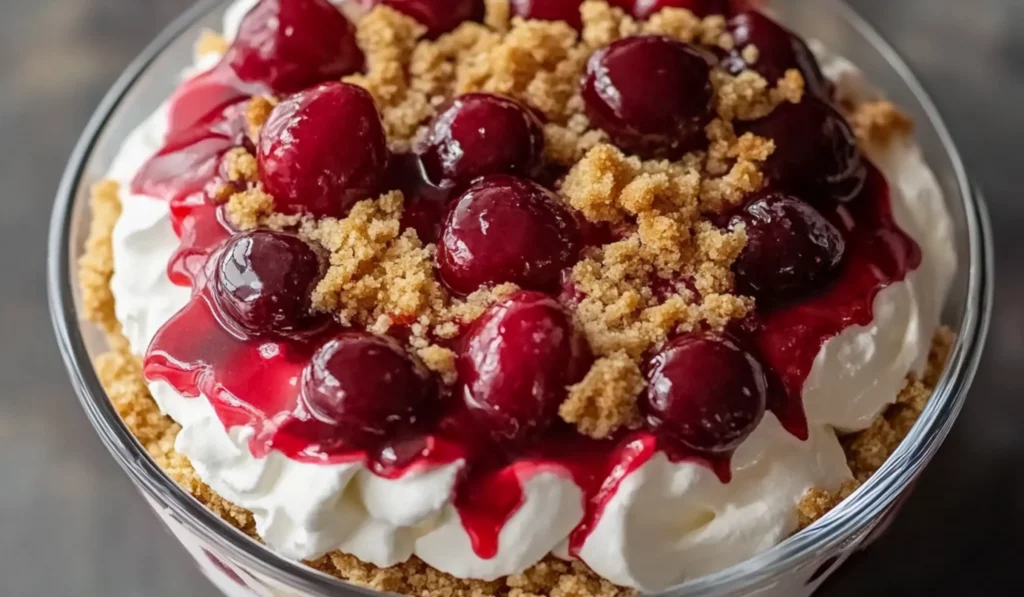
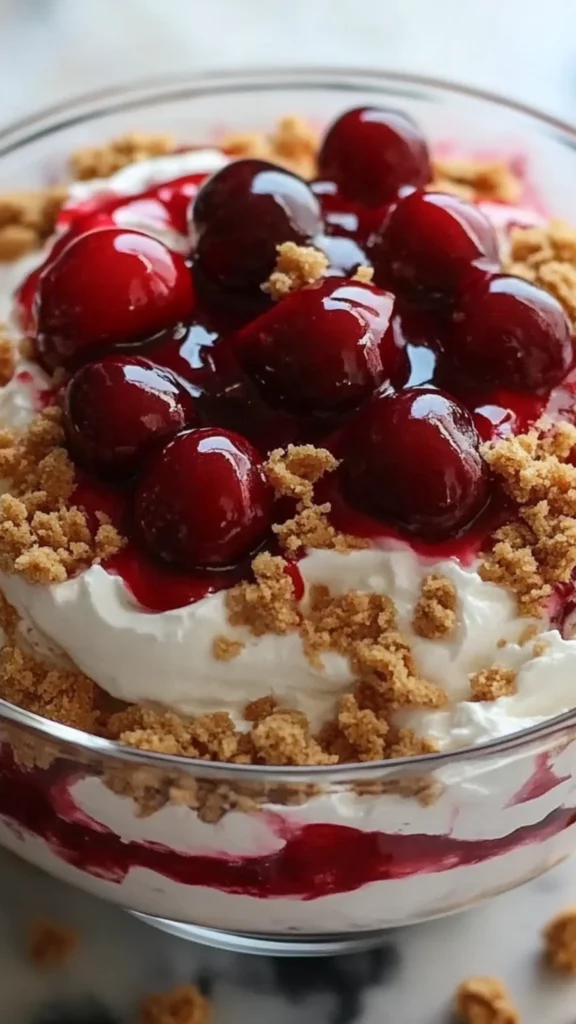
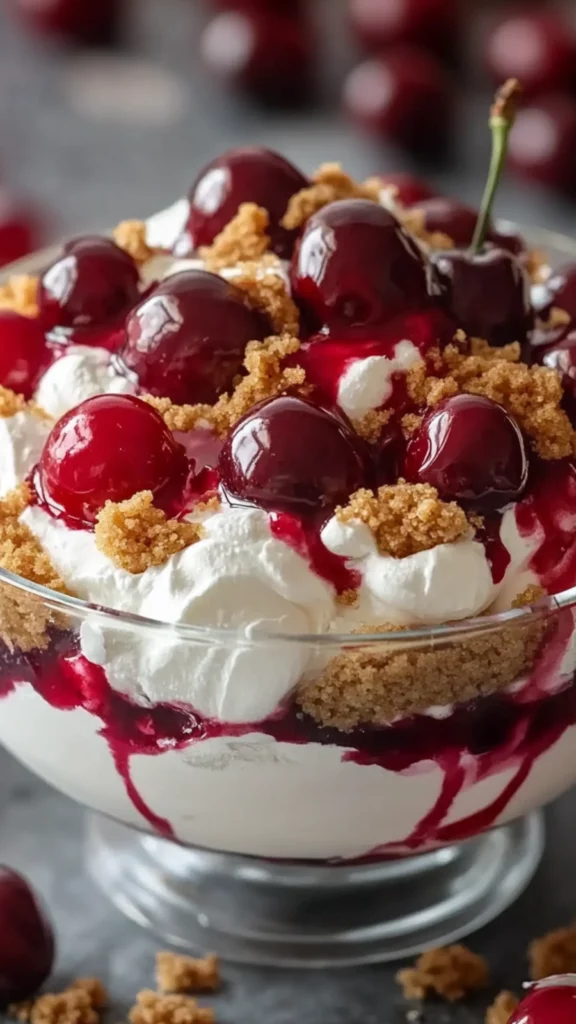
After the cream cheese layer, spoon the cherry pie filling over the top. Spread it out gently to cover the cream cheese layer completely. The cherries will give the dessert that sweet and tart kick, and the vibrant red color will make the dessert look even more appealing.
Finally, sprinkle the remaining graham cracker crumble over the cherry layer. This will give the fluff its final crunch and finish the dessert off beautifully.
4. Chill and Set
Cover the dessert with plastic wrap or a lid, and refrigerate it for at least 2 hours. Ideally, you want to let it chill for about 4 hours or even overnight for the best results. The longer it chills, the better the flavors meld together, and the fluff becomes firmer and easier to scoop.
Notes
- Cream Cheese Softening: Make sure your cream cheese is fully softened before you begin mixing. Cold cream cheese will make it harder to blend and may result in a lumpy texture. If you’re in a rush, you can soften cream cheese in the microwave by cutting it into small cubes and microwaving for 10-15 seconds at a time until soft.
- Folding Whipped Topping: When folding in the whipped topping, use a gentle folding motion to preserve the airiness. Avoid stirring too aggressively, as it can deflate the fluffiness.
- Chill Time: Don’t skip the chilling time! The dessert needs time to firm up and allow the layers to set. The longer it sits, the better it will taste.
- Serving: When serving, consider using a large spoon to scoop the layers and create an attractive presentation. If you’re making individual servings, parfait glasses or mason jars can make for a cute and personal touch.
This recipe holds a special place in my heart because it’s one of those desserts that has saved me on more than one occasion. Whether it was a last-minute potluck or a family gathering, this dessert always gets rave reviews. I can’t tell you how many times I’ve been asked for the recipe, and every time, I get to share the magic of this no-bake wonder. What makes it even better is that it’s so beginner-friendly. It doesn’t require any fancy skills or equipment, just some simple mixing and layering. Perfect for anyone just starting out in the kitchen or anyone who wants a quick, impressive dessert!
In this article, I’ll walk you through how to make Cherry Cheesecake Fluff from start to finish. From the ingredients and prep to assembling the layers, you’ll learn everything you need to know to create a dessert that’s as simple as it is satisfying. I’ll also share a few tips and alternatives to help you customize the recipe to your liking. By the end, you’ll be able to make this dessert with ease, and maybe even make it your go-to treat for every occasion!
Ingredients and Preparation
Let’s begin with the essentials. To create the best Cherry Cheesecake Fluff, you’ll need a handful of ingredients. Here’s what you’ll need for the fluff itself and the crumbly graham cracker base that adds texture and flavor:
For the Fluff:
- 1 (8 oz) package cream cheese, softened
- 1 cup powdered sugar
- 1 teaspoon vanilla extract
- 2 cups whipped topping (like Cool Whip), thawed
- 1 (21 oz) can cherry pie filling
For the Crumble:
- 1 cup graham cracker crumbs
- 1/4 cup unsalted butter, melted
- 2 tablespoons sugar
Before you begin, it’s important to gather all your ingredients and tools. You’ll need a large mixing bowl for the cream cheese mixture, a smaller bowl for the crumble, a spatula to fold ingredients together, and a serving dish. A trifle bowl or any large glass dish works wonderfully because it allows the beautiful layers to show through. But don’t worry—any dish you have on hand will do!
Ingredient Alternatives and Flexibility
One of the best things about this Cherry Cheesecake Fluff recipe is how flexible it is. Here are some simple alternatives and substitutions if you need to adjust based on what you have on hand or your dietary preferences:
- Cream Cheese: If you prefer a lighter version of this dessert, you can use reduced-fat cream cheese, or if you’re looking for a dairy-free option, try a non-dairy cream cheese substitute. Greek yogurt can also be used in place of cream cheese for a tangier flavor and a healthier twist.
- Whipped Topping: While Cool Whip is the go-to choice for many, if you want to make your own, homemade whipped cream works just as well. Simply beat heavy cream with a little sugar until stiff peaks form, and fold it in as you would the Cool Whip.
- Cherry Pie Filling: The classic cherry topping is fantastic, but feel free to get creative! You could swap out the cherry filling for other fruit pie fillings like blueberry, strawberry, or even peach. If you prefer fresh fruit, a mixture of fresh berries or sliced peaches can be used in place of the canned pie filling for a lighter, fresher option.
- Graham Cracker Crumbs: Graham crackers are traditional, but you can easily substitute with crushed vanilla wafer cookies or digestive biscuits if that’s what you have on hand. For a gluten-free option, look for gluten-free graham crackers or use gluten-free cookies.
- Sugar: The amount of sugar can be adjusted based on your preference. You can also use a sugar substitute, like stevia or erythritol, if you’re watching your sugar intake.
Step-by-Step Instructions
Let’s dive into the process of making this Cherry Cheesecake Fluff. I’ve broken the recipe down into easy-to-follow steps that will make sure even the most beginner of cooks can create a stunning dessert.
1. Prepare the Crumble
Start by making the graham cracker crumble. In a medium-sized bowl, combine the graham cracker crumbs, melted butter, and sugar. Stir until everything is evenly mixed. You should have a moist, crumbly texture. This mixture will form the base of your fluff and add a satisfying crunch that contrasts beautifully with the creamy cheesecake filling.
Once everything is mixed together, set the crumble mixture aside for later.
2. Prepare the Fluff
Next, it’s time to make the creamy fluff filling. In a large mixing bowl, use a hand mixer (or a stand mixer if you have one) to beat the softened cream cheese until it’s smooth and creamy. This is an important step, so take your time to ensure there are no lumps. Once smooth, add the powdered sugar and vanilla extract, continuing to mix until the sugar is fully incorporated.
Afterward, fold in the whipped topping gently. Be careful not to overmix here. You want to maintain the fluffiness and lightness of the whipped topping, so use a spatula to gently fold until everything is smooth and combined.
3. Assemble the Layers
Now, it’s time to assemble the dessert! Grab your serving dish and start with half of the graham cracker crumble. Spread it evenly at the bottom of the dish. This will form the first layer of texture.
Next, spread the cream cheese mixture over the crumble layer. Use a spatula to smooth it out, making sure it’s even and covers the entire surface. You want the creamy cheesecake mixture to be thick and luscious, so don’t skimp on this step.
After the cream cheese layer, spoon the cherry pie filling over the top. Spread it out gently to cover the cream cheese layer completely. The cherries will give the dessert that sweet and tart kick, and the vibrant red color will make the dessert look even more appealing.
Finally, sprinkle the remaining graham cracker crumble over the cherry layer. This will give the fluff its final crunch and finish the dessert off beautifully.
4. Chill and Set
Cover the dessert with plastic wrap or a lid, and refrigerate it for at least 2 hours. Ideally, you want to let it chill for about 4 hours or even overnight for the best results. The longer it chills, the better the flavors meld together, and the fluff becomes firmer and easier to scoop.
Beginner Tips and Notes
Here are a few additional tips to ensure your Cherry Cheesecake Fluff turns out perfectly every time:
- Cream Cheese Softening: Make sure your cream cheese is fully softened before you begin mixing. Cold cream cheese will make it harder to blend and may result in a lumpy texture. If you’re in a rush, you can soften cream cheese in the microwave by cutting it into small cubes and microwaving for 10-15 seconds at a time until soft.
- Folding Whipped Topping: When folding in the whipped topping, use a gentle folding motion to preserve the airiness. Avoid stirring too aggressively, as it can deflate the fluffiness.
- Chill Time: Don’t skip the chilling time! The dessert needs time to firm up and allow the layers to set. The longer it sits, the better it will taste.
- Serving: When serving, consider using a large spoon to scoop the layers and create an attractive presentation. If you’re making individual servings, parfait glasses or mason jars can make for a cute and personal touch.
Serving Suggestions
This Cherry Cheesecake Fluff is a fantastic stand-alone dessert, but it can also be paired with other dishes to create a more complete meal or treat. Here are a few ideas:
- Light Salads: If you’re serving this for a larger gathering, a fresh green salad with a tangy vinaigrette can be a great way to balance out the richness of the fluff.
- Fresh Fruit: Complement the dessert with fresh fruit like sliced strawberries, blueberries, or even citrus wedges to add a fresh, tart contrast to the sweet and creamy fluff.
- More Toppings: Top each serving with a dollop of fresh whipped cream or even some chocolate shavings for an extra touch of decadence. A drizzle of caramel or a few extra cherries will add even more flair.
Storage Tips: If you happen to have leftovers (which is unlikely!), store them in an airtight container in the fridge. The Cherry Cheesecake Fluff can be kept for up to 3 days, though it’s best enjoyed within the first day or two for maximum freshness and texture.
Conclusion
This Cherry Cheesecake Fluff is the epitome of simple, no-bake desserts that deliver big on flavor. Whether you’re a beginner cook or someone who simply wants a quick and satisfying treat, this dessert has got you covered. It’s rich, creamy, and packed with sweetness, making it a favorite among anyone who tries it.
I hope you’re excited to give this recipe a try! It’s the perfect dish to make when you want something easy, impressive, and absolutely delicious. Don’t forget to share your thoughts and variations in the comments below—I’d love to hear how it turns out and if you made any fun tweaks to the recipe.
Happy cooking, and enjoy your Cherry Cheesecake Fluff!


