I remember the first time I saw a cheesecake taco. It was at a local food festival, and I was immediately intrigued by the playful combination of a crispy shell and creamy filling. It looked like a fun and unique dessert, but I wasn’t sure if I could recreate it at home. However, I soon discovered that these Mini Strawberry Cheesecake Tacos are surprisingly simple to make, even for beginner cooks. This recipe is perfect for anyone looking to add a touch of whimsy to their dessert repertoire. Imagine serving a platter of these delightful cheesecake tacos at your next party or family gathering. The crispy graham cracker coated shells, filled with a smooth and creamy cheesecake filling and topped with a sweet strawberry glaze, are sure to be a hit. This recipe is not only easy and time-efficient, but it also allows for creative customization and provides a fun way to experiment with different dessert textures. Let’s embark on this delicious adventure and create these delightful treats!

Cheesecake Tacos: A Fun and Easy Dessert Adventure for Beginners
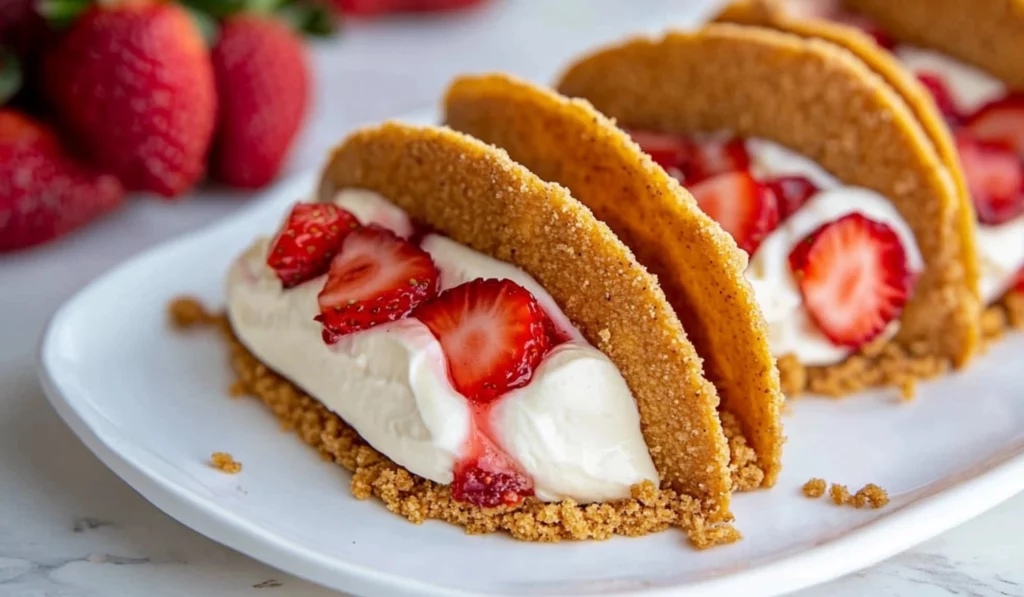
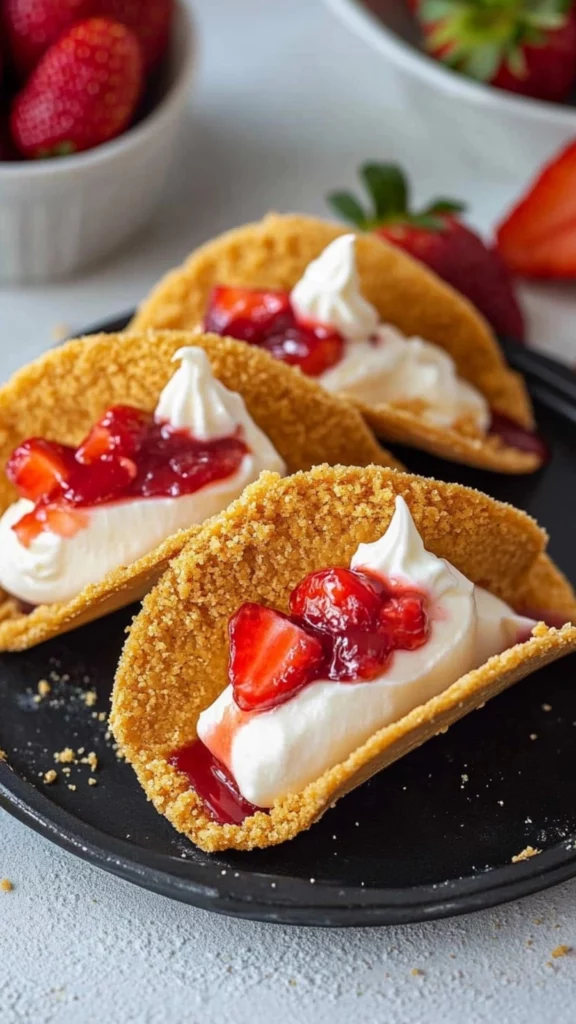
These Mini Strawberry Cheesecake Tacos offer a fun and easy dessert experience. Crispy graham cracker coated shells filled with creamy cheesecake and topped with a sweet strawberry glaze make for a delightful treat.
- Prep Time: 20 minutes
- Cook Time: 11 minutes
- Total Time: 31 minutes
- Yield: 21 tacos 1x
- Category: Dessert
- Method: Baking, Mixing, Piping
- Cuisine: American
- Diet: Vegetarian
Ingredients
- 7 9-inch tortilla shells
- 1 cup graham cracker crumbs
- 1 ½ tablespoons granulated sugar
- ⅓ cup melted butter
- 8 ounces cream cheese, room temperature
- 3 tablespoons cheesecake instant pudding mix
- 1 cup heavy whipping cream
- ½ cup powdered sugar
- 1 teaspoon vanilla extract
- ½ cup chopped strawberries
- ¾ cup strawberry glaze
Instructions
Shells:
- Preheat the Oven: Preheat the oven to 400 degrees Fahrenheit. This ensures even baking.
- Combine Crumbs and Sugar: Add the graham cracker crumbs and granulated sugar to a shallow dish. Stir to combine. This prepares the coating.
- Cut Tortillas: Using a 3 ¾ inch circle cookie cutter, cut out 3 circles per 9-inch tortilla shell. This creates uniform shells.
- Pierce Shells: Using a fork, stab each circle 6 to 7 times on both sides to help prevent air bubbles. This prevents bubbles while baking.
- Brush with Butter: Using a brush, coat each 3 ¾ inch shell with melted butter. This helps the crumbs adhere.
- Coat with Crumbs: Place the shells in the shallow dish of graham cracker crumbs and gently press down. Flip and repeat until the shell is coated in crumbs. This creates a crispy coating.
- Form Tacos: Fold each shell in half and form a seam in the middle. This creates the taco shape.
- Place on Cupcake Pan: Flip a cupcake pan upside down and stagger the shells between the cups. This maintains the taco shape during baking.
- Bake: Place in the preheated oven and bake for 11 minutes until the edges are brown and stiff. This ensures a crispy shell.
- Cool: Remove from the oven and leave to cool in the cupcake pans. This allows the taco shells to keep their shape once they’ve cooled completely.
Cheesecake:
- Beat Cream Cheese: Add the cream cheese to a large mixing bowl. Using a hand mixer, beat until smooth and creamy. Scrape down the sides of the bowl. This ensures a smooth filling.
- Add Pudding Mix: Add in the pudding mix, ½ cup of the heavy cream, powdered sugar, and vanilla extract. Beat until incorporated. This combines the ingredients.
- Whip Cream: Add in the remaining heavy cream and beat until smooth and fluffy. This creates a light and airy filling.
- Pipe Filling: Fill a piping bag fitted with a Wilton 1M piping tip with the cheesecake filling. Pipe the filling into the cooled taco shells.
- Filling Pattern: Pipe the cheesecake filling in the middle of the shell, to one edge, back to the center, to the other edge, and back to the center in one continuous flow. This ensures even filling distribution.
Topping:
- Combine Topping: Add the fresh chopped strawberries with the strawberry glaze to a bowl and stir to combine. This mixes the topping.
- Add Topping: Spoon the topping onto the cheesecake tacos. This adds the final touch.
- Serve: Serve immediately. This ensures the best texture and freshness.
Notes
- Use room temperature cream cheese.
- Cool shells completely before filling.
- Get creative with fruit toppings.
- Use a piping bag for neat filling.
- Bake shells until golden brown.
Ingredients and Preparation: Your Cheesecake Taco Essentials – Simple and Sweet
Creating these cheesecake tacos requires just a few basic ingredients, making it ideal for beginner cooks. Proper preparation ensures a crispy shell and creamy filling.
For the Shells: The Crunchy Foundation – The Heart of the Taco:
- 7 9-inch Tortilla Shells – Provides the base for the taco shell. Alternatives: You can use smaller tortilla shells for mini tacos. Tortilla shells are the base. Small tortillas are an alternative.
- 1 cup Graham Cracker Crumbs – Creates the crispy coating. Alternatives: You can use crushed digestive biscuits or other cookie crumbs. Graham cracker crumbs add crunch. Other cookie crumbs are an alternative.
- 1 ½ tablespoons Granulated Sugar – Adds sweetness to the shell. Alternatives: You can use brown sugar for a richer flavor. Granulated sugar adds sweetness. Brown sugar is an alternative.
- ⅓ cup Butter, Melted – Binds the crumbs and adds flavor. Alternatives: You can use coconut oil for a dairy-free option. Melted butter adds flavor. Coconut oil is a dairy free alternative.
For the Cheesecake Filling: The Creamy Center – The Decadent Layer:
- 8 ounces Cream Cheese, Room Temperature – Provides the creamy base. Alternatives: You can use Neufchâtel cheese for a lighter option. Cream cheese is the base. Neufchâtel cheese is a lighter option.
- 3 tablespoons Cheesecake Instant Pudding Mix – Adds flavor and thickens the filling. Alternatives: You can use vanilla instant pudding mix with added flavor extracts. Pudding mix thickens. Vanilla pudding mix is an alternative.
- 1 cup Heavy Whipping Cream – Creates a light and fluffy texture. Alternatives: Coconut cream for a dairy-free option. Heavy whipping cream is fluffy. Coconut cream is a dairy free option.
- ½ cup Powdered Sugar – Adds sweetness and smooth texture. Alternatives: You can use granulated sugar, but powdered sugar blends better. Powdered sugar is smooth. Granulated sugar is an alternative.
- 1 teaspoon Vanilla Extract – Enhances the flavor. Alternatives: Almond extract or other flavor extracts. Vanilla extract adds flavor. Almond extract is an alternative.
For the Topping: The Sweet Finish – Adding Extra Sweetness:
- ½ cup Chopped Strawberries – Adds a fresh, fruity flavor. Alternatives: You can use other berries like blueberries or raspberries. Strawberries are fruity. Blueberries are an alternative.
- ¾ cup Strawberry Glaze – Provides a sweet and glossy finish. Alternatives: You can use other fruit glazes or jams. Strawberry glaze adds finish. Other fruit glazes are an alternative.
Step-by-Step Instructions: Your Guide to Cheesecake Taco Success – Easy and Fun
Shells:
- Preheat the Oven: Preheat the oven to 400 degrees Fahrenheit. This ensures even baking.
- Combine Crumbs and Sugar: Add the graham cracker crumbs and granulated sugar to a shallow dish. Stir to combine. This prepares the coating.
- Cut Tortillas: Using a 3 ¾ inch circle cookie cutter, cut out 3 circles per 9-inch tortilla shell. This creates uniform shells.
- Pierce Shells: Using a fork, stab each circle 6 to 7 times on both sides to help prevent air bubbles. This prevents bubbles while baking.
- Brush with Butter: Using a brush, coat each 3 ¾ inch shell with melted butter. This helps the crumbs adhere.
- Coat with Crumbs: Place the shells in the shallow dish of graham cracker crumbs and gently press down. Flip and repeat until the shell is coated in crumbs. This creates a crispy coating.
- Form Tacos: Fold each shell in half and form a seam in the middle. This creates the taco shape.
- Place on Cupcake Pan: Flip a cupcake pan upside down and stagger the shells between the cups. This maintains the taco shape during baking.
- Bake: Place in the preheated oven and bake for 11 minutes until the edges are brown and stiff. This ensures a crispy shell.
- Cool: Remove from the oven and leave to cool in the cupcake pans. This allows the taco shells to keep their shape once they’ve cooled completely.
Cheesecake:
- Beat Cream Cheese: Add the cream cheese to a large mixing bowl. Using a hand mixer, beat until smooth and creamy. Scrape down the sides of the bowl. This ensures a smooth filling.
- Add Pudding Mix: Add in the pudding mix, ½ cup of the heavy cream, powdered sugar, and vanilla extract. Beat until incorporated. This combines the ingredients.
- Whip Cream: Add in the remaining heavy cream and beat until smooth and fluffy. This creates a light and airy filling.
- Pipe Filling: Fill a piping bag fitted with a Wilton 1M piping tip with the cheesecake filling. Pipe the filling into the cooled taco shells.
- Filling Pattern: Pipe the cheesecake filling in the middle of the shell, to one edge, back to the center, to the other edge, and back to the center in one continuous flow. This ensures even filling distribution.
Topping:
- Combine Topping: Add the fresh chopped strawberries with the strawberry glaze to a bowl and stir to combine. This mixes the topping.
- Add Topping: Spoon the topping onto the cheesecake tacos. This adds the final touch.
- Serve: Serve immediately. This ensures the best texture and freshness.
Beginner Tips and Notes: Your Kitchen Companion – Helpful Advice and Hacks
- Troubleshooting:
- Shells Not Crispy: Bake for a few more minutes.
- Filling Too Runny: Beat for a longer time or refrigerate before piping.
- Topping Too Wet: Drain excess liquid from strawberries.
- Prep Efficiency:
- Measure Ingredients: Measure all ingredients before starting.
- Prepare Topping: Chop strawberries and mix with glaze ahead of time.
- Use Room Temperature Cream Cheese: This ensures a smooth filling.
- Tool Substitutions:
- No Piping Bag: Use a zip-top bag with a corner cut off.
- No Cookie Cutter: Use a glass or round object to cut circles.
- No Hand Mixer: Use a whisk, but it will require more effort.
- Flavor Boosters:
- Add Lemon Zest: Add lemon zest to the filling.
- Add Chocolate Chips: Sprinkle mini chocolate chips on top.
- Add Nuts: Sprinkle crushed nuts on top.
- Use Different Fruit Glaze: Use raspberry or blueberry glaze.
Serving Suggestions: Enhancing Your Cheesecake Tacos
These cheesecake tacos are delicious on their own, but you can elevate the experience with complementary sides and toppings.
- Sides:
- Fruit Salad: Serve with a fresh fruit salad.
- Whipped Cream: Add a dollop of whipped cream.
- Ice Cream: Serve with a scoop of vanilla ice cream.
- Toppings:
- Chocolate Sauce: Drizzle with chocolate sauce.
- Caramel Sauce: Drizzle with caramel sauce.
- Sprinkles: Add colorful sprinkles.
- Storage:
- Refrigerate: Store leftover tacos in an airtight container in the refrigerator for up to 2 days.
- Do Not Freeze: Freezing is not recommended as it will alter the texture.
A Sweet Conclusion: Sharing the Joy of Cheesecake Tacos
These Mini Strawberry Cheesecake Tacos are a fun and easy way to enjoy a delicious dessert. They are perfect for parties, family gatherings, or simply when you want a sweet treat. The combination of crispy shells, creamy filling, and sweet topping makes them a delightful dessert that everyone will love. Don’t be afraid to experiment with variations and add your personal touch. And most importantly, have fun! We’d love to see your cheesecake taco creations! Share your photos and any variations you try in the comments below. Happy baking!
What other fun dessert recipes would you like to see us explore? Are you interested in learning more about different baking techniques or mastering other dessert skills? Let us know in the comments! We’re here to support you on your culinary journey, one delicious bite at a time. We can’t wait to hear about your culinary triumphs! Share your photos and tag us in your creations – we’re excited to see what you make! We’re confident that this recipe will become a regular part of your dessert repertoire. It’s a guaranteed way to bring some sweet, crispy, and creamy goodness to your table. Enjoy! And remember, making desserts doesn’t have to be complicated or intimidating. With a little planning and the right recipes, you can create delicious and impressive treats that everyone will love. These cheesecake tacos are a perfect example of that. So, get in the kitchen, get creative, and get ready to impress your friends and family (and yourself!) with your cooking skills! You’ve got this!


