There’s something undeniably magical about the flavors of fall—crisp apples, warm spices, and rich caramel. The combination of these flavors has been a staple in desserts for generations, evoking cozy memories of autumn afternoons spent baking in the kitchen. But what if you could capture the essence of fall in a dessert that’s easy to make, perfectly portioned, and irresistibly delicious? Enter Caramel Apple Dessert Cups. These delightful, no-bake treats offer the perfect way to enjoy the comforting flavors of apple pie, without the need to turn on the oven. With their buttery vanilla wafer crust, fluffy salted caramel mousse, cinnamon-spiced apples, and a decadent drizzle of caramel sauce, these little cups of indulgence are sure to become your new favorite dessert.
PrintCaramel Apple Dessert Cups: A Perfect Seasonal Treat

There’s something undeniably magical about the flavors of fall—crisp apples, warm spices, and rich caramel. The combination of these flavors has been a staple in desserts for generations, evoking cozy memories of autumn afternoons spent baking in the kitchen. But what if you could capture the essence of fall in a dessert that’s easy to make, perfectly portioned, and irresistibly delicious? Enter Caramel Apple Dessert Cups. These delightful, no-bake treats offer the perfect way to enjoy the comforting flavors of apple pie, without the need to turn on the oven. With their buttery vanilla wafer crust, fluffy salted caramel mousse, cinnamon-spiced apples, and a decadent drizzle of caramel sauce, these little cups of indulgence are sure to become your new favorite dessert.
- Prep Time: 45 minutes
- Cook Time: 10 minutes
- Total Time: 55 minutes
- Yield: 28 (2-ounce cups) 1x
- Category: Dessert
- Method: No-bake
- Cuisine: American
- Diet: Vegetarian
Ingredients
Cinnamon Apples
- 4 cups apples, peeled and chopped (choose a balance of sweet and tart apples like Granny Smith, Honeycrisp, or Fuji)
- ½ cup light brown sugar
- 1 tsp ground cinnamon
The apples are the heart of this dessert, offering a soft and tender texture that contrasts beautifully with the rich mousse and crunchy crust. You’ll want to choose apples that hold up well to cooking, like Granny Smith, which provides a tart contrast to the sweet caramel, or Honeycrisp, which has a perfect balance of sweetness and crispness. The cinnamon and brown sugar will infuse the apples with a warm, aromatic flavor that captures the essence of autumn.
Caramel Apple Dessert Cups
- 2 cups vanilla wafer crumbs
- ¼ cup salted or unsalted butter, melted
- 1 package instant vanilla pudding mix (3.4 ounces)
- 1 cup milk
- ⅓ cup salted caramel sauce (store-bought or homemade)
- 1½ cups heavy cream
- Additional caramel sauce for garnish
The base of the dessert consists of a buttery vanilla wafer crust, which provides a crunchy, slightly sweet contrast to the smooth mousse. The salted caramel sauce adds richness and depth to the pudding, giving it that signature caramel flavor without being overly sweet. The heavy cream is whipped into the pudding, turning it into a mousse-like consistency that’s light and airy, yet creamy and indulgent.
Equipment
- 28 2-ounce plastic cups with lids (for portability and easy serving)
- Electric hand mixer (for whipping the mousse to perfection)
Instructions
Step 1: Preparing the Cinnamon Apples
The cinnamon apples are the first layer you’ll need to prepare. These apples provide the warm, spiced flavor that’s the foundation of the entire dessert. Start by peeling and chopping the apples into small, uniform pieces. Try to cut them into chunks that are no larger than ½-inch cubes—this will ensure that they cook evenly and fit nicely in the cups.
Next, place the chopped apples in a medium saucepan. Add the brown sugar and ground cinnamon to the apples and stir well to coat them evenly in the sugar and spice. Cook the mixture over medium heat, stirring occasionally, until the apples have softened and the syrup has thickened. This should take about 8–10 minutes. The apples should be tender, but not mushy, and the syrup should have a slightly sticky consistency. Once done, set the apples aside to cool. Cooling the apples is crucial, as it prevents them from making the mousse runny when you assemble the cups.
Step 2: Making the Vanilla Wafer Crust
The crust is made from crushed vanilla wafer cookies, which offer a buttery, slightly sweet crunch that contrasts beautifully with the creamy mousse. Start by crushing the vanilla wafer cookies into fine crumbs. You can do this by placing the cookies in a zip-top bag and using a rolling pin to crush them, or you can pulse them in a food processor until they reach a fine crumb texture.
In a mixing bowl, combine the crushed wafer crumbs with melted butter. Stir until the mixture resembles wet sand. The butter helps to bind the crumbs together, ensuring that your crust holds its shape. Using a small cookie scoop, portion the crumb mixture into the bottoms of 28 2-ounce plastic cups. Use the back of another plastic cup or a spoon to press the crumbs down firmly to create a compact, even layer.
Step 3: Making the Salted Caramel Mousse
The salted caramel mousse is the star of this dessert, adding a creamy, indulgent layer that pairs perfectly with the apples. Begin by making the pudding base. In a large mixing bowl, whisk together the instant vanilla pudding mix and milk. The pudding mix should dissolve completely in the milk, creating a smooth mixture. Chill this mixture in the refrigerator for 5 minutes to allow it to set slightly.
Once the pudding has thickened, add the salted caramel sauce to the pudding mixture. Use an electric hand mixer on medium speed to blend the caramel sauce into the pudding until smooth and well-combined. This adds a deep, rich flavor to the pudding, turning it into a luxurious mousse. If you prefer, you can also make your own salted caramel sauce at home using sugar, butter, and heavy cream, but store-bought sauce works just as well for convenience.
Next, pour the heavy cream into the pudding mixture. Using the hand mixer, whip the mixture on medium-high speed for about 3–5 minutes, or until it thickens and becomes light and airy. The whipped cream helps to lighten the texture of the mousse, giving it that melt-in-your-mouth consistency. Be careful not to over-whip the mixture, as this can cause it to become too stiff.
Step 4: Assembling the Dessert Cups
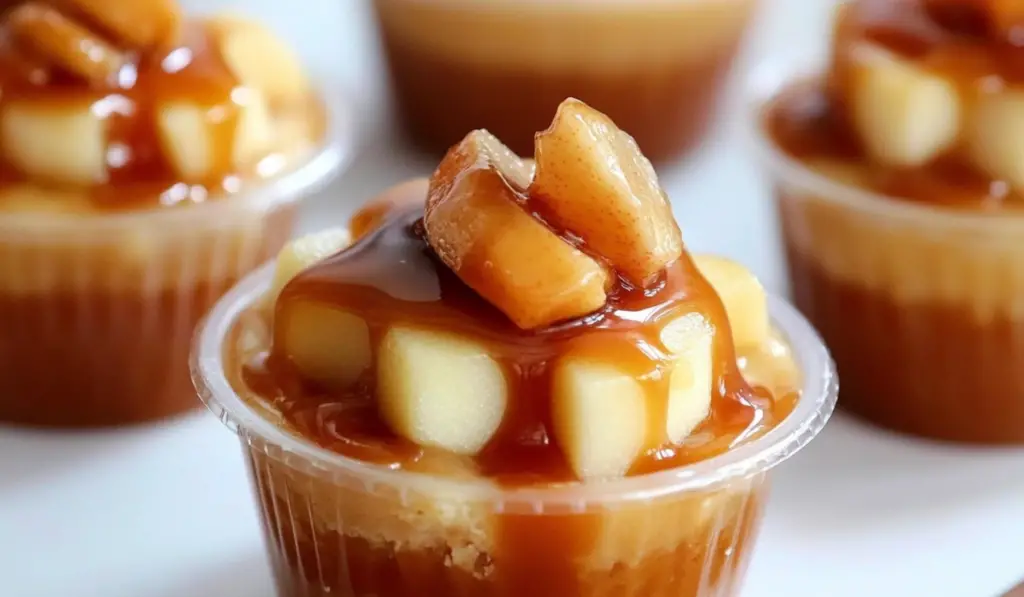
Now comes the fun part—assembling your dessert cups! Start by transferring the caramel mousse into a large piping bag. If you don’t have a piping bag, you can also use a plastic zip-top bag with the corner snipped off. Pipe the mousse into the prepared cups, filling them about two-thirds of the way full. This creates the perfect base for the cinnamon apples and ensures there’s enough mousse in each cup to balance the other layers.
Once the mousse layer is in place, spoon the cooled cinnamon apples over the mousse. Be generous with the apples—this layer adds both texture and flavor to the dessert. The tender apples, sweetened with cinnamon and brown sugar, complement the creamy caramel mousse perfectly.
For the finishing touch, drizzle additional salted caramel sauce over the top of each cup. This not only enhances the flavor but also adds a beautiful glossy finish to each serving. You can use store-bought caramel sauce, or if you’ve made your own, now’s the time to drizzle it over the apples for an extra special touch.
Step 5: Chilling and Serving
Once your dessert cups are assembled, it’s time to let them chill. Cover the cups with lids and refrigerate them for at least 1 hour to allow the mousse to set and the flavors to meld together. The chilled dessert is perfectly creamy and refreshing, with all the layers coming together into one harmonious bite.
These dessert cups can be stored in the refrigerator for up to 3 days, making them a great option for meal prep or make-ahead desserts. Simply keep the cups covered, and they’ll stay fresh and delicious until you’re ready to serve them. When you’re ready to enjoy them, simply remove the lids and serve.
Notes
Add a Crunchy Topping:
For added texture and flavor, sprinkle chopped nuts—such as pecans, walnuts, or almonds—on top of the caramel apples. The crunch of the nuts complements the creamy mousse and adds a new layer of flavor.
Incorporate Chocolate:
If you’re a fan of chocolate, try swirling in some melted chocolate with the caramel mousse or drizzling chocolate sauce over the apples. Chocolate pairs wonderfully with caramel and will elevate the dessert.
Make it Adult-Only:
For an adult twist, add a splash of bourbon or apple liqueur to the cinnamon apples or the caramel sauce. The alcohol adds a rich depth of flavor and pairs beautifully with the caramel and apples.
Spice it Up:
Experiment with different spices to enhance the apple layer. Nutmeg, allspice, or cardamom can add complexity and warmth to the cinnamon apples.
Use Different Caramel Sauces:
If you prefer a different flavor profile, try making your own caramel sauce with a touch of maple syrup for a unique, maple-infused caramel flavor. Or, go for a spicier version by adding a pinch of cayenne pepper to the caramel sauce for a hint of heat.
Whether you’re hosting a fall gathering, attending a family potluck, or simply craving a taste of autumn, Caramel Apple Dessert Cups are the perfect dessert to add to your repertoire. They are portable, easy to serve, and packed with all the flavors you love about fall. Let’s dive into the details of this recipe, including a step-by-step guide on how to make them, tips on ingredient substitutions, and ideas for variations that will make these dessert cups uniquely yours.
Ingredients: A Flavorful Symphony of Fall
The beauty of Caramel Apple Dessert Cups lies in their simplicity. With just a handful of ingredients, you can create a dessert that is both comforting and sophisticated. Let’s take a closer look at each ingredient that makes these dessert cups so irresistible.
Cinnamon Apples
- 4 cups apples, peeled and chopped (choose a balance of sweet and tart apples like Granny Smith, Honeycrisp, or Fuji)
- ½ cup light brown sugar
- 1 tsp ground cinnamon
The apples are the heart of this dessert, offering a soft and tender texture that contrasts beautifully with the rich mousse and crunchy crust. You’ll want to choose apples that hold up well to cooking, like Granny Smith, which provides a tart contrast to the sweet caramel, or Honeycrisp, which has a perfect balance of sweetness and crispness. The cinnamon and brown sugar will infuse the apples with a warm, aromatic flavor that captures the essence of autumn.
Caramel Apple Dessert Cups
- 2 cups vanilla wafer crumbs
- ¼ cup salted or unsalted butter, melted
- 1 package instant vanilla pudding mix (3.4 ounces)
- 1 cup milk
- ⅓ cup salted caramel sauce (store-bought or homemade)
- 1½ cups heavy cream
- Additional caramel sauce for garnish
The base of the dessert consists of a buttery vanilla wafer crust, which provides a crunchy, slightly sweet contrast to the smooth mousse. The salted caramel sauce adds richness and depth to the pudding, giving it that signature caramel flavor without being overly sweet. The heavy cream is whipped into the pudding, turning it into a mousse-like consistency that’s light and airy, yet creamy and indulgent.
Equipment
- 28 2-ounce plastic cups with lids (for portability and easy serving)
- Electric hand mixer (for whipping the mousse to perfection)
Step-by-Step Instructions: Crafting Your Perfect Dessert Cups
Now that we’ve gone over the ingredients, it’s time to roll up your sleeves and get to work. This recipe is simple but requires a bit of attention to detail to ensure that each layer is perfectly crafted. Let’s break down each step of the process, from preparing the cinnamon apples to assembling the dessert cups.
Step 1: Preparing the Cinnamon Apples
The cinnamon apples are the first layer you’ll need to prepare. These apples provide the warm, spiced flavor that’s the foundation of the entire dessert. Start by peeling and chopping the apples into small, uniform pieces. Try to cut them into chunks that are no larger than ½-inch cubes—this will ensure that they cook evenly and fit nicely in the cups.
Next, place the chopped apples in a medium saucepan. Add the brown sugar and ground cinnamon to the apples and stir well to coat them evenly in the sugar and spice. Cook the mixture over medium heat, stirring occasionally, until the apples have softened and the syrup has thickened. This should take about 8–10 minutes. The apples should be tender, but not mushy, and the syrup should have a slightly sticky consistency. Once done, set the apples aside to cool. Cooling the apples is crucial, as it prevents them from making the mousse runny when you assemble the cups.
Step 2: Making the Vanilla Wafer Crust
The crust is made from crushed vanilla wafer cookies, which offer a buttery, slightly sweet crunch that contrasts beautifully with the creamy mousse. Start by crushing the vanilla wafer cookies into fine crumbs. You can do this by placing the cookies in a zip-top bag and using a rolling pin to crush them, or you can pulse them in a food processor until they reach a fine crumb texture.
In a mixing bowl, combine the crushed wafer crumbs with melted butter. Stir until the mixture resembles wet sand. The butter helps to bind the crumbs together, ensuring that your crust holds its shape. Using a small cookie scoop, portion the crumb mixture into the bottoms of 28 2-ounce plastic cups. Use the back of another plastic cup or a spoon to press the crumbs down firmly to create a compact, even layer.
Step 3: Making the Salted Caramel Mousse
The salted caramel mousse is the star of this dessert, adding a creamy, indulgent layer that pairs perfectly with the apples. Begin by making the pudding base. In a large mixing bowl, whisk together the instant vanilla pudding mix and milk. The pudding mix should dissolve completely in the milk, creating a smooth mixture. Chill this mixture in the refrigerator for 5 minutes to allow it to set slightly.
Once the pudding has thickened, add the salted caramel sauce to the pudding mixture. Use an electric hand mixer on medium speed to blend the caramel sauce into the pudding until smooth and well-combined. This adds a deep, rich flavor to the pudding, turning it into a luxurious mousse. If you prefer, you can also make your own salted caramel sauce at home using sugar, butter, and heavy cream, but store-bought sauce works just as well for convenience.
Next, pour the heavy cream into the pudding mixture. Using the hand mixer, whip the mixture on medium-high speed for about 3–5 minutes, or until it thickens and becomes light and airy. The whipped cream helps to lighten the texture of the mousse, giving it that melt-in-your-mouth consistency. Be careful not to over-whip the mixture, as this can cause it to become too stiff.
Step 4: Assembling the Dessert Cups
Now comes the fun part—assembling your dessert cups! Start by transferring the caramel mousse into a large piping bag. If you don’t have a piping bag, you can also use a plastic zip-top bag with the corner snipped off. Pipe the mousse into the prepared cups, filling them about two-thirds of the way full. This creates the perfect base for the cinnamon apples and ensures there’s enough mousse in each cup to balance the other layers.
Once the mousse layer is in place, spoon the cooled cinnamon apples over the mousse. Be generous with the apples—this layer adds both texture and flavor to the dessert. The tender apples, sweetened with cinnamon and brown sugar, complement the creamy caramel mousse perfectly.
For the finishing touch, drizzle additional salted caramel sauce over the top of each cup. This not only enhances the flavor but also adds a beautiful glossy finish to each serving. You can use store-bought caramel sauce, or if you’ve made your own, now’s the time to drizzle it over the apples for an extra special touch.
Step 5: Chilling and Serving
Once your dessert cups are assembled, it’s time to let them chill. Cover the cups with lids and refrigerate them for at least 1 hour to allow the mousse to set and the flavors to meld together. The chilled dessert is perfectly creamy and refreshing, with all the layers coming together into one harmonious bite.
These dessert cups can be stored in the refrigerator for up to 3 days, making them a great option for meal prep or make-ahead desserts. Simply keep the cups covered, and they’ll stay fresh and delicious until you’re ready to serve them. When you’re ready to enjoy them, simply remove the lids and serve.
Why These Dessert Cups Are a Fall Favorite
Caramel Apple Dessert Cups are the perfect representation of autumn. They combine all the best flavors of the season—cinnamon, caramel, and apples—into a portable, easy-to-serve treat that’s sure to impress. But beyond their amazing taste, they also offer a lot of versatility. Whether you’re making them for a special occasion or a cozy weeknight treat, you can customize them to suit your preferences.
The beauty of this recipe lies in its simplicity. The no-bake nature of the dessert makes it easy to whip up, even on busy days when you don’t want to spend hours in the kitchen. Plus, the individual cups make it easy to serve and store, so you can enjoy them at your leisure.
Variations and Tips for Customizing Your Caramel Apple Dessert Cups
While this recipe is already a crowd-pleaser, there’s plenty of room for creativity. Here are a few variations and tips to take your Caramel Apple Dessert Cups to the next level:
Add a Crunchy Topping:
For added texture and flavor, sprinkle chopped nuts—such as pecans, walnuts, or almonds—on top of the caramel apples. The crunch of the nuts complements the creamy mousse and adds a new layer of flavor.
Incorporate Chocolate:
If you’re a fan of chocolate, try swirling in some melted chocolate with the caramel mousse or drizzling chocolate sauce over the apples. Chocolate pairs wonderfully with caramel and will elevate the dessert.
Make it Adult-Only:
For an adult twist, add a splash of bourbon or apple liqueur to the cinnamon apples or the caramel sauce. The alcohol adds a rich depth of flavor and pairs beautifully with the caramel and apples.
Spice it Up:
Experiment with different spices to enhance the apple layer. Nutmeg, allspice, or cardamom can add complexity and warmth to the cinnamon apples.
Use Different Caramel Sauces:
If you prefer a different flavor profile, try making your own caramel sauce with a touch of maple syrup for a unique, maple-infused caramel flavor. Or, go for a spicier version by adding a pinch of cayenne pepper to the caramel sauce for a hint of heat.

Conclusion: A Sweet Way to Celebrate Fall
Caramel Apple Dessert Cups are more than just a dessert—they’re a celebration of the flavors that make fall so special. The combination of sweet cinnamon apples, creamy caramel mousse, and buttery vanilla wafer crust creates a dessert that’s both comforting and indulgent. Whether you’re serving them at a holiday gathering, a family dinner, or as a sweet treat for yourself, these dessert cups are sure to become a favorite in your fall dessert rotation.
With their simple ingredients and easy preparation, these Caramel Apple Dessert Cups offer a delightful way to indulge in the best flavors of autumn, all in a portable, single-serving form. Try them today, and bring the warmth and richness of the season to your table in every bite.


