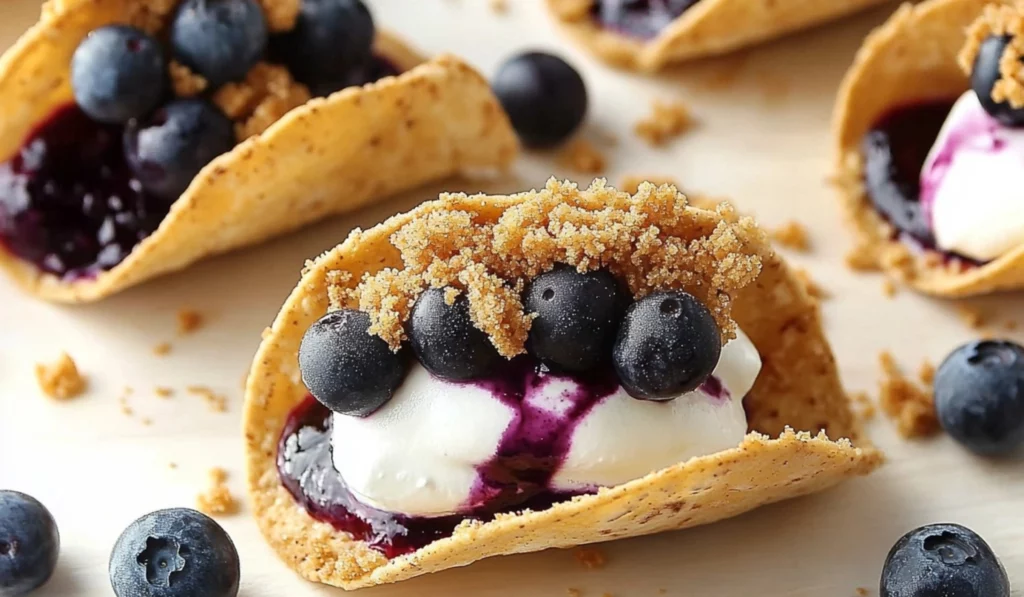
If you’re on the hunt for a dessert that’s as fun to make as it is to eat, look no further than Blueberry Cheesecake Tacos. Imagine a crispy, crunchy taco shell filled with a creamy, smooth cheesecake filling and topped with a sweet and tangy homemade blueberry sauce. This dessert takes all the best elements of a classic cheesecake and wraps it up in a fun, bite-sized taco shape. It’s the perfect treat to bring to a party, serve for a family gathering, or just indulge in when you’re craving something sweet yet easy to make.
Blueberry Cheesecake Tacos: A Fun and Delicious Treat for Beginners
Looking for a dessert that’s easy, delicious, and fun? Blueberry Cheesecake Tacos are the answer! With crunchy taco shells filled with creamy cheesecake and topped with homemade blueberry sauce, this treat is perfect for any occasion. I stumbled upon this recipe one afternoon, and it quickly became a crowd favorite. In just 30 minutes, you can enjoy these irresistible, beginner-friendly tacos that combine the indulgence of cheesecake with the excitement of tacos. Perfect for parties, family gatherings, or a sweet treat any day!
- Prep Time: 20 minutes
- Cook Time: 10 minutes
- Total Time: 30 minutes
- Yield: 24 tacos 1x
- Category: Dessert
- Method: Baking, Stovetop
- Cuisine: American, Mexican
- Diet: Vegetarian
Ingredients
For the Taco Shells:
- 6 large 8-inch tortillas (yields about 24–30 taco shells)
- 1 cup graham cracker crumbs
- 1/2 teaspoon cinnamon
- 1/4 cup melted butter
For the Cheesecake Filling:
- 1 cup heavy cream
- 1 cup cream cheese (softened)
- 1 teaspoon lemon zest
- 1 teaspoon vanilla extract
- 1/4 cup powdered sugar
For the Homemade Blueberry Sauce (yields about 1 cup of sauce):
- 1/2 cup granulated sugar
- 2 cups fresh or frozen blueberries (about 8 oz)
- 5 tablespoons warm water
- 1 tablespoon lemon juice (optional, but recommended)
- 3 tablespoons cornstarch
Instructions
Step 1: Prepare the Taco Shells
Start by preheating your oven to 400°F (200°C). It’s important to make sure your oven is fully preheated before you begin baking the shells so they cook evenly.
In a medium-sized bowl, combine the graham cracker crumbs and cinnamon. This will be the coating for the tortilla rounds. Set this mixture aside, as you’ll need it in a few minutes.
Take your 6 tortillas and use a cookie cutter to cut 4-5 rounds from each tortilla. You should end up with about 24-30 taco shells, depending on the size of your cookie cutter. The rounds should be just big enough to fit into the muffin cups and form a taco shape.
Melt the butter in the microwave or on the stovetop. Dip each tortilla round into the melted butter and then coat it in the graham cracker mixture. Make sure each round is evenly coated for a crispy, flavorful crust. The butter helps the graham cracker crumbs stick to the tortilla and creates that golden, crunchy texture once baked.
Step 2: Bake the Taco Shells
Take a muffin tin and flip it upside down. Carefully place each tortilla round between the muffin cups so the edges of the tortillas hang slightly over the side of the cup. This will allow them to form the taco shape while they bake.
Bake the taco shells in the preheated oven for about 10 minutes, or until they turn golden brown and crispy. Keep an eye on them, especially towards the end of the baking time, to ensure they don’t burn. Once they’re done, let them cool in the muffin tin for a few minutes before gently removing them. If you leave them in the tin for too long, they may become difficult to remove without breaking.
Step 3: Make the Homemade Blueberry Sauce
While your taco shells are cooling, it’s time to make the homemade blueberry sauce. This sauce is easy to make, and the fresh blueberries give it a vibrant, natural flavor.
In a small bowl, whisk together the warm water, lemon juice (if using), and cornstarch. Set it aside for later.
In a small saucepan over medium-low heat, combine the blueberries and sugar. Stir the mixture occasionally for about 4-5 minutes, until the blueberries start to break apart and release their juice.
Once the blueberries have softened, add the cornstarch mixture to the saucepan. Stir everything together and let it simmer for about 3 more minutes until the sauce thickens. The cornstarch helps to create a smooth, syrupy consistency. Once the sauce has thickened, remove it from the heat and let it cool to room temperature.
Step 4: Prepare the Cheesecake Filling
Now it’s time to make the cheesecake filling! This step is quick and easy, but the results are creamy and delicious.
In a large mixing bowl, beat the softened cream cheese, heavy cream, powdered sugar, lemon zest, and vanilla extract using a hand mixer or stand mixer. Mix on medium speed for about 2 minutes until the filling becomes thick and smooth. If you don’t have a mixer, you can use a whisk, but be prepared for a little more elbow grease.
Once the cheesecake filling is ready, place it in the refrigerator to chill for about 30 minutes. This will help the filling firm up and make it easier to pipe into the taco shells later on.
Step 5: Assemble the Blueberry Cheesecake Tacos
The final step is the most fun! Once your taco shells are cool, the cheesecake filling is chilled, and the blueberry sauce has cooled to room temperature, it’s time to assemble the tacos.
Transfer the chilled cheesecake filling into a piping bag or a plastic sandwich bag with the tip cut off. This will make filling the taco shells easy and mess-free.
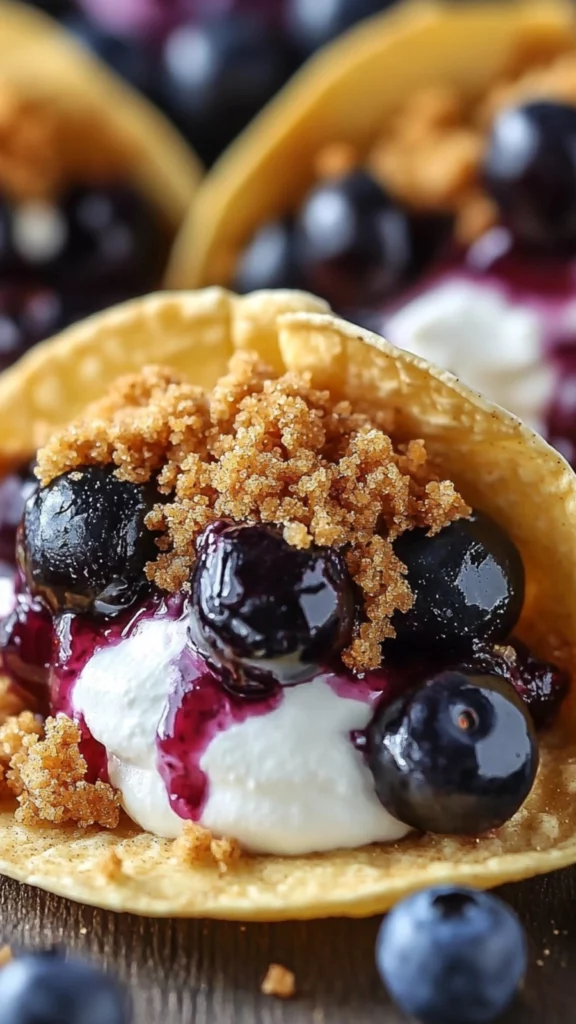
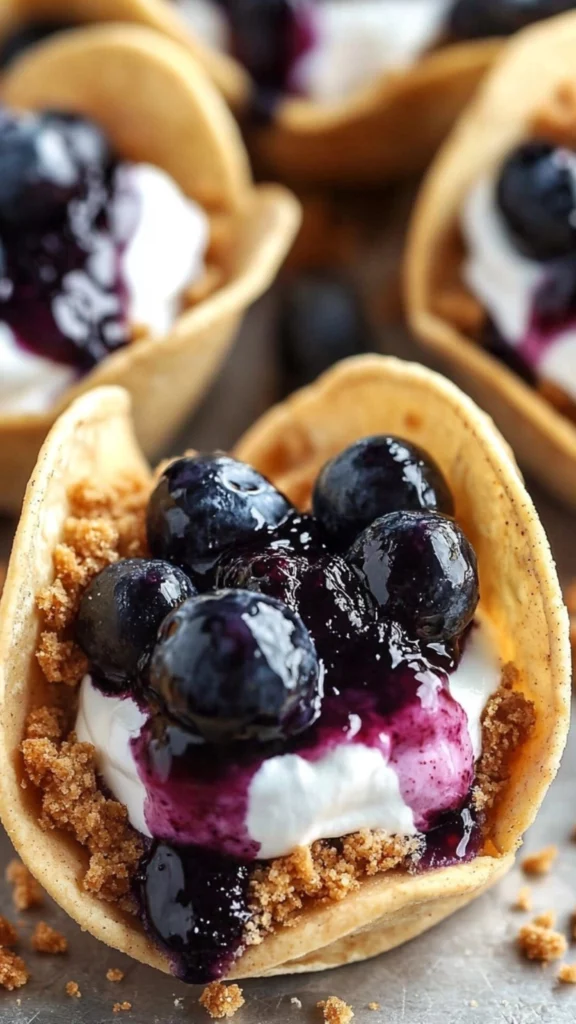
Pipe the cheesecake filling into each taco shell, being generous but not overfilling. Top each filled taco with a spoonful of blueberry sauce. If you’re using homemade blueberry sauce, a teaspoon or two per taco is plenty. For a final touch, sprinkle extra graham cracker crumbs over the top for added crunch and flavor.
Notes
Tip 1: Watch the Taco Shells Carefully Taco shells can go from perfectly crispy to overdone quickly, so be sure to check on them during baking. If they get too crispy, they can break when you try to fill them.
Tip 2: Get the Cheesecake Filling Just Right If your cheesecake filling is too thin or runny, you may not be able to pipe it into the taco shells effectively. Make sure your cream cheese is softened before mixing it with the other ingredients, and don’t skip the chilling step. A few minutes in the fridge will help it firm up.
Tip 3: Use Canned Filling for Convenience If you don’t have time to make the homemade blueberry sauce, using canned blueberry pie filling is a great shortcut. It’s sweet, thick, and saves time, making this dessert even quicker to prepare.
I first stumbled upon this dessert when I was trying to come up with something unique yet simple for a gathering. I was tired of making the usual cakes and cookies, so I wanted something that felt both fresh and exciting. That’s when I discovered Blueberry Cheesecake Tacos. From the moment I assembled the first taco, I knew I had found a winner. And now, I’m excited to share this recipe with you, hoping it becomes a new favorite in your dessert repertoire!
What makes this dessert especially appealing to beginner cooks is its simplicity. The entire recipe can be made in about 30 minutes, and it doesn’t require any fancy kitchen tools or complicated techniques. With just a few ingredients and easy steps, you can create a dessert that looks and tastes like you’ve spent hours in the kitchen. Let’s break it down so you can confidently make this delicious treat at home.
Ingredients and Preparation
Before jumping into the steps, let’s go over the ingredients. There are three key components to this dessert: the taco shells, the cheesecake filling, and the blueberry sauce. I’ll walk you through what you need for each part and offer some substitution ideas in case you don’t have everything on hand.
For the Taco Shells:
- 6 large 8-inch tortillas (yields about 24-30 taco shells)
- 1 cup graham cracker crumbs
- 1/2 teaspoon cinnamon
- 1/4 cup melted butter
These ingredients are easy to find at any grocery store, and they create the crispy taco shells that hold the cheesecake filling. If you don’t have graham cracker crumbs, you can substitute with crushed-up vanilla wafer cookies or digestive biscuits. The cinnamon adds a subtle warmth to the crust, but you could easily leave it out or experiment with other spices, such as nutmeg or allspice, if you prefer a different flavor.
For the Cheesecake Filling:
- 1 cup heavy cream
- 1 cup cream cheese (softened)
- 1 teaspoon lemon zest
- 1 teaspoon vanilla extract
- 1/4 cup powdered sugar
This simple cheesecake filling is light, fluffy, and perfectly sweet. If you prefer a lighter version, you can substitute half of the heavy cream with Greek yogurt or use a lower-fat cream cheese. The lemon zest brings a refreshing citrus flavor that balances the richness of the cream cheese. Vanilla extract is essential for flavor depth, but you can also try using almond extract for a unique twist.
For the Homemade Blueberry Sauce (yields about 1 cup of sauce):
- 1/2 cup granulated sugar
- 2 cups fresh or frozen blueberries (about 8 oz)
- 5 tablespoons warm water
- 1 tablespoon lemon juice (optional, but recommended)
- 3 tablespoons cornstarch
Fresh blueberries work best, but frozen blueberries will do just fine, especially if they’re not in season. The lemon juice in the sauce isn’t mandatory, but it really enhances the flavor, so I highly recommend using it if possible. If you’re short on time or don’t want to make the sauce from scratch, you can use canned blueberry pie filling instead. It’s a quick shortcut that still tastes great!
Step-by-Step Instructions
Now that we’ve gone over the ingredients, let’s walk through the steps to create these delightful Blueberry Cheesecake Tacos. Don’t worry—each step is easy to follow, and I’ve included tips along the way to make the process as smooth as possible for beginner cooks.
Step 1: Prepare the Taco Shells
Start by preheating your oven to 400°F (200°C). It’s important to make sure your oven is fully preheated before you begin baking the shells so they cook evenly.
In a medium-sized bowl, combine the graham cracker crumbs and cinnamon. This will be the coating for the tortilla rounds. Set this mixture aside, as you’ll need it in a few minutes.
Take your 6 tortillas and use a cookie cutter to cut 4-5 rounds from each tortilla. You should end up with about 24-30 taco shells, depending on the size of your cookie cutter. The rounds should be just big enough to fit into the muffin cups and form a taco shape.
Melt the butter in the microwave or on the stovetop. Dip each tortilla round into the melted butter and then coat it in the graham cracker mixture. Make sure each round is evenly coated for a crispy, flavorful crust. The butter helps the graham cracker crumbs stick to the tortilla and creates that golden, crunchy texture once baked.
Step 2: Bake the Taco Shells
Take a muffin tin and flip it upside down. Carefully place each tortilla round between the muffin cups so the edges of the tortillas hang slightly over the side of the cup. This will allow them to form the taco shape while they bake.
Bake the taco shells in the preheated oven for about 10 minutes, or until they turn golden brown and crispy. Keep an eye on them, especially towards the end of the baking time, to ensure they don’t burn. Once they’re done, let them cool in the muffin tin for a few minutes before gently removing them. If you leave them in the tin for too long, they may become difficult to remove without breaking.
Step 3: Make the Homemade Blueberry Sauce
While your taco shells are cooling, it’s time to make the homemade blueberry sauce. This sauce is easy to make, and the fresh blueberries give it a vibrant, natural flavor.
In a small bowl, whisk together the warm water, lemon juice (if using), and cornstarch. Set it aside for later.
In a small saucepan over medium-low heat, combine the blueberries and sugar. Stir the mixture occasionally for about 4-5 minutes, until the blueberries start to break apart and release their juice.
Once the blueberries have softened, add the cornstarch mixture to the saucepan. Stir everything together and let it simmer for about 3 more minutes until the sauce thickens. The cornstarch helps to create a smooth, syrupy consistency. Once the sauce has thickened, remove it from the heat and let it cool to room temperature.
Step 4: Prepare the Cheesecake Filling
Now it’s time to make the cheesecake filling! This step is quick and easy, but the results are creamy and delicious.
In a large mixing bowl, beat the softened cream cheese, heavy cream, powdered sugar, lemon zest, and vanilla extract using a hand mixer or stand mixer. Mix on medium speed for about 2 minutes until the filling becomes thick and smooth. If you don’t have a mixer, you can use a whisk, but be prepared for a little more elbow grease.
Once the cheesecake filling is ready, place it in the refrigerator to chill for about 30 minutes. This will help the filling firm up and make it easier to pipe into the taco shells later on.
Step 5: Assemble the Blueberry Cheesecake Tacos
The final step is the most fun! Once your taco shells are cool, the cheesecake filling is chilled, and the blueberry sauce has cooled to room temperature, it’s time to assemble the tacos.
Transfer the chilled cheesecake filling into a piping bag or a plastic sandwich bag with the tip cut off. This will make filling the taco shells easy and mess-free.
Pipe the cheesecake filling into each taco shell, being generous but not overfilling. Top each filled taco with a spoonful of blueberry sauce. If you’re using homemade blueberry sauce, a teaspoon or two per taco is plenty. For a final touch, sprinkle extra graham cracker crumbs over the top for added crunch and flavor.
Beginner Tips and Notes
Making Blueberry Cheesecake Tacos is straightforward, but here are a few tips to help you along the way:
Tip 1: Watch the Taco Shells Carefully Taco shells can go from perfectly crispy to overdone quickly, so be sure to check on them during baking. If they get too crispy, they can break when you try to fill them.
Tip 2: Get the Cheesecake Filling Just Right If your cheesecake filling is too thin or runny, you may not be able to pipe it into the taco shells effectively. Make sure your cream cheese is softened before mixing it with the other ingredients, and don’t skip the chilling step. A few minutes in the fridge will help it firm up.
Tip 3: Use Canned Filling for Convenience If you don’t have time to make the homemade blueberry sauce, using canned blueberry pie filling is a great shortcut. It’s sweet, thick, and saves time, making this dessert even quicker to prepare.
Serving Suggestions
Blueberry Cheesecake Tacos are delicious on their own, but you can elevate the dish by adding some complementary sides or toppings. Here are a few ideas:
- Fresh Whipped Cream: Add a dollop of freshly whipped cream on top for extra creaminess.
- Ice Cream: Vanilla ice cream or blueberry sorbet would pair wonderfully with these tacos.
- Fruit Salad: A light fruit salad with fresh berries can balance the richness of the tacos.
Storage Tips for Leftovers: If you have any leftover tacos, store the taco shells separately from the cheesecake filling and blueberry sauce. This will prevent the shells from getting soggy. The cheesecake filling and blueberry sauce can be refrigerated for up to 2 days.
Conclusion
Blueberry Cheesecake Tacos are a fun, easy-to-make dessert that’s perfect for beginner cooks. With their crispy taco shells, creamy cheesecake filling, and sweet blueberry topping, they’re sure to impress anyone who tries them. Whether you’re making them for a special occasion or just as a sweet treat for yourself, these tacos are sure to become a go-to recipe. Don’t forget to share your results in the comments—let me know how your tacos turn out, and feel free to make any creative substitutions. Enjoy!


