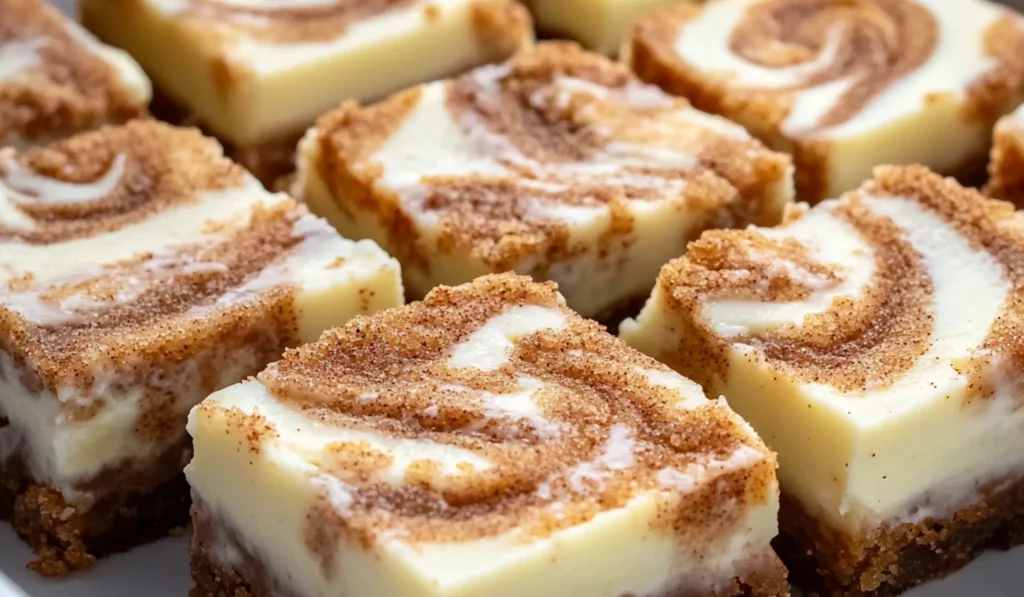
There’s something magical about cinnamon rolls, and when you pair them with cheesecake, you’ve created a dessert masterpiece. The swirls of cinnamon in a creamy, velvety cheesecake filling, all sitting atop a crunchy graham cracker crust — it’s the ultimate dessert experience. Whether you’re baking for a special occasion, a family gathering, or simply treating yourself, these Blender Cinnamon Roll Cheesecake Bars are the perfect blend of indulgent and simple.

Blender Cinnamon Roll Cheesecake Bars: A Sweet Twist on Classic Cheesecake
Blender Cinnamon Roll Cheesecake Bars combine the best of both worlds: the warm, cozy flavors of cinnamon rolls and the creamy richness of cheesecake. This simple and beginner-friendly recipe uses a blender to easily create a dessert that looks and tastes like it took hours to prepare. Perfect for those who love indulgent treats without the hassle, these cheesecake bars are a quick, delicious way to satisfy your sweet cravings!
- Prep Time: 15 minutes
- Cook Time: 45 minutes
- Total Time: 1 hour
- Yield: 12 servings 1x
- Category: Dessert
- Method: Bake, Blend
- Cuisine: American
- Diet: Vegetarian
Ingredients
For the Crust:
- 1.5 cups graham cracker crumbs: These will form the base of your bars. They provide a perfect crunchy contrast to the smooth cheesecake.
- 1/4 cup brown sugar: Brown sugar adds a hint of molasses flavor that enhances the depth of your crust.
- 6 tablespoons melted butter: This binds everything together and gives the crust that buttery, rich flavor.
- 1 teaspoon cinnamon: Cinnamon is the key flavor that ties everything together, making the crust complement the cinnamon swirl inside the cheesecake filling.
For the Cheesecake Filling:
- 16 ounces (2 packages) cream cheese: The main ingredient for the filling, softened to room temperature for easy blending.
- 1/2 cup sour cream: Adds creaminess and a slight tang to balance out the sweetness of the cheesecake.
- 2/3 cup sugar: Sweetens the cheesecake filling, balancing the cinnamon spice and richness of the cream cheese.
- 2 large eggs: Eggs help bind the ingredients together and create a smooth, set cheesecake filling.
- 1 tablespoon vanilla extract: Enhances the flavor of the cheesecake and provides a fragrant, sweet aroma.
For the Cinnamon Swirl:
- 6 tablespoons melted butter: This will create the cinnamon swirl, adding to the decadent flavor of the cheesecake.
- 1 cup dark brown sugar: The sugar forms the rich base of the swirl, which will create that signature gooey texture when baked.
- 1 teaspoon cinnamon: Cinnamon is the highlight of the swirl, giving it that familiar flavor from classic cinnamon rolls.
- 1/4 cup flour: This helps thicken the swirl mixture, giving it the right consistency for easy spreading.
Instructions
Step 1: Preheat the Oven Preheat your oven to 350°F. This ensures the temperature is just right for baking the crust.
Step 2: Make the Crust In a large bowl, combine graham cracker crumbs, brown sugar, melted butter, and cinnamon. Mix well until the mixture resembles wet sand. Press this mixture into the bottom of an 8×8-inch baking dish, making sure it’s even and well-packed. Bake this crust for 8 minutes. This will help it set and hold its shape. Let it cool for a few minutes while you prepare the cheesecake filling.
Step 3: Lower the Oven Temperature After the crust is done baking, lower the oven temperature to 325°F. This ensures that the cheesecake filling bakes at the perfect temperature and doesn’t overcook.
Step 4: Blend the Cheesecake Filling In your blender, combine the softened cream cheese, sugar, and vanilla extract. Blend on medium-high speed until smooth and creamy. Add the sour cream and blend again until fully incorporated. Next, add the eggs one at a time, blending between each addition until fully mixed. You should have a smooth, velvety filling by the time you’re done.
Step 5: Make the Cinnamon Swirl In a small bowl, whisk together the melted butter, brown sugar, cinnamon, and flour until smooth. The mixture should be thick enough to spread but not too stiff. This will be used to create that signature cinnamon swirl.
Step 6: Assemble the Cheesecake Bars Pour half of the cheesecake filling over the cooled graham cracker crust. Then, drop spoonfuls of the cinnamon swirl mixture over the filling. Use a knife or a skewer to gently swirl the cinnamon mixture into the cheesecake, creating a marbled effect. Repeat the process with the remaining cheesecake filling and cinnamon swirl. Don’t overmix — you want to see the cinnamon swirls clearly.
Step 7: Bake the Bars Bake at 325°F for 35-40 minutes. The cheesecake should be set around the edges, with a slight jiggle in the center. If the top of the cheesecake begins to brown too quickly, cover it loosely with aluminum foil to prevent burning. Once baked, remove it from the oven and let it cool at room temperature.
Step 8: Chill the Bars Once cooled, transfer the bars to the refrigerator and let them chill for at least 2 hours. This helps the cheesecake set properly and gives it time to firm up, making it easier to slice.
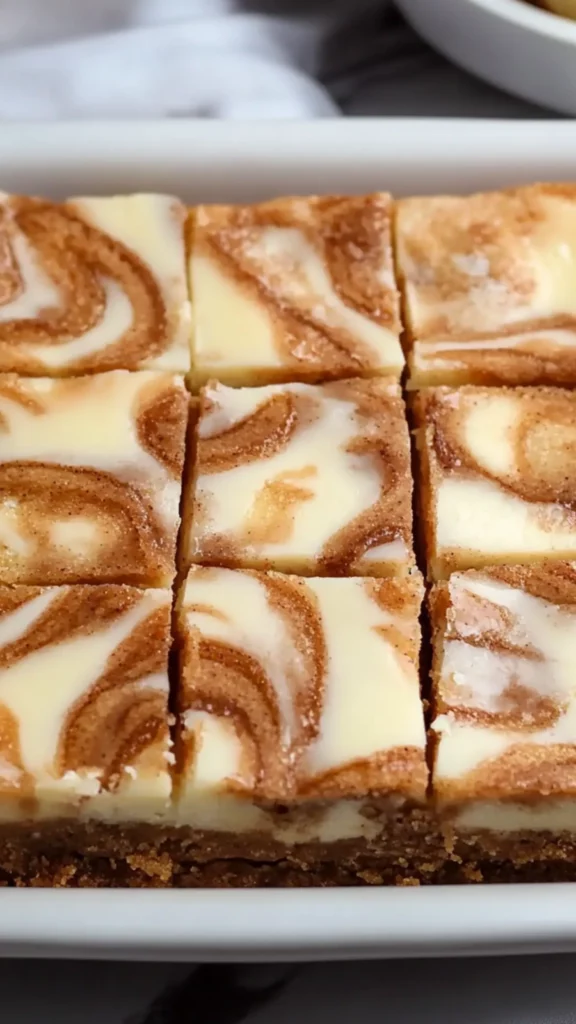
Step 9: Serve and Enjoy After chilling, dust the bars with powdered sugar and slice them into squares. The bars should be creamy, with a crunchy graham cracker crust, a silky cheesecake filling, and a beautiful cinnamon swirl throughout.
Notes
How to Tell When the Cheesecake Is Done: One of the most important things to keep in mind when making cheesecake is ensuring it’s perfectly baked without being overcooked. The cheesecake should be set around the edges but still slightly jiggly in the center. If you gently tap the pan, the middle should move slightly but not be liquid.
Preventing Cracks in Your Cheesecake: To minimize the chance of cracks, make sure your ingredients are all at room temperature before mixing. This helps create a smoother texture without over-mixing. Over-mixing can incorporate too much air into the batter, causing cracks as the cheesecake cools. Additionally, it’s a good idea to bake the cheesecake in a water bath if you’re looking for the ultimate crack-free cheesecake (though this is not necessary for this recipe).
Troubleshooting the Cinnamon Swirl: If your cinnamon swirl doesn’t come out as expected, don’t worry! The bars will still taste amazing. You can always adjust the swirling technique next time — just be gentle and create a marbled effect rather than fully mixing everything together. The swirl should remain visible and not fully blended.
One of the reasons this recipe is so special is how beginner-friendly it is. If you’re a novice baker, you’ll be thrilled to know that you don’t need complicated techniques or fancy tools to make these bars. The use of a blender for the cheesecake filling makes it incredibly easy to achieve that smooth, creamy texture that’s characteristic of a high-quality cheesecake. There’s no need for a mixer or a stand mixer — the blender does all the heavy lifting for you.
As someone who loves baking but doesn’t always have the time or energy for complex recipes, I can tell you that this dessert is an absolute lifesaver. It combines some of my favorite flavors — cinnamon rolls and cheesecake — while being straightforward enough for even a beginner baker to tackle. Not only will it save you time, but it will also impress anyone who has the pleasure of enjoying it. You’ll feel like a pro, even if this is one of your first attempts in the kitchen.
Why This Recipe is Perfect for Beginners
Baking can sometimes feel intimidating, but this recipe makes it approachable and enjoyable. It’s perfect for beginners because of the following reasons:
- Minimal Equipment: No need for specialized kitchen gadgets or equipment. A blender, baking dish, and a simple set of bowls are all you need. You don’t have to worry about a mixer or special tools — just follow the simple steps and let the ingredients do the work.
- Simple Steps: The recipe has clear, straightforward steps that break down the process into manageable tasks. Each step is designed with beginners in mind, so you won’t feel overwhelmed.
- Flexibility: If you don’t have a particular ingredient, there are easy substitutes that won’t compromise the flavor. This makes it accessible, even if you’re working with what you have in your pantry.
- Time-Efficient: Despite being a rich and decadent dessert, these cinnamon roll cheesecake bars come together fairly quickly. With a prep time of only about 15 minutes and a bake time of 35-40 minutes, it’s a dessert that won’t take up your whole day.
- Impressive Results: The beauty of this recipe is that it looks and tastes like something you’d find at a bakery or a high-end restaurant, yet it’s easy enough for someone new to baking to pull off. The layered texture, cinnamon swirl, and cheesecake filling all make this dessert visually appealing and delicious.
Ingredients and Preparation
For a recipe that’s simple yet indulgent, the ingredients are crucial. But don’t worry — this recipe uses common ingredients you likely already have in your kitchen. Here’s a rundown of everything you’ll need:
For the Crust:
- 1.5 cups graham cracker crumbs: These will form the base of your bars. They provide a perfect crunchy contrast to the smooth cheesecake.
- 1/4 cup brown sugar: Brown sugar adds a hint of molasses flavor that enhances the depth of your crust.
- 6 tablespoons melted butter: This binds everything together and gives the crust that buttery, rich flavor.
- 1 teaspoon cinnamon: Cinnamon is the key flavor that ties everything together, making the crust complement the cinnamon swirl inside the cheesecake filling.
For the Cheesecake Filling:
- 16 ounces (2 packages) cream cheese: The main ingredient for the filling, softened to room temperature for easy blending.
- 1/2 cup sour cream: Adds creaminess and a slight tang to balance out the sweetness of the cheesecake.
- 2/3 cup sugar: Sweetens the cheesecake filling, balancing the cinnamon spice and richness of the cream cheese.
- 2 large eggs: Eggs help bind the ingredients together and create a smooth, set cheesecake filling.
- 1 tablespoon vanilla extract: Enhances the flavor of the cheesecake and provides a fragrant, sweet aroma.
For the Cinnamon Swirl:
- 6 tablespoons melted butter: This will create the cinnamon swirl, adding to the decadent flavor of the cheesecake.
- 1 cup dark brown sugar: The sugar forms the rich base of the swirl, which will create that signature gooey texture when baked.
- 1 teaspoon cinnamon: Cinnamon is the highlight of the swirl, giving it that familiar flavor from classic cinnamon rolls.
- 1/4 cup flour: This helps thicken the swirl mixture, giving it the right consistency for easy spreading.
Step-by-Step Instructions
Now that we’ve covered the ingredients, it’s time to dive into the process of making these decadent bars. Follow these steps, and you’ll be enjoying your homemade cinnamon roll cheesecake bars in no time.
Step 1: Preheat the Oven Preheat your oven to 350°F. This ensures the temperature is just right for baking the crust.
Step 2: Make the Crust In a large bowl, combine graham cracker crumbs, brown sugar, melted butter, and cinnamon. Mix well until the mixture resembles wet sand. Press this mixture into the bottom of an 8×8-inch baking dish, making sure it’s even and well-packed. Bake this crust for 8 minutes. This will help it set and hold its shape. Let it cool for a few minutes while you prepare the cheesecake filling.
Step 3: Lower the Oven Temperature After the crust is done baking, lower the oven temperature to 325°F. This ensures that the cheesecake filling bakes at the perfect temperature and doesn’t overcook.
Step 4: Blend the Cheesecake Filling In your blender, combine the softened cream cheese, sugar, and vanilla extract. Blend on medium-high speed until smooth and creamy. Add the sour cream and blend again until fully incorporated. Next, add the eggs one at a time, blending between each addition until fully mixed. You should have a smooth, velvety filling by the time you’re done.
Step 5: Make the Cinnamon Swirl In a small bowl, whisk together the melted butter, brown sugar, cinnamon, and flour until smooth. The mixture should be thick enough to spread but not too stiff. This will be used to create that signature cinnamon swirl.
Step 6: Assemble the Cheesecake Bars Pour half of the cheesecake filling over the cooled graham cracker crust. Then, drop spoonfuls of the cinnamon swirl mixture over the filling. Use a knife or a skewer to gently swirl the cinnamon mixture into the cheesecake, creating a marbled effect. Repeat the process with the remaining cheesecake filling and cinnamon swirl. Don’t overmix — you want to see the cinnamon swirls clearly.
Step 7: Bake the Bars Bake at 325°F for 35-40 minutes. The cheesecake should be set around the edges, with a slight jiggle in the center. If the top of the cheesecake begins to brown too quickly, cover it loosely with aluminum foil to prevent burning. Once baked, remove it from the oven and let it cool at room temperature.
Step 8: Chill the Bars Once cooled, transfer the bars to the refrigerator and let them chill for at least 2 hours. This helps the cheesecake set properly and gives it time to firm up, making it easier to slice.
Step 9: Serve and Enjoy After chilling, dust the bars with powdered sugar and slice them into squares. The bars should be creamy, with a crunchy graham cracker crust, a silky cheesecake filling, and a beautiful cinnamon swirl throughout.
Beginner Tips and Notes
How to Tell When the Cheesecake Is Done: One of the most important things to keep in mind when making cheesecake is ensuring it’s perfectly baked without being overcooked. The cheesecake should be set around the edges but still slightly jiggly in the center. If you gently tap the pan, the middle should move slightly but not be liquid.
Preventing Cracks in Your Cheesecake: To minimize the chance of cracks, make sure your ingredients are all at room temperature before mixing. This helps create a smoother texture without over-mixing. Over-mixing can incorporate too much air into the batter, causing cracks as the cheesecake cools. Additionally, it’s a good idea to bake the cheesecake in a water bath if you’re looking for the ultimate crack-free cheesecake (though this is not necessary for this recipe).
Troubleshooting the Cinnamon Swirl: If your cinnamon swirl doesn’t come out as expected, don’t worry! The bars will still taste amazing. You can always adjust the swirling technique next time — just be gentle and create a marbled effect rather than fully mixing everything together. The swirl should remain visible and not fully blended.
Serving Suggestions
These bars are delicious on their own, but you can always elevate them with a few creative touches:
- Vanilla Ice Cream: A scoop of creamy vanilla ice cream pairs wonderfully with the cinnamon and cheesecake flavors.
- Fresh Berries: Fresh strawberries, raspberries, or blueberries provide a refreshing contrast to the richness of the bars.
- Caramel Sauce: Drizzle some homemade or store-bought caramel sauce over the bars for an added layer of sweetness.
- Coffee or Tea: The warm, comforting flavors of cinnamon and cheesecake go beautifully with a hot beverage. A strong cup of coffee or black tea would complement the sweetness of the bars perfectly.
Storing Leftovers
If you happen to have leftovers, you’re in luck! These bars store wonderfully in the fridge for up to 5 days. Simply cover them with plastic wrap or store them in an airtight container to keep them fresh. They also freeze well for up to 3 months. To freeze, wrap the bars tightly in plastic wrap and aluminum foil, then place them in a freezer-safe container. When you’re ready to enjoy, let them thaw in the fridge overnight before serving.
Conclusion
Blender Cinnamon Roll Cheesecake Bars are the perfect dessert for beginner bakers. They combine the comfort of a cinnamon roll with the decadence of a cheesecake, all in one easy-to-make treat. The best part is that it’s an approachable recipe that anyone can make — from seasoned bakers to those who have never stepped foot in the kitchen before. With simple ingredients, minimal equipment, and clear instructions, these bars are sure to become a favorite. Don’t forget to share your experience in the comments and tell us how your bars turned out. Happy baking!


