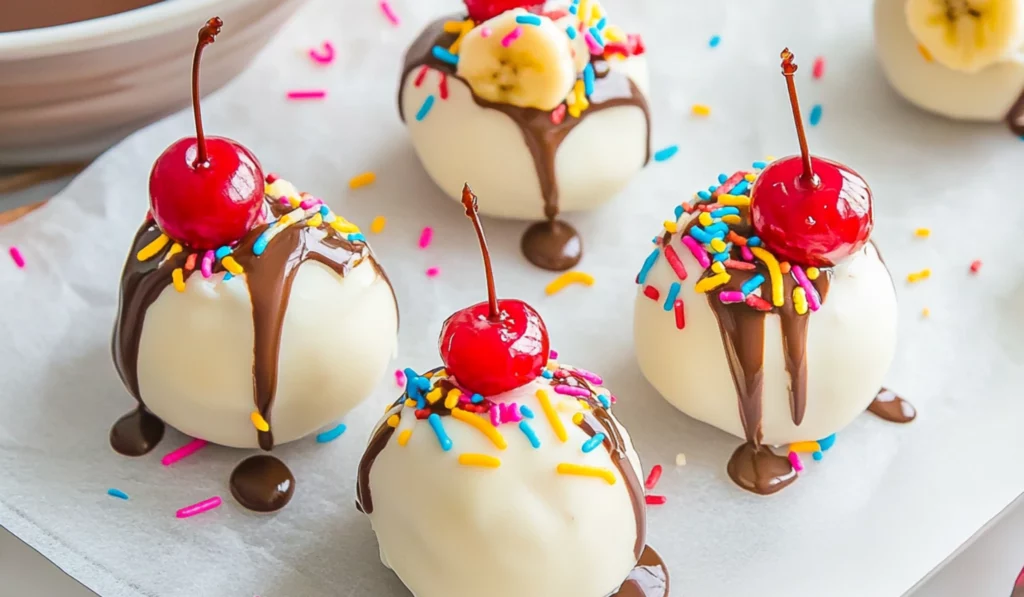
Banana splits have been a beloved dessert for generations. It’s that iconic treat with layers of creamy ice cream, rich chocolate syrup, whipped cream, and maraschino cherries that make every bite feel like a celebration. But what if you could turn that classic banana split into something bite-sized, easy to prepare, and even more delicious? Enter Banana Split Truffles, a perfect twist on the traditional dessert. These truffles encapsulate all the flavors of a banana split in a fun, bite-sized treat that’s perfect for any occasion. The best part? You don’t need a lot of experience in the kitchen to make them, making them an ideal choice for beginner cooks. Whether you’re planning a party, hosting a gathering, or just looking to make a simple but indulgent treat for yourself, Banana Split Truffles will never disappoint.
Banana Split Truffles: A Delicious Twist on a Classic Dessert
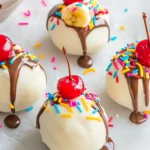
Craving a simple yet irresistible dessert? These Banana Split Truffles are a fun twist on the classic banana split, combining creamy cake, tangy pineapple, fresh banana, and crunchy walnuts, all coated in smooth chocolate. Perfect for beginner cooks, they’re easy to make, requiring just a few ingredients and some chill time. Whether for a party or a sweet treat at home, these truffles are sure to impress with minimal effort. Let’s dive into this delicious, no-fuss recipe!
- Prep Time: 25 minutes
- Cook Time: 2 hours
- Total Time: 2 hours 25 minutes
- Yield: 18 truffles 1x
- Category: Dessert
- Method: No-bake, chill, dip
- Cuisine: American
- Diet: Vegetarian
Ingredients
- 1 box (15.25 oz) white cake mix, heat-treated (see notes for instructions)
- 8 oz block of cream cheese, softened to room temperature
- 1 teaspoon vanilla extract
- ½ cup crushed pineapple, very well drained
- ¾ cup chopped walnuts
- 1 banana, sliced
- 8 oz white candy coating
- ½ cup chocolate melting wafers
- Rainbow sprinkles, for garnish
- Stemmed maraschino cherries, for garnish
Instructions
Step 1: Prepare the Cookie Sheet Start by lining a large cookie sheet with parchment paper. This will make it much easier to remove the truffles once they’ve chilled and set. Having parchment paper also prevents the truffles from sticking, which is essential when working with sticky candy coatings. Set the parchment-lined cookie sheet aside as you work on the truffle mixture.
Step 2: Cream the Cake Mix, Cream Cheese, and Vanilla In a medium-sized mixing bowl, combine the white cake mix, softened cream cheese, and vanilla extract. Using a hand mixer or a spoon, mix everything together until you achieve a dough-like consistency. The cream cheese should blend seamlessly with the cake mix, creating a soft and sticky dough. This will serve as the base for your truffles. Be sure to mix thoroughly, but don’t overmix. You want a smooth, dough-like texture, but not a dense one.
Step 3: Add the Pineapple, Walnuts, and Banana Now that the dough is ready, it’s time to incorporate the pineapple, walnuts, and banana. Stir the ingredients gently into the dough, ensuring that the pineapple is evenly distributed and the banana slices don’t break down too much. You want the fruit and nuts to be evenly mixed into the dough, providing the truffles with texture and flavor. Be gentle while mixing to preserve the integrity of the banana slices.
Step 4: Shape the Truffles Using a 1- to 1 ½-inch cookie scoop, scoop out the mixture and roll it into balls using the palms of your hands. This step can get a little messy, but it’s fun! Aim for truffles that are smooth and round. Once you’ve shaped all the truffles, place them on the prepared cookie sheet. You should get about 18 truffles from the mixture, depending on the size you prefer.
Step 5: Chill the Truffles Refrigerate the truffle balls for about 1 hour. This is an important step, as the chilling process will firm them up and make them easier to dip in chocolate. Don’t skip this step; it will ensure that your truffles hold their shape when you dip them later.
Step 6: Melt the Candy Coating While the truffles chill, it’s time to melt the candy coating. Place the white candy coating in a microwave-safe bowl. Microwave it on 50% power for 1 minute, then stir it thoroughly. Continue microwaving in 30-second intervals, stirring in between, until the coating is completely melted and smooth. The key here is to be patient and stir often to prevent overheating.
Step 7: Dip the Truffles Once the truffles have chilled, it’s time to dip them in the melted candy coating. Use two forks or a dipping tool to gently dip each truffle into the candy coating. Make sure each truffle is fully covered. Once coated, place the truffles back on the parchment paper to set. Repeat this step until all the truffles are coated. If you have leftover chocolate, feel free to drizzle it over the truffles for a decorative touch.
Step 8: Chill Again Once all the truffles are coated in the white chocolate, place the cookie sheet back in the refrigerator for 30 minutes or until the coating has set. This ensures that the chocolate coating is firm and the truffles are ready for the next step.
Step 9: Melt the Chocolate Melting Wafers For the finishing touch, melt the chocolate melting wafers. Follow the same process as you did for the white candy coating, microwaving in intervals and stirring until the chocolate is completely smooth.
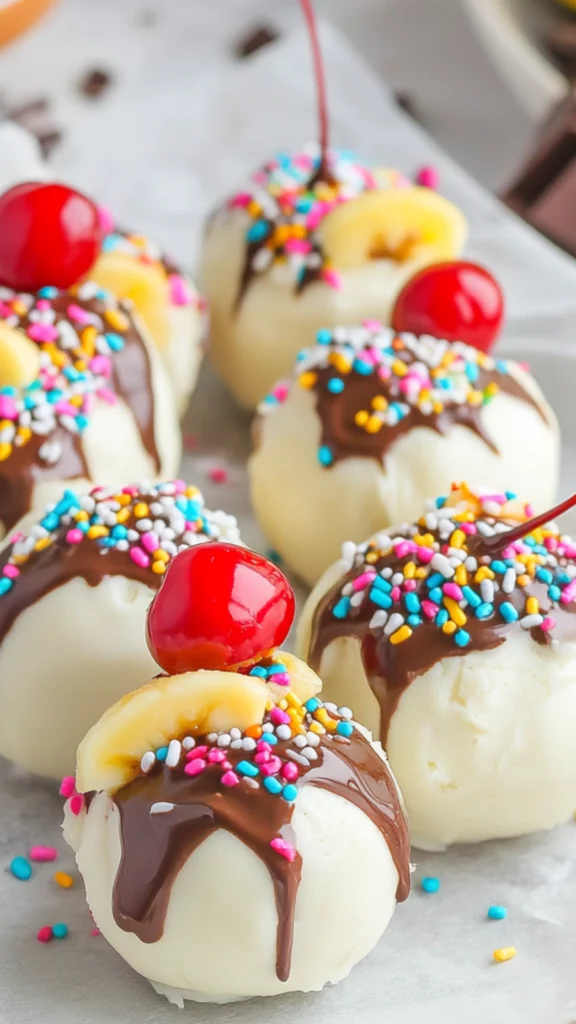
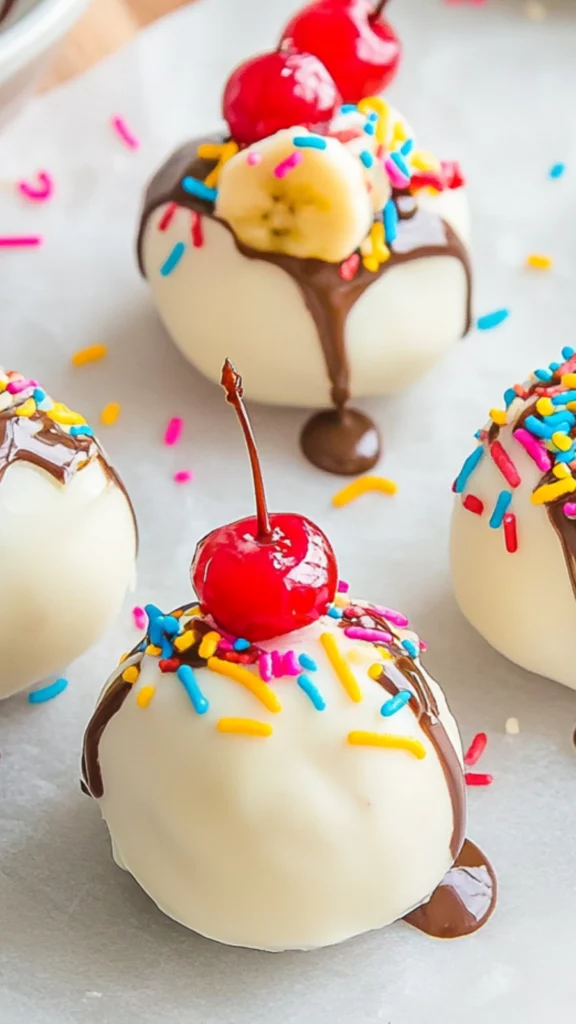
Step 10: Drizzle the “Chocolate Syrup” Once the chocolate melting wafers have melted, drizzle a small dollop over the top of each truffle to create the “chocolate syrup” effect. Immediately place a maraschino cherry on top and hold it in place for a few seconds until it firms up. Sprinkle each truffle with rainbow sprinkles to give them that fun, festive look.
Step 11: Final Chill Return the truffles to the refrigerator and allow them to chill for another 30 minutes. This ensures that the chocolate syrup topping sets and firms up, making the truffles easy to handle and perfect for serving.
Notes
- Chill Time is Key: Make sure to give the truffles plenty of time to chill. The chilling process helps the truffles set and firm up, making them easier to dip and handle.
- Preventing Banana Browning: To keep your bananas from browning too quickly, consider using ripe bananas just before mixing them into the dough. If you’re preparing them in advance, you can also toss the banana slices in a little lemon juice to slow down the browning process.
- Troubleshooting: If your truffles feel too sticky to roll, try refrigerating the mixture for a little longer to firm it up. Additionally, make sure your cake mix is heat-treated to avoid any food safety concerns when using it raw. If you’re unfamiliar with how to heat-treat cake mix, simply spread it out on a baking sheet and bake at 350°F for 5 minutes, then let it cool completely before using.
The combination of cake mix, cream cheese, and tropical fruits like pineapple and banana, all coated in smooth white chocolate and topped with a cherry, is sure to impress anyone who takes a bite. What’s even better is how simple and fast they are to prepare. They come together in just a few steps, and with minimal hands-on time, they’re a perfect way to get a homemade treat without feeling overwhelmed. These truffles are the ultimate party dessert, and they’ll quickly become a favorite in your dessert repertoire. As a beginner, you’ll love how easy it is to make them, and how flexible the recipe is when it comes to substitutions and personal preferences. Plus, the flavor combinations are truly nostalgic and indulgent—everything you love about a banana split, packed into a creamy, crunchy, bite-sized treat. So if you’re looking to impress your guests with a fun, decadent, and easy dessert, look no further than these Banana Split Truffles.
Ingredients and Preparation:
Before you dive into the fun part—making the truffles—let’s gather all the ingredients you’ll need. The ingredients list for these Banana Split Truffles is straightforward, featuring common items that you likely already have in your pantry or fridge. To make sure you get the perfect balance of flavors and textures, here’s the full ingredient list along with precise measurements:
Ingredients:
- 1 box (15.25 oz) white cake mix, heat-treated (see notes for instructions)
- 8 oz block of cream cheese, softened to room temperature
- 1 teaspoon vanilla extract
- ½ cup crushed pineapple, very well drained
- ¾ cup chopped walnuts
- 1 banana, sliced
- 8 oz white candy coating
- ½ cup chocolate melting wafers
- Rainbow sprinkles, for garnish
- Stemmed maraschino cherries, for garnish
This recipe makes about 18 truffles, which is plenty to share with family and friends or enjoy yourself over the course of a few days. While the recipe is straightforward, it’s important to follow the measurements and instructions closely to ensure the truffles turn out just right.
Ingredient Substitutions and Flexibility:
- White Cake Mix: While the recipe calls for white cake mix, you can experiment with other flavors of cake mix. If you prefer a slightly richer truffle, try using yellow cake mix or even a chocolate cake mix for a fun twist on flavor. The beauty of these truffles is their versatility, so don’t be afraid to make them your own by using flavors that appeal to you.
- Cream Cheese: Cream cheese gives the truffles a rich, creamy texture. If you want a slightly lighter option, you can swap regular cream cheese for reduced-fat cream cheese. Alternatively, for a tangy flavor and extra protein, you can substitute the cream cheese with Greek yogurt. Keep in mind that Greek yogurt will make the texture a bit lighter but still delicious.
- Pineapple: Crushed pineapple is a key component in this recipe because it provides the tropical flavor that’s synonymous with banana splits. However, if pineapple isn’t your thing or you don’t have it on hand, you can use other fruits like finely chopped mango or peaches. Be sure to drain the fruit well before adding it to the truffle mixture to avoid excess moisture.
- Banana: The banana is crucial for that authentic banana split flavor, but if bananas are out of season or you prefer a different taste, feel free to use mashed banana instead of slices. This will result in a smoother consistency throughout the truffles, but it still maintains that unmistakable banana flavor.
- White Candy Coating: White candy coating is often used for truffles because it melts easily and gives a smooth, glossy finish. However, if you prefer milk or dark chocolate, you can absolutely use those instead. Just be sure to adjust the melting process for each type of chocolate, as it may require a slightly different technique to achieve the smooth, glossy finish.
Step-by-Step Instructions:
Making these Banana Split Truffles is a simple, enjoyable process. Follow these easy-to-follow steps to create truffles that are perfect every time. If you’re a beginner cook, you’ll appreciate how straightforward the steps are, and the minimal hands-on time means you won’t be stuck in the kitchen for too long.
Step 1: Prepare the Cookie Sheet Start by lining a large cookie sheet with parchment paper. This will make it much easier to remove the truffles once they’ve chilled and set. Having parchment paper also prevents the truffles from sticking, which is essential when working with sticky candy coatings. Set the parchment-lined cookie sheet aside as you work on the truffle mixture.
Step 2: Cream the Cake Mix, Cream Cheese, and Vanilla In a medium-sized mixing bowl, combine the white cake mix, softened cream cheese, and vanilla extract. Using a hand mixer or a spoon, mix everything together until you achieve a dough-like consistency. The cream cheese should blend seamlessly with the cake mix, creating a soft and sticky dough. This will serve as the base for your truffles. Be sure to mix thoroughly, but don’t overmix. You want a smooth, dough-like texture, but not a dense one.
Step 3: Add the Pineapple, Walnuts, and Banana Now that the dough is ready, it’s time to incorporate the pineapple, walnuts, and banana. Stir the ingredients gently into the dough, ensuring that the pineapple is evenly distributed and the banana slices don’t break down too much. You want the fruit and nuts to be evenly mixed into the dough, providing the truffles with texture and flavor. Be gentle while mixing to preserve the integrity of the banana slices.
Step 4: Shape the Truffles Using a 1- to 1 ½-inch cookie scoop, scoop out the mixture and roll it into balls using the palms of your hands. This step can get a little messy, but it’s fun! Aim for truffles that are smooth and round. Once you’ve shaped all the truffles, place them on the prepared cookie sheet. You should get about 18 truffles from the mixture, depending on the size you prefer.
Step 5: Chill the Truffles Refrigerate the truffle balls for about 1 hour. This is an important step, as the chilling process will firm them up and make them easier to dip in chocolate. Don’t skip this step; it will ensure that your truffles hold their shape when you dip them later.
Step 6: Melt the Candy Coating While the truffles chill, it’s time to melt the candy coating. Place the white candy coating in a microwave-safe bowl. Microwave it on 50% power for 1 minute, then stir it thoroughly. Continue microwaving in 30-second intervals, stirring in between, until the coating is completely melted and smooth. The key here is to be patient and stir often to prevent overheating.
Step 7: Dip the Truffles Once the truffles have chilled, it’s time to dip them in the melted candy coating. Use two forks or a dipping tool to gently dip each truffle into the candy coating. Make sure each truffle is fully covered. Once coated, place the truffles back on the parchment paper to set. Repeat this step until all the truffles are coated. If you have leftover chocolate, feel free to drizzle it over the truffles for a decorative touch.
Step 8: Chill Again Once all the truffles are coated in the white chocolate, place the cookie sheet back in the refrigerator for 30 minutes or until the coating has set. This ensures that the chocolate coating is firm and the truffles are ready for the next step.
Step 9: Melt the Chocolate Melting Wafers For the finishing touch, melt the chocolate melting wafers. Follow the same process as you did for the white candy coating, microwaving in intervals and stirring until the chocolate is completely smooth.
Step 10: Drizzle the “Chocolate Syrup” Once the chocolate melting wafers have melted, drizzle a small dollop over the top of each truffle to create the “chocolate syrup” effect. Immediately place a maraschino cherry on top and hold it in place for a few seconds until it firms up. Sprinkle each truffle with rainbow sprinkles to give them that fun, festive look.
Step 11: Final Chill Return the truffles to the refrigerator and allow them to chill for another 30 minutes. This ensures that the chocolate syrup topping sets and firms up, making the truffles easy to handle and perfect for serving.
Beginner Tips and Notes:
- Chill Time is Key: Make sure to give the truffles plenty of time to chill. The chilling process helps the truffles set and firm up, making them easier to dip and handle.
- Preventing Banana Browning: To keep your bananas from browning too quickly, consider using ripe bananas just before mixing them into the dough. If you’re preparing them in advance, you can also toss the banana slices in a little lemon juice to slow down the browning process.
- Troubleshooting: If your truffles feel too sticky to roll, try refrigerating the mixture for a little longer to firm it up. Additionally, make sure your cake mix is heat-treated to avoid any food safety concerns when using it raw. If you’re unfamiliar with how to heat-treat cake mix, simply spread it out on a baking sheet and bake at 350°F for 5 minutes, then let it cool completely before using.
Serving Suggestions and Storing Leftovers:
These Banana Split Truffles are perfect for any occasion. Serve them at a birthday party, a family gathering, or a holiday celebration. They’re also a great treat for gifting. You can place them in a decorative box or clear bag with a festive ribbon for a personalized gift. Leftovers (if there are any) can be stored in an airtight container in the refrigerator for up to 1 week. If you want to extend their freshness, you can freeze the truffles for up to 2 months. Simply place them in a single layer on a parchment-lined baking sheet, freeze for 2 hours, and then transfer them to a freezer-safe container or zip-top bag.
Conclusion:
Banana Split Truffles are a fun, easy, and delightful treat that’s sure to bring smiles to everyone’s faces. With their creamy filling, crunchy texture, and nostalgic banana split flavors, they offer a delicious twist on the classic dessert. Whether you’re a beginner cook or an experienced baker, these truffles are simple to make, customizable, and perfect for any occasion. With just a few simple ingredients and some creative touches, you’ll be enjoying these bite-sized delights in no time. So, why not give them a try and bring the joy of banana splits to your next gathering in the form of a delicious, shareable treat? You’ll be glad you did!