Sometimes, the best desserts come from the simplest of ideas. Banana pudding lasagna is one such creation—a perfect mashup of layers that blend together the rich, comforting flavors of banana pudding with the smooth, indulgent texture of a cheesecake. This dessert doesn’t just look impressive; it’s easy to make, delicious to taste, and a guaranteed crowd-pleaser. It’s a no-bake, fridge-set dessert that requires minimal kitchen skills, making it ideal for beginners. If you’re looking for a fun, quick dessert that’s a breeze to prepare but always gets rave reviews, this is the one to try. As someone who grew up enjoying classic banana pudding at family gatherings, the idea of turning that familiar dessert into a lasagna-style treat was both exciting and nostalgic. The result? A sweet, creamy masterpiece that’s perfect for any occasion.
Banana Pudding Lasagna: A Dessert Dream Come True for Beginners
Banana pudding lasagna is one of those desserts that takes a beloved classic and gives it a fun, creative twist. Imagine combining the creamy richness of banana pudding with the smooth indulgence of a cheesecake layered over a crisp, buttery vanilla wafer crust. This dessert is a crowd favorite, and what makes it even better is how easy it is to make, even for beginner cooks. You don’t need any fancy tools or baking skills to pull this one off—just a few simple ingredients and a bit of patience as it chills in the fridge. Whether you’re serving it at a family gathering, a potluck, or just craving something sweet for yourself, this no-bake dessert is guaranteed to satisfy. The best part? It comes together in no time and tastes just as impressive as it looks. Get ready to dive into this incredibly delicious treat that everyone will love.
- Prep Time: 20 minutes
- Cook Time: 0 minutes (No baking required)
- Total Time: 2 hours 20 minutes (includes chilling time)
- Yield: 12 servings 1x
- Category: Dessert
- Method: No-bake, Layered
- Cuisine: American
- Diet: Vegetarian
Ingredients
Crust Ingredients:
- 2 boxes (11 oz each) of vanilla wafers
- 6 tablespoons of melted butter
Cheesecake Layer Ingredients:
- 2 packages (8 oz each) of cream cheese, softened
- 3/4 cup sugar
- 2 cups heavy whipping cream
- 1 teaspoon vanilla extract
- 1 box (3.4 oz) of instant banana pudding mix
- 1 3/4 cups milk
- 5 large bananas, sliced
Instructions
Step 1: Prepare the Crust
Start by making the crust. Take one box of vanilla wafers and place them in a food processor or blender. Pulse until they turn into fine crumbs—this is the base of your lasagna. If you don’t have a food processor, you can place the wafers in a large resealable bag and crush them with a rolling pin. Once crushed, transfer the crumbs to a bowl and mix in the melted butter. Use a fork to combine everything thoroughly. It’s important that the crumbs are evenly coated with butter, as this will help them stick together once pressed into the baking dish. Now, press the mixture into the bottom of a 9×13-inch baking dish to form an even crust. Use the back of a spoon or a measuring cup to press the crumbs down firmly so that the crust holds together. Once that’s done, set it aside while you prepare the next layer. It’s essential to make sure the crust is compacted well, as it forms the base of your lasagna, giving it structure and flavor.
Step 2: Make the Cheesecake Layer
For the cheesecake layer, beat together the softened cream cheese and sugar in a large mixing bowl using an electric mixer. Beat until the mixture is smooth and fluffy. This will take about 2 minutes. If you don’t have a mixer, you can use a whisk, but it will take more effort to get it nice and smooth. Next, add the heavy whipping cream and vanilla extract. Continue to beat the mixture until stiff peaks form. You’ll know the mixture is ready when it holds its shape and doesn’t collapse. This step is crucial for getting that perfect creamy, cheesecake-like texture. If you overbeat the cream, however, it could start turning into butter, so be mindful and stop as soon as it forms stiff peaks. In a separate bowl, prepare the banana pudding mix by whisking together the pudding mix and milk until it thickens. Once it has thickened, add the pudding mixture to the cream cheese mixture. Use a spatula to gently fold everything together until fully combined. This will create the creamy, rich filling for your lasagna. Be careful not to overmix, as you want to keep the texture light and airy.
Step 3: Assemble the Layers
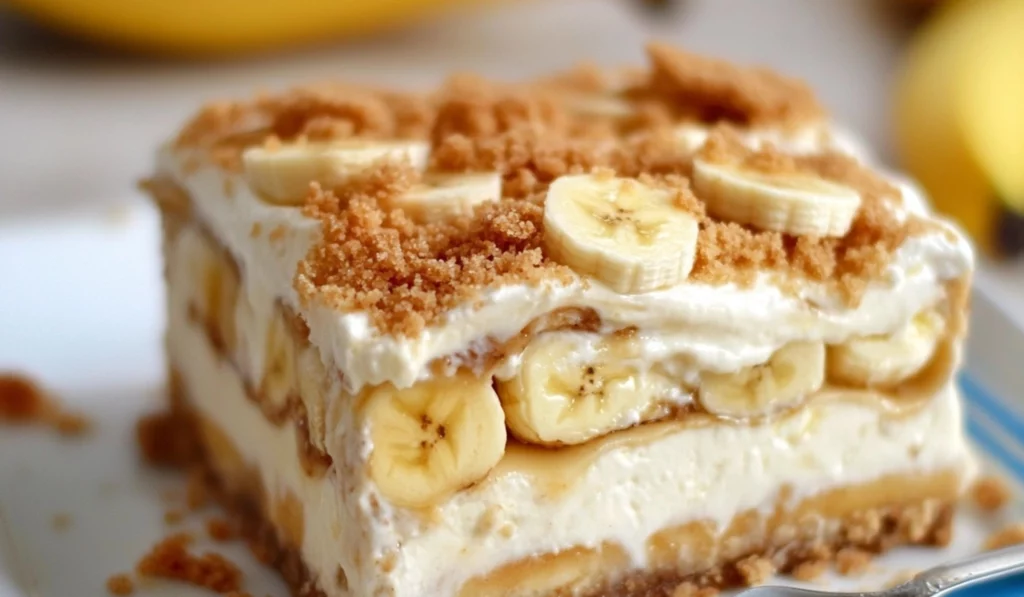
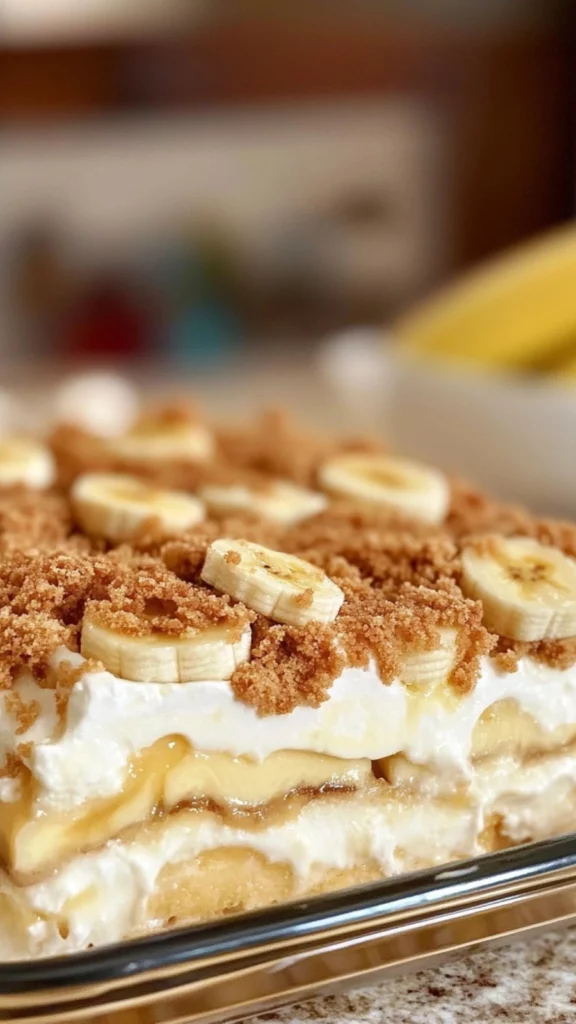
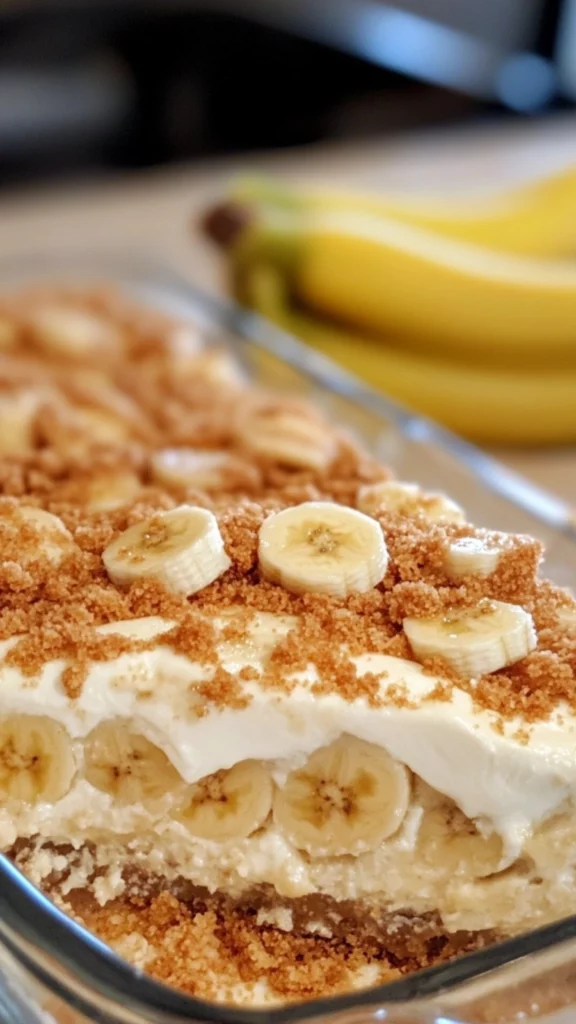
Now, it’s time to assemble the banana pudding lasagna. Start by spreading half of the cheesecake mixture over the crust you prepared earlier. Use a spatula to spread it evenly across the surface. Make sure it reaches all the edges to ensure every bite will have that creamy goodness. Next, add a layer of sliced bananas on top of the cheesecake mixture. You’ll want to arrange the banana slices in an even layer to ensure every bite has a piece of banana. The bananas are an essential part of this dessert, adding sweetness and freshness to balance out the rich creaminess of the cheesecake layer. After that, place a layer of whole vanilla wafers over the bananas. Gently press the wafers into the mixture, ensuring they stick slightly to the creamy layers. The wafers will soften as the dessert chills, providing the perfect texture contrast to the cream and bananas. Don’t worry if the wafers overlap or break a little—they’ll still work perfectly in the layers. Spread the remaining cheesecake mixture over the wafers, smoothing it out with your spatula. Then, add another layer of sliced bananas on top of the cheesecake layer. This repetition of banana layers gives the dessert its signature banana pudding flavor and makes it extra indulgent.
Step 4: Add the Final Touches
For the final layer, crush the remaining vanilla wafers into smaller chunks and sprinkle them over the top of the banana layer. This adds a nice texture contrast and enhances the overall flavor. If you like a bit of extra crunch, you can add more crushed wafers than suggested—feel free to customize it based on your preferences.
Step 5: Refrigerate
Cover the dish with plastic wrap or a lid and refrigerate for at least 2 hours. This chilling time allows the dessert to set properly and ensures the flavors meld together. If you have time, letting it chill overnight will give the dessert even more time to develop its flavor. The longer it sits, the more the layers will come together, and the more the wafers will absorb the creamy layers, making it even more delicious. Once the time is up, it’s time to serve and enjoy! The dessert will be firm and sliceable, making it perfect for cutting into squares or serving in individual portions.
Notes
- Cream Cheese Softness: Make sure your cream cheese is softened before mixing. If it’s too cold, it may not blend properly with the sugar, which can cause lumps in the filling. If you’re short on time, you can microwave the cream cheese for about 20 seconds to soften it more quickly.
- Whipping the Cream: When whipping the heavy cream, it’s important to beat it until stiff peaks form. This helps the cheesecake layer stay firm and creamy. If you overbeat it, you might end up with butter instead of whipped cream, so keep an eye on it!
- Banana Ripeness: Choose ripe but not overly soft bananas. You want them to be sweet but still firm enough to hold up in the layers. Overripe bananas will mush too easily when sliced, which could make your layers look less appealing.
- Crushing Wafers: If you don’t have a food processor, you can use a rolling pin to crush the vanilla wafers in a resealable bag, but be careful not to crush them too finely. You want some texture in the crust, so aim for small crumbs rather than a powdery texture.
- Substituting Ingredients: If you’re out of heavy whipping cream, you can use whipped topping instead, though the texture might be slightly different. For a lighter version, you can use reduced-fat cream cheese or even Greek yogurt as a substitute for the cream cheese to lower the fat content.
Whether you’re a beginner in the kitchen or just in need of a dessert that won’t take up too much of your time, this banana pudding lasagna is your ticket to success. With just a few simple ingredients and easy-to-follow steps, you can create a dessert that tastes just as incredible as it looks. This recipe is ideal for beginner cooks for several reasons. First, it requires no baking—everything is assembled in layers and left to chill in the fridge. The steps are straightforward, making it a fun project even for those who are just starting to experiment in the kitchen. Plus, the ingredients are all easy to find, and the prep time is minimal. It’s the kind of dessert that impresses without stressing you out. You can focus more on enjoying the process of making it and sharing it with loved ones rather than getting lost in complex cooking techniques. So, let’s dive into how you can make this easy, no-bake banana pudding lasagna that everyone will love!
Ingredients and Preparation
Before we get into the steps, let’s gather everything you’ll need to make this delicious dessert. The ingredients list is simple, and many of them are pantry staples or easy to find at any grocery store. Here’s what you’ll need:
Crust Ingredients:
- 2 boxes (11 oz each) of vanilla wafers
- 6 tablespoons of melted butter
Cheesecake Layer Ingredients:
- 2 packages (8 oz each) of cream cheese, softened
- 3/4 cup sugar
- 2 cups heavy whipping cream
- 1 teaspoon vanilla extract
- 1 box (3.4 oz) of instant banana pudding mix
- 1 3/4 cups milk
- 5 large bananas, sliced
Gathering these ingredients beforehand makes the assembly process easier and smoother. While you can find most of these items in the baking section of any grocery store, there are a few ingredient alternatives if you’re looking to tweak things to your preference. For the crust, if you can’t find vanilla wafers, you could use graham crackers or even animal crackers for a fun twist. Both alternatives will provide a similar texture, though vanilla wafers are classic for this recipe. The heavy whipping cream is essential for achieving a thick, rich texture, but if you’re looking for a lighter option, you could use half-and-half or even whole milk. For the cream cheese, be sure to soften it before you mix it with the sugar to avoid lumps. If you want to make this dessert a little less sweet, you can decrease the amount of sugar, but keep in mind that the sweetness balances out well with the bananas.
Step-by-Step Instructions
Now that you have everything you need, let’s walk through the steps to make this mouthwatering banana pudding lasagna. The process is relatively simple, and with a little patience, you’ll have a dessert that looks like it came from a professional kitchen.
Step 1: Prepare the Crust
Start by making the crust. Take one box of vanilla wafers and place them in a food processor or blender. Pulse until they turn into fine crumbs—this is the base of your lasagna. If you don’t have a food processor, you can place the wafers in a large resealable bag and crush them with a rolling pin. Once crushed, transfer the crumbs to a bowl and mix in the melted butter. Use a fork to combine everything thoroughly. It’s important that the crumbs are evenly coated with butter, as this will help them stick together once pressed into the baking dish. Now, press the mixture into the bottom of a 9×13-inch baking dish to form an even crust. Use the back of a spoon or a measuring cup to press the crumbs down firmly so that the crust holds together. Once that’s done, set it aside while you prepare the next layer. It’s essential to make sure the crust is compacted well, as it forms the base of your lasagna, giving it structure and flavor.
Step 2: Make the Cheesecake Layer
For the cheesecake layer, beat together the softened cream cheese and sugar in a large mixing bowl using an electric mixer. Beat until the mixture is smooth and fluffy. This will take about 2 minutes. If you don’t have a mixer, you can use a whisk, but it will take more effort to get it nice and smooth. Next, add the heavy whipping cream and vanilla extract. Continue to beat the mixture until stiff peaks form. You’ll know the mixture is ready when it holds its shape and doesn’t collapse. This step is crucial for getting that perfect creamy, cheesecake-like texture. If you overbeat the cream, however, it could start turning into butter, so be mindful and stop as soon as it forms stiff peaks. In a separate bowl, prepare the banana pudding mix by whisking together the pudding mix and milk until it thickens. Once it has thickened, add the pudding mixture to the cream cheese mixture. Use a spatula to gently fold everything together until fully combined. This will create the creamy, rich filling for your lasagna. Be careful not to overmix, as you want to keep the texture light and airy.
Step 3: Assemble the Layers
Now, it’s time to assemble the banana pudding lasagna. Start by spreading half of the cheesecake mixture over the crust you prepared earlier. Use a spatula to spread it evenly across the surface. Make sure it reaches all the edges to ensure every bite will have that creamy goodness. Next, add a layer of sliced bananas on top of the cheesecake mixture. You’ll want to arrange the banana slices in an even layer to ensure every bite has a piece of banana. The bananas are an essential part of this dessert, adding sweetness and freshness to balance out the rich creaminess of the cheesecake layer. After that, place a layer of whole vanilla wafers over the bananas. Gently press the wafers into the mixture, ensuring they stick slightly to the creamy layers. The wafers will soften as the dessert chills, providing the perfect texture contrast to the cream and bananas. Don’t worry if the wafers overlap or break a little—they’ll still work perfectly in the layers. Spread the remaining cheesecake mixture over the wafers, smoothing it out with your spatula. Then, add another layer of sliced bananas on top of the cheesecake layer. This repetition of banana layers gives the dessert its signature banana pudding flavor and makes it extra indulgent.
Step 4: Add the Final Touches
For the final layer, crush the remaining vanilla wafers into smaller chunks and sprinkle them over the top of the banana layer. This adds a nice texture contrast and enhances the overall flavor. If you like a bit of extra crunch, you can add more crushed wafers than suggested—feel free to customize it based on your preferences.
Step 5: Refrigerate
Cover the dish with plastic wrap or a lid and refrigerate for at least 2 hours. This chilling time allows the dessert to set properly and ensures the flavors meld together. If you have time, letting it chill overnight will give the dessert even more time to develop its flavor. The longer it sits, the more the layers will come together, and the more the wafers will absorb the creamy layers, making it even more delicious. Once the time is up, it’s time to serve and enjoy! The dessert will be firm and sliceable, making it perfect for cutting into squares or serving in individual portions.
Beginner Tips and Notes
Banana pudding lasagna is a straightforward dessert to make, but here are some tips to help you along the way:
- Cream Cheese Softness: Make sure your cream cheese is softened before mixing. If it’s too cold, it may not blend properly with the sugar, which can cause lumps in the filling. If you’re short on time, you can microwave the cream cheese for about 20 seconds to soften it more quickly.
- Whipping the Cream: When whipping the heavy cream, it’s important to beat it until stiff peaks form. This helps the cheesecake layer stay firm and creamy. If you overbeat it, you might end up with butter instead of whipped cream, so keep an eye on it!
- Banana Ripeness: Choose ripe but not overly soft bananas. You want them to be sweet but still firm enough to hold up in the layers. Overripe bananas will mush too easily when sliced, which could make your layers look less appealing.
- Crushing Wafers: If you don’t have a food processor, you can use a rolling pin to crush the vanilla wafers in a resealable bag, but be careful not to crush them too finely. You want some texture in the crust, so aim for small crumbs rather than a powdery texture.
- Substituting Ingredients: If you’re out of heavy whipping cream, you can use whipped topping instead, though the texture might be slightly different. For a lighter version, you can use reduced-fat cream cheese or even Greek yogurt as a substitute for the cream cheese to lower the fat content.
Serving Suggestions
Banana pudding lasagna is delicious on its own, but there are a few things you can serve it with to take it to the next level:
- Whipped Cream: Top your banana pudding lasagna with a dollop of freshly whipped cream for an extra touch of indulgence. You can even add a little vanilla extract to the whipped cream for added flavor.
- Caramel Sauce: A drizzle of caramel sauce over the top can add a rich, sweet layer of flavor that complements the bananas perfectly. This pairs wonderfully with the creamy cheesecake layer and adds a bit of depth to the overall taste.
- Fresh Berries: Add a side of fresh berries like strawberries or blueberries to balance the sweetness and add a pop of color. The freshness of the berries contrasts beautifully with the richness of the banana pudding layers.
If you have leftovers (which is rare with this dessert!), store them in an airtight container in the refrigerator. It will keep for about 3-4 days, and the flavors will continue to develop, making it even tastier the next day. If you find the layers becoming a little too soft, just pop it back into the fridge to firm it up again before serving.
Conclusion
Banana pudding lasagna is the perfect dessert for beginners who want to impress without stress. With simple ingredients, minimal prep time, and no baking required, this dessert is both easy and incredibly delicious. Whether you’re making it for a family gathering, a potluck, or just because you want a sweet treat to enjoy, banana pudding lasagna will quickly become your go-to dessert. It’s a fun, no-bake treat that combines the flavors of a classic banana pudding with the texture of a layered cake, creating a dessert that everyone will rave about. Give this recipe a try, and let us know how it turns out! Share your experience in the comments and tell us how you made this dessert your own. We’d love to hear about your creative variations or tips!


